Trig Bracelets
This activity is based off of this design by mathgrrl. Students will design their own trig bracelet and then come up with a reasonable formula for it. It will satisfy the following Common Core standard:
CCSS.Math.Content.HSF.TF.B.5
Choose trigonometric functions to model periodic phenomena with specified amplitude, frequency, and midline.
For this activity you will have to be in a computer lab. Start by having students go to the Thingiverse link and clicking on the “Open in Customizer” link on the right. In the customizer students can set the diameter of the bracelet. They will need to measure the length of their wrist and set this value a little higher so that it fits over their wrist. They can also set the height of the bracelet. This is just a matter of preference. Next they choose the amplitude and frequency of the trig curve. The last box changes the degree of how the bracelet twists. I would ask students to leave this at 0. It is especially nice that once you make a change to any of these fields there is a picture that gets updated so that you can see how those changes affect the shape of the bracelet. Students can then save their file and print their bracelet.
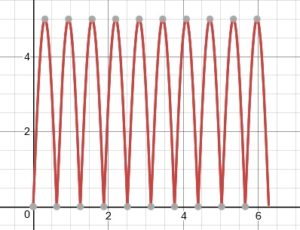
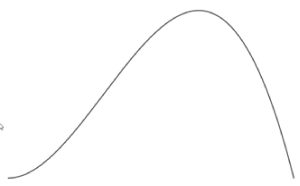
While the bracelets are printing students can think of cutting their bracelet and plotting the graph. Ask them to draw what it would look like from 0 to 2π and to come up with a formula for it. For example, I made a bracelet with an amplitude of 5 and a frequency of 10. I will start with the sine function. I know from 0 to 2π the sine usually has two peaks, one going up and one going down. My bracelet has 10 peaks and I want them all going up. I also want to change the amplitude to 5. My new function becomes y = |5sin(5x)|. It can be seen in this picture:
Introduction to Imaginary Numbers
This activity is designed for a high school class when they are first learning about imaginary numbers. It satisfies the high school Number and Quantity standard below:
CCSS.Math.Content.HSN.CN.A.1
Know there is a complex number i such that i2 = -1, and every complex number has the form a + bi with a and b real.
This activity starts with a “Do Now” where students evaluate √25, √9 and √36. Then they estimate √50 and √80. Lastly, they are asked what the square root of -25 is.
After the “Do Now” students can discuss their answers. First, make sure they understand what the square root function does. Then, have students share in a class discussion what they thought the square root of -25 is. Once they realize that they can’t think of a good answer to this you can introduce i as the square root of negative 1.
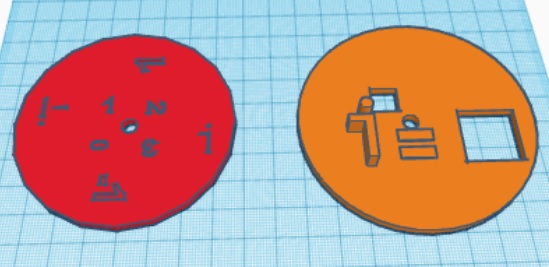
Next, students can get into groups. Each group is given a 3D printed spinner. This spinner was created in TinkerCad. I first made a circle with diameter 80 mm and height 10 mm. On this circle I added the text “i =”. I made two square holes in the circle, one to leave a spot open above the i to act as the exponent and one after the equals sign. Next I created another circle. This one had a dimeter of 75 mm and a height of 3 mm. I placed the first circle on top of it and then created a small circular hole in the center of both circles. Then, where the square holes were in the top circle I put a ‘0’ for the exponent and a ‘1’ after the equals sign in the bottom circle. I made these holes but had them not go all the way through. I rotated the top circle and repeated this process for the other exponents and solutions.
First students are asked to find i raised to the 0,1,2, and 3. These they can get right from the spinner. Then they are asked to find i raised to the 4,5,6, and 7. They will have to realize that the pattern keeps repeating. Hopefully using the spinner will help them see that the values will keep repeating (1, i, -1,-i). Then students are asked to come up with a formula to find any non-negative power of i and to use their formula to find higher powers of i. The activity sheet and solutions can be found here.
Discovering Volume Formulas
This activity is for a geometry class. Students choose a 2-dimensional object and then discover the volume formulas for stacking copies of that object. They then are given a model that splits the cube into 3 pyramids. By looking at this model they come up with the pyramid volume formula. The following standards are covered:
CCSS.Math.Content.HSG.GMD.A.1
Give an informal argument for the formulas for the circumference of a circle, area of a circle, volume of a cylinder, pyramid, and cone.
CCSS.Math.Content.HSG.GMD.A.3
Use volume formulas for cylinders, pyramids, cones, and spheres to solve problems.*
CCSS.Math.Content.HSG.GMD.B.4
Identify the shapes of two-dimensional cross-sections of three-dimensional objects, and identify three-dimensional objects generated by rotations of two-dimensional objects.
First, ask students to choose a 2-dimensional object and print 5 copies of it. Alternatively, you can save class time by having these already printed or give students cardboard and scissors to make the shapes. As an example I used TinkerCad to design squares that stacked. Students are asked to stack their shapes and calculate the volume of this new three-dimensional object. Then they think of a general formula for the volume of the shape formed. Most likely at least one student will start with a rectangle, square, and circle and then they get formulas for the volume of a rectangular prism (length·width·height), cube (side3), and cylinder (πr2h). Then students share their shape and volume formula with the rest of the class.
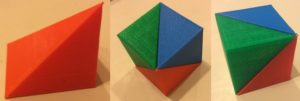
Next, students look at a model where the cube is split into three equal shapes so that each has a full side of the cube.
I used 123D Design to split the cube up. First I used Polyline to get a triangle on one of the cube faces.

Then I extruded the triangle to take it away.

Next, I turned the object and did the same for each side.
To get these three pyramids to stick together, use Velcro dots or magnets. I used these magnets found at a craft store.
You can give one model to each group and ask them to find the volume of each shape. Students should use the fact that the volume of a cube is the side cubed to calculate the volume of each object as 1⁄3·side3. At this point, the objects can be referred to as pyramids.
Next, students think about how the volume formula would change if instead of having a square base the pyramid had a rectangular base. The formula for a pyramid with a rectangular base is 1⁄3(length)(width)(height). Next, they come up with a general formula for a pyramid with any shape base and use this formula to find the volume of a cone. The formula for a pyramid with any shape base is 1⁄3(area of base)(height) The formula for the volume of a cone, which has a circular base, is 1⁄3πr2 h.
Mathematical Rollercoaster
In this activity, students use their knowledge of different types of functions and what their graphs look like in order to design a rollercoaster. Students are given certain specifications they must follow. First they will hand design the coaster, then they will use a graph plotter to digitally plot their graphs. Finally, students will use modeling software to 3D print their rollercoaster and test it out with a marble or small ball.
This activity satisfies the following standards:
CCSS.Math.Content.HSF.IF.C.7.a
Graph linear and quadratic functions and show intercepts, maxima, and minima.
CCSS.Math.Content.HSF.IF.C.7.b
Graph square root, cube root, and piecewise-defined functions, including step functions and absolute value functions.
CCSS.Math.Content.HSF.IF.C.7.c
Graph polynomial functions, identifying zeros when suitable factorizations are available, and showing end behavior.
CCSS.Math.Content.HSF.IF.C.7.e
Graph exponential and logarithmic functions, showing intercepts and end behavior, and trigonometric functions, showing period, midline, and amplitude.
CCSS.Math.Content.HSF.BF.A.1.b
Combine standard function types using arithmetic operations. For example, build a function that models the temperature of a cooling body by adding a constant function to a decaying exponential, and relate these functions to the model.
CCSS.Math.Content.HSF.BF.B.3
Identify the effect on the graph of replacing f(x) by f(x) + k, k f(x), f(kx), and f(x + k) for specific values of k (both positive and negative); find the value of k given the graphs. Experiment with cases and illustrate an explanation of the effects on the graph using technology. Include recognizing even and odd functions from their graphs and algebraic expressions for them.
Next Generation Science Standards:
MS-PS3-2
Develop a model to describe that when the arrangement of objects interacting at a distance changes, different amounts of potential energy are stored in the system.
Following is the lesson plan for this activity.
Review/Introduction (if necessary)
Review how to graph linear, polynomial, logarithmic, trigonometric, and exponential functions, as well as doing transformations of them.
Day 1: Background and Start Design
First ask students to share anything they know about rollercoasters. Then you can show pictures of rollercoasters such as this one.

If it hasn’t already been mentioned, students can see the loops, the dips and hills, and the banked turns. Students may notice that rollercoasters don’t have circular loops. This is because when they used to be built like that passengers got neck injuries. Making the loop tear-shaped has fixed this problem (optional physics explanation can be found here).
Explain how a rollercoaster works: A chain pulls the car to the top of the first hill. After that, it coasts through the rest of the track. For this to work, the first hill has to be the biggest one.
Ask students to read through the following page where they can learn about the law of conservation of energy. They will learn that potential energy is highest at the top of a hill and kinetic energy is highest at the bottom of the hill when the rollercoaster is moving fastest. There is an animation that shows both types of energy levels at various points on the rollercoaster.
Now onto the fun part! Ask students to design their own rollercoaster given the knowledge they now possess. Since they will be modeling with a marble or ball, ask students to start their coaster at the top of a hill. Imagine that there is a set of stairs that lead to the top of the hill and that is where the ride starts. You may choose to not allow loops as they may be difficult to print. Give students the lesson handout/worksheet to complete in groups that can be found here. If you would like to ensure individual accountability, you can assign each group member a role, such as one person in charge of the final sketch, one person in charge of plotting the graphs, and one person in charge of using the 3D modeling software.
On the handout students will be sketching a design of their rollercoaster, explaining how they got each piece of their graph and transformations used, finding where their graph is increasing and decreasing, points of relative extrema, and where potential and kinetic energy are at their maximum. They will then be asked to plot their graph using a free browser-based grapher located at desmos.com.
Days 2 & 3: Finish Worksheet
Once students have their graph plotted ask them to make sure that all pieces are drawn in black and remove the gridlines. They can then grab a screenshot of the graph. One method to do this is by creating a Desmos account then saving the graph. On the top right an option will appear to share your graph. Clicking on ‘Share’ and then ‘Image’ will create a good quality screenshot they can save.
Day 4 & 5: 3D Modeling
The next step is to create a 3D file to print the rollercoasters. First, students convert their file into an SVG file and then import this file into 123D Design.
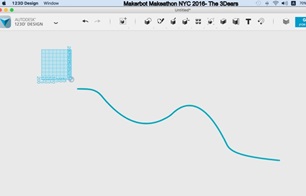
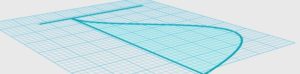
Next, draw a Spline that resembles the original curve. Splines are curves that connect several points. If needed, a tutorial can be seen here. Then delete the original curve. Change the grid linear snap as needed.
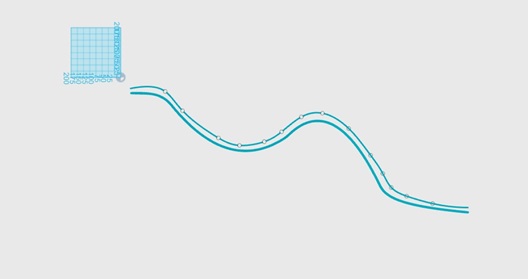
Next, scale the spline to the maximum printer size. This can be done by adding lines in order to make the sketch an enclosed region. Then scale the closed sketch by measuring the length and height and then scaling it according to the printer bed size.

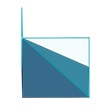
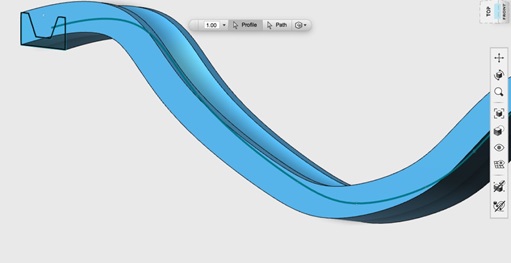
After scaling, delete the added lines to get the curve back. Next, draw the profile shape of the groove you want to put on your curve to make a track on it. This example used half of a hexagon for printability purposes.
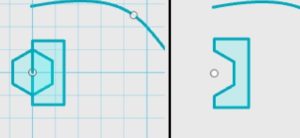
Then rotate the sketch to position the profile shape perpendicular to the curve plane.
Make sure the groove is positioned correctly. Then sweep this profile through the curve path.
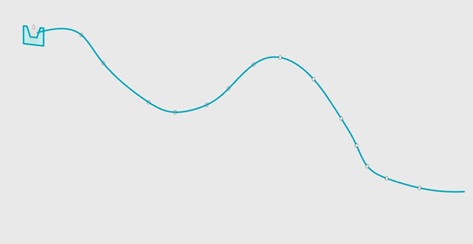
Finally, add a support to the front so that your model will stand up.
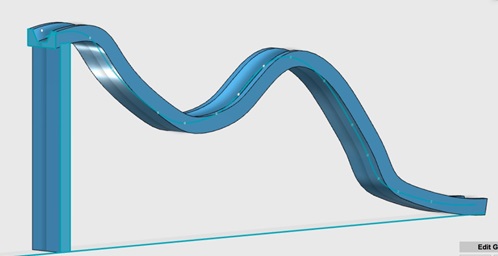
Print each group’s rollercoaster outside of class. When printing, you should lay the rollercoaster flat so that you will not need to add supports.
Day 6: Wrap-up
Have each group try rolling a marble or ball down their rollercoaster. Then they will each present to the class, sharing their answers to worksheet questions and how they made their model.
Is My Coin Fair?
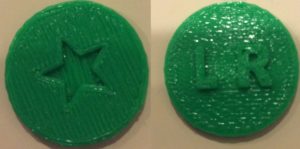
This next activity would be used in an AP Statistics class or a college level Statistics class. Full details as well as a copy of the worksheet and solutions can be found here. The activity gives practice using a Chi-Square Goodness of Fit Test. Students are asked to pick a type of coin and look up its dimensions. They then design and print this type of coin, decorating it any way they choose. I used TinkerCad and designed a quarter. A quarter has a 24.26 mm diameter and a width of 1.75 mm. The cylinder can be shaped to that size and then decorated however students choose. I purposely did one side with an indentation and one side with letters popping out in hopes of showing this coin is unfair.
The print time for my quarter sized coin was nine minutes, so depending on how many groups you have designing a coin and how long your class meetings are, you may be able to get them printed in one class period. While their coin is printing students answer the following questions:
- We are going to check if your coin is fair (do you get heads and tails 50% of the time). To do this we will run a Chi-Square Goodness of Fit hypothesis test. What is your null hypothesis?
- What is your alternative hypothesis?
- Find the degrees of freedom.
- If we toss the coin 50 times what is the expected number of heads and tails?
- We will use a significance level of .05. Find the critical value on the Chi-Square chart.
- Once your coin is finished printing designate one side as heads and the other as tails. Toss your coin 50 times and record the results.
# heads =_____ # tails = _____
- Complete the hypothesis test and write a few sentences explaining the results. Is it the outcome you expected? Explain.
(Optional Extension)
- Now that you saw the results of your coin, try to purposefully design a fair coin or a biased coin. Then run through the test again to see your results. Is it the outcome you expected? Explain.
Galton Board
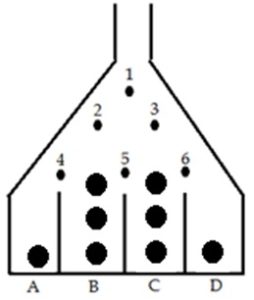
A Galton Board is a tool that was named after the scientist Sir Francis Galton. The board has evenly spaced pegs with a funnel on top and slots at the bottom for the balls to fall into. A ball is dropped from the top and it bounces off the pegs to land in one of the slots. The pegs are placed to form a triangular shape. You can 3D print a Galton Board found here.
This activity is also for an AP or college level statistics course. Students need to have already learned the Binomial Distribution, or you can use this activity as an introduction to it.
Students will think about what type of distribution the balls will drop into. It is easiest to start with a board with a small number of rows, such as the one displayed here.
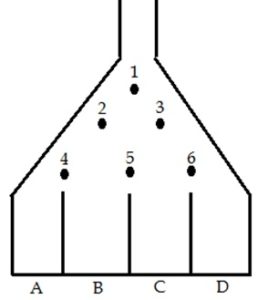
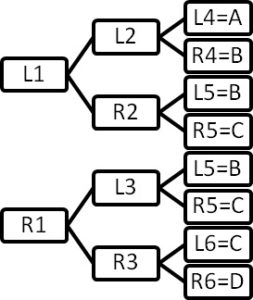
First, ask students to draw a tree diagram to list all of the possible situations.
A ball that is dropped from the top at peg 1 can either go left (L1) or right (R1). If it went left the ball then goes to peg 2. Again the ball can either go left (L2) or right (R2). If it went left again then the ball goes to peg 4. At this point if the ball goes left (L4) then it fall into slot A and if it goes right (R4) then it falls into slot B. The remaining possibilities are shown in the tree diagram.
Assuming that the ball has an equal probability of going left or right at each peg, students can then draw what the ball drops would look like if they followed this theoretical distribution:
Next, have students repeat that analysis with a fourth row added to the board. The distribution looks like:

This turns out to be the Binomial Distribution. Now students can use the Galton Board that was printed to test this out and see if it looks similar to what was expected.
Finding Volume Using Discs
This activity is for a calculus class to help students visualize how to calculate volume by the disc method. Students will be given a typical volume problem and create six to eight discs to approximate the shape. Then they make the actual shape and calculate the volume. It satisfies the AP Calculus Learning Outcome 3.4D: Apply definite integrals to problems involving area, volume.
First assign each student (or group) a region that they will be rotating around the x-axis. Then have them use desmos.com, or a similar graph plotter, to plot their region. Then they will create 6-8 discs with radius f(x). Next, they will think about the full region rotated and print that. Look back in Chapter 2 to see the full details of how I used 123D Design to draw this region and rotate it. Then students will get the formula for the area of each disc and volume of the rotated region. Finally, they will calculate the volume for their region. A student worksheet with solutions can be found here.
Finding Volume Using Shells
This activity is for a calculus class to help students visualize how to calculate volume by the shells method. Students will be given a typical volume problem and create 5 to 7 cylinder shells to approximate the shape. Then they make the actual shape and calculate the volume. It is similar to the Finding Volume by Discs activity. It also satisfies the AP Calculus Learning Outcome 3.4D: Apply definite integrals to problems involving area, volume.
For the cylinder shells I used TinkerCad. I took a cylinder shape with diameter 2x and height f(x) (using the values from the table made in question 3 on the worksheet found here). I multiplied every value by a factor of 10 so that the pieces would be bigger. For each cylinder I created a cylinder hole that was 1 mm smaller in diameter so that the thickness of each shell was 1 mm.
To create the rotated object I first got the 2 dimensional graph using desmos.com. Then I did a printscreen to capture the graph.
I used an online SVG converter and opened it in 123D Design. I used the Polyline tool to enclose the region. Then I used Polyline again to draw a line acting as the y axis that this shape would get rotated over.
Next I used the revolve tool to rotate my graph around the line I drew.
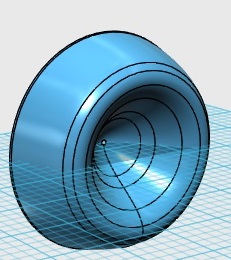
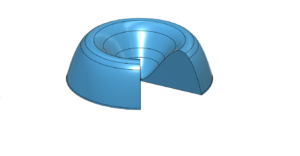
I also printed the object with a slice taken out so students can see the cross section. This was done by inserting a wedge and then subtracting it from the object.
For the activity first assign each student (or group) a region that they will be rotating around the y-axis. Then have them use desmos.com, or a similar graph plotter, to plot their region. Then they will split the x values into 6-8 subintervals and create corresponding cylinder shells with radius x and height f(x). Next, they will think about the full region rotated and print that. Then they will get the formula for surface area of a cylinder and volume of the rotated region. Finally, they will calculate the volume for their region.
Infinite Benders
In an episode of Futurama, Bender makes copies of himself with an increasingly smaller mass and The Professor worries that the Benders will take over the earth. The clip can be seen here. In this activity students look at the formula given in the television show and come up with a more realistic equation to model the situation. They will design some robots and use the geometric series sum formula to show that the mass of the Bender copies converge.
First, students are shown a clip from Futurama where they see an infinite series. Students then show that this series diverges, but that it doesn’t accurately describe the situation from the show. Then students come up with their own model that is more accurate. Students get into groups and each group picks one term in the series to design and print two robots that, together, have that mass. I used TinkerCad to design a robot using some of the geometric shapes they have. Students can be creative with this part and make their robot as simple or as complicated as they want. They can try to replicate Bender or simply make an object that looks like a robot. If you do not want to spend time on the design part of this lesson, there are figures of Bender on Thingiverse students can use and then just change the mass (see here). Once I designed the robot, I put it in MakerBot Desktop and played around with scaling it until I got close to the desired mass.
Then students analyze their model to see that the mass of the Benders actually converges. The student activity sheets as well as solutions can be found here.
