Distributing Constants over Linear Expressions
In this activity students will use the integers one through nine along with linear expressions x, x+1, x+2, …, x+9 to figure out how to distribute those integers over the expression. It will satisfy the following Common Core Standard:
CCSS.Math.Content.6.EE.A.3
Apply the properties of operations to generate equivalent expressions.
For each group you will need to print one copy of the numbers one through nine and up to nine copies of the linear expressions. It was fairly simple to make these manipulatives. In TinkerCad I used a square for the numbers and a rectangle for the expressions. I copy and pasted to get ten copies of the square (for the numbers 1-9 and an ‘x’) and nine copies of the rectangle. I placed the numbers and the x on the squares and used the text generator for the expressions.
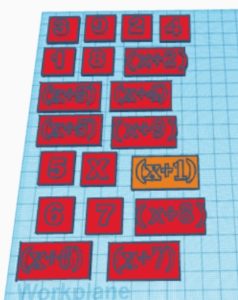
Start by working through one example with students. Pick a number and an expression and place them together as shown here:
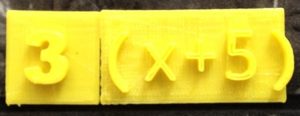
Write your new expression here: 3(x+5)
Now take three copies of the (x+5) as shown here:
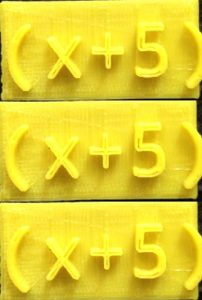
How many x letters do you see? Count them to get 3 x letters.
How many constants do you count? 5+5+5 = 15
What is the solution? 3x + 15
Then have students make up three of their own examples to distribute the constant over the expression. To make sure they understand the concept of distributing, ask students to describe how they can re-write 4(x+2) directly without any intermediate steps and how they can re-write any number times (x+ any number) directly without any intermediate steps. A student worksheet and solutions can be found here.
Dividing Fractions
This activity is for sixth grade when students are learning how to divide fractions. It will satisfy the following standard:
CCSS.Math.Content.6.NS.A.1
Interpret and compute quotients of fractions, and solve word problems involving division of fractions by fractions, e.g., by using visual fraction models and equations to represent the problem.
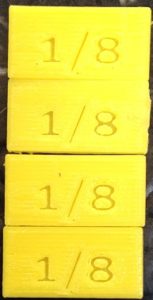
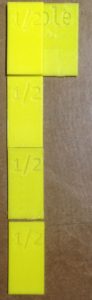
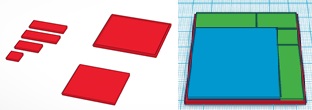
Before getting to dividing a fraction by another fraction, we will start with dividing a fraction by a whole number. To create a model I used TinkerCad to get rectangles of different sizes. The original “whole” square is 50 mm by 50 mm. Then I made a half, a fourth, and eighth, and a sixteenth of that whole. If you would like to use examples with fractions other than these you can do similar steps with different size fractions.

Depending on what examples students are figuring out will determine how many of each shape you will need to give them. For my examples I need 4 halves, 6 fourths, and 4 eighths. The first example we’ll look at is ½ divided by 4. You can talk students through this first example and then give them additional problems to try in groups. Start with the ½ rectangle and think of dividing it into 4 equal parts. We want to know how big one of those parts is. You can figure out that four of the ⅛ths will fit on the ½. This means ½ divided by 4 = ⅛.
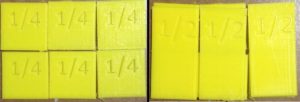
Once students are comfortable using a model to divide fractions by whole numbers, you can move on to dividing fractions by fractions. Similarly, you can talk students through the first example and then give them additional problems to try in groups. We will look at ½ divided by ¼. I will start with the ½ piece. Here we want to think about how big the shape needs to be so that this half is one fourth of the whole. So we can put together 4 halves, which is equivalent to 2. Thus, ½ divided by ¼ = 2.
I’ll go through one more example. We want to find ¾ divided by ½. Take 3 fourth rectangles and think about what this is one half of. You can add another 3 fourths. Add them to get three halves. Thus, ¾ divided by ½ = 3⁄2.
Adding and Subtracting Linear Expressions
This activity uses algebra tiles to add and subtract linear expressions with integer coefficients. This lesson will meet the following standard:
CCSS.Math.Content.7.EE.A.1
Apply properties of operations as strategies to add, subtract, factor, and expand linear expressions with rational coefficients.
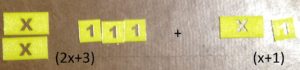
These manipulatives were really easy to create. I went into TinkerCad and created a rectangle with a hole shaped like an ‘x.’ Then I created a square with a hole shaped like a ‘1.’ They also print pretty quickly, but you may need to print a lot of them. Start this activity by guiding students through an example. We want to add (2x+3) + (x+1). Show them how to set up these two expressions as shown here.
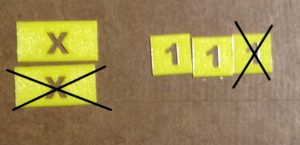
Next, have students count or group together all of the x letters to see that there are a total of three and do the same for the ones to see a total of four. They should write out the result as 3x + 4. Once they see how this works students can work on more examples on their own or in groups. Then, guide students through a subtraction example. To subtract (2x+3) – (x+1) take away from the first group the number of x letters and 1s in the second. We are left with x + 2.
A worksheet is posted here.
Exploring Triangles
In this activity students explore an incorrect statement about isosceles triangles that the scarecrow from The Wizard of Oz makes. The clip can be seen here. Then students explore right triangles with a related clip from The Simpsons, seen here. This leads to the Pythagorean Theorem. Students are shown an existing model and are asked to create their own. This activity is good for an eighth grade class. It satisfies CCSS.Math.Content.8.G.B.6 Explain a proof of the Pythagorean Theorem and its converse.
To start off this activity, students will review the triangle property that the sum of any two sides must be greater than the third side. This will be used later on. I give an example such as: If you have a triangle with lengths 3,6, and x then what are the possible values of x? We know 3+6 > x, 3+x > 6, and 6+x > 3. These become x<9, x>3, and x>-3. Thus, 3<x<9. After answering this question show The Wizard of Oz clip.
Next, students work in groups to decide if the scarecrow’s statement is true. He said “the sum of the square roots of any two sides of an isosceles triangle is equal to the square root of the remaining side.” It should be easy for them to come up with a counterexample to show that this statement is false. For example, if the sides of the triangle are 16 and the base is 25 then √16+√16=4+4=8≠√25=5 and √16+√25=4+5=9≠√16=4.
Now that they know the statement isn’t always true they will think about if it is ever true. If we name the sides of the isosceles triangle x, x, and y, then this means we want to know if either of these can ever be true: √x+√y=√x or √x+√x=√y. The first case is easy since the equation reduces to √y=0, which is equivalent to saying y = 0. A triangle can’t have a side with length zero so this will never happen. The second case becomes 2√x=√y. Squaring both sides yields y = 4x. This can also never be true because then the sides of the triangle would be x, x, and 4x. This does not work since x+x=2x<4x.
Next, you can show the clip from The Simpsons. In The Simpsons clip Homer is corrected as to the type of triangle this theorem should hold true for. The new statement becomes, “the sum of the square roots of any two sides of a right triangle is equal to the square root of the remaining side.” Students now decide if this new statement is true.
This statement also will not work. If we name the sides of the triangle x, y, and z, with z being the hypotenuse then the statement says √y+√z=√x, √x+√z=√y, or √x+√y=√z. The first two won’t work because we know z is opposite the largest angle, making it the largest side, i.e. z>x and z>y. Thus, √z>√x and √z>√y. Then √y+√z=√x<√z becomes √y+√z<√z. This leads to √y<0, which can’t happen because sides of a triangle can’t be negative. Similarly √x+√z=√y<√z becomes √x+√z<√z, leading to √x<0. The last one doesn’t work because of the property mentioned earlier, x+y>z. If we start with √x+√y=√z and square both sides it becomes x+2√x√y+y=z. But the left side has to be greater than z, and therefore cannot be equal to z.
Next, students are asked to find the correct theorem. At this point they should come up with the Pythagorean Theorem: the sum of the squares of the two sides of a right triangle is equal to the square of the hypotenuse. Alternatively, if students have not seen this theorem before this would be a good point to introduce it.
Finally, students are shown a 3D model that proves the Pythagorean Theorem. There are many available on Thingiverse, such as this one. They are then asked to design and print their own model proving the Pythagorean Theorem. It is strongly suggested that students first use pen and paper to brainstorm their design before going to TinkerCad. I decided to use rectangles and split up the 3 by 3 square and left the 4 by 4 square to fit together to make the 5 by 5 square. I used TinkerCad to make all of these shapes separately.
Your students may use different shapes, but it should be pretty easy to use the given geometric shapes or the shape generators in TinkerCad.
Finding the Area of a Hexagon
In this activity students are shown a 3D model with six equilateral triangles that form a hexagon. They are then asked to prove that the hexagon is regular and to find its area. This activity fits some standards from 6th and 7th grade, but it is better suited for 8th grade because it also uses the Pythagorean Theorem.
CCSS.Math.Content.6.G.A.1
Find the area of right triangles, other triangles, special quadrilaterals, and polygons by composing into rectangles or decomposing into triangles and other shapes; apply these techniques in the context of solving real-world and mathematical problems.
CCSS.Math.Content.7.G.B.6
Solve real-world and mathematical problems involving area, volume and surface area of two- and three-dimensional objects composed of triangles, quadrilaterals, polygons, cubes, and right prisms.
CCSS.Math.Content.8.G.B.7
Apply the Pythagorean Theorem to determine unknown side lengths in right triangles in real-world and mathematical problems in two and three dimensions.
I designed a hexagon model that is made up of six equilateral triangles that have been extruded. To make this model I used the TinkerCad polygon shape generator. I put in three sides to get the triangle and gave each side a length of 50 mm.

I made the thickness 20 mm. Then I used Velcro dots to make the triangles stick together.
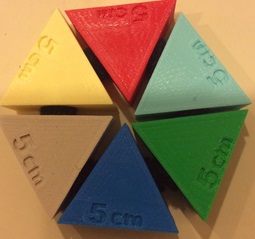
You can print just one copy to pass around or have several for students to play with. Next, have students prove that this is a regular hexagon. In a regular hexagon the sum of the interior angles will be (6-2)180 = 720 degrees. Since each angle is equivalent, the measure of each interior angle will be 720/6 = 120 degrees. Each triangle is equilateral, which means all angles in the triangles are 60 degrees. Since each angle in the hexagon is made up of two angles of a triangle, it is 120 degrees.
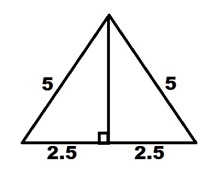
Now you can have students find the area of the hexagon. To get the area of the hexagon it is only necessary to know the area of one of these equilateral triangles. Each triangle is the same since the hexagon is regular and we know all sides have the same length. That means the area of the hexagon will be six times the area of one of the triangles. For example, if each side has length 5 cm then we can take one of the equilateral triangles and we know each side of it has a length of 5 cm. To find the area of the triangle we can draw a perpendicular to form two right triangles. The hypotenuse is still 5 cm and the base will be 2.5 cm because it was bisected. Thus, the height can be found by solving h2 + 2.52 = 52. The height is found to be 5√3⁄2 cm. This means that the area of the equilateral triangle is 2(½·5⁄2·5√3⁄2)=25√3⁄4 cm2. Thus, the area of the hexagon is 75√3⁄2 cm2.
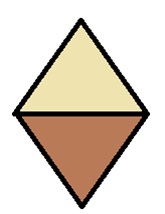
Students can also think about what other shapes can be made out of equilateral triangles. First they can try to make a triangle and find its area.
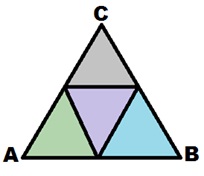
Each angle is 60 degrees in the smaller equilateral triangles so we know the sum of the angles in the larger triangle is 180 degrees. It formed a larger equilateral triangle. The area is 4 times the area of the triangle. Next, they can try to make a rhombus and find its area. We know opposite angles are equal (two are 60 and the other two are 120) and sides are all equal length since they are all sides of the equilateral triangle. The area is 2 times the area of the triangle.
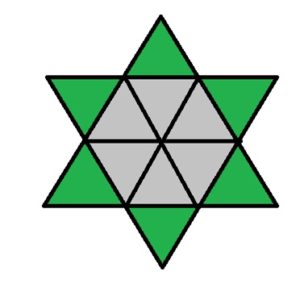
Finally, students can be creative and come up with other shapes they can make out of equilateral triangles. One example is this star that you can make by starting with a hexagon then putting an equilateral triangle on top of each side. The area is 12 times the area of the triangle.
It may also be interesting to think about what shapes cannot be made out of equilateral triangles. For example, you cannot make a square.
