4
Creating Queries
At this time, you have been able to create tables while entering data records into the database. With data now entered into the database, you can create a query that will display data from the tables in a database. A query is a saved Access object that is similar to asking the database questions which can display, sort, or filter this data into useful information.
Queries are used for multiple purposes in a database environment. Queries can be used to view table data that contains criteria to restrict the information a user can see. A variety of different query types can be created to view, change, add and delete data. As a result, queries can be executed to form the basis of a Microsoft Access form and report.
We shall use the Library database for the following Access query examples. With Microsoft Access, you can create a query in multiple ways with the select query being the most basic type of Access query. We will start creating our first query examples using Query Design. To create an Access query, click the Create tab and then click the Query Design icon:
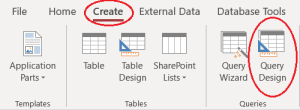
Figure 4.1 Create a query
As a result, Access opens a Query By Example (QBE) window that you use to specify components of a query:
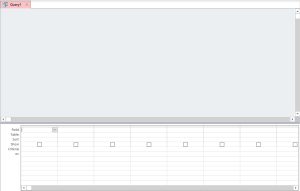
Figure 4.2 Query Design – QBE window
This window comprises two areas: Relationships and Grid. The Relationships area (upper window pane) will display each table and fields that need to be accessed along with the identified relationships used between those tables.
The Grid area (lower window pane) is used to specify:
- fields and tables,
- sort fields,
- fields to be included in the results display,
- different types of criteria can be applied in the row to obtain specific query information,
- calculations,
- grouping of rows with similar values in the field list to display summary information.
While using the Library database, we will start with simple query examples and progressively work our way to more complex scenarios.
4.1 Simple Query
The simplest query is one that displays all of the rows and columns in a table. In our first example, we want to list all of the books in the library. The process of creating the select query is as follows:
-
- Click on the Create tab (if necessary) and then click on the Query Design icon. Now, you can select the tables for your query in the Library database.
- If the Show Table dialog box has not displayed, choose the Show Table option in the query setup group.
- A Show Table window displays. From the list of tables, you must select the Book table. This task can be completed by double-clicking on the Book name or single click on Book and click on Add button.
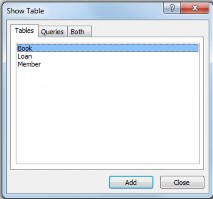
Figure 4.3 QBE List of table names
-
- Choose Close from the Show Table pop up window.
Microsoft Access displays the Book table and its fields in the Relationships area. The first in this list is an * which stands for all attributes. To display all records in the Book table, double-click the asterisk symbol (*). This results will then be displayed as the following:
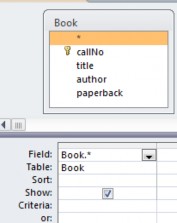
Figure 4.4 Choosing all fields in the Book table
We can run the query to test it and confirm the results that we expect: list all rows in Book. To run a query, click the Run (!) icon:
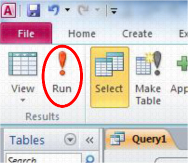
Figure 4.5 Run a query
There are other views of a query. If you click the drop down just below the View icon:
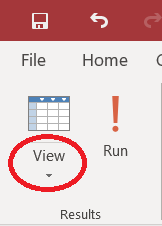
Figure 4.6 Several types of query views
You can see all the ways of viewing a query, including:
-
-
- Datasheet View
- Design View
- SQL View
-
You can also run a query by choosing Datasheet View. When developing a query, one often alternates between Datasheet View and Design View in order to obtain the desired query results. When you run a query, Access will retrieve the display requested table information. In this case, the results of running the query are:
|
callNo |
title |
author |
paperback |
|
CB 351 M293 1983 |
Atlas of medieval Europe |
Donald Matthew |
True |
|
HQ 1143 P68 1975 |
Medieval women |
Eileen Power |
False |
|
PC 14 V48 1965 |
Medieval miscellany |
Frederick Whitehead |
True |
|
QA 76.73 S67C435 2004 |
Joe Celko’s Trees and hierarchies in SQL for smarties |
Joe Celko |
False |
|
QA 76.73 S67C46 1997 |
Joe Celko’s SQL puzzles & answers |
Joe Celko |
True |
|
QA 76.76 A65P76 2011 |
Programming Android |
Zigurd R Mednieks |
True |
|
QA 76.9 D26H355 2008 |
Information modeling and relational databases |
T A Halpin |
True |
|
QA 76.9 D26H39 1996 |
Data model patterns : conventions of thought |
David Hay |
True |
|
QA 76.9 D35C45 1999 |
Joe Celko’s data & databases : concepts in practice |
Joe Celko |
False |
|
R 141 E45 2006 |
Medieval medicine and the plague |
Lynne Elliott |
False |
|
R 487 T35 1967 |
Medicine in medieval England. |
Charles H Talbot |
False |
Figure 4.7 Displayed Query results
Save your query by clicking on the Save button on the Quick Access Toolbar.

Figure 4.8 Pop-Up dialog box for saving a query
After saving the query, you can see the saved query name listed as an Access database object. This would save the definition of the query in the database. The results of the query are not stored or saved since it displays data records from the associated tables. The query, however, can be run any time by an end user. Whenever a user runs the query, the current contents of the Book table are accessed in this example.
4.2 Projection Query
Next, we will build a query that displays a subset of columns from a table. Projection queries display a subset of the fields in the table and is said to produce a vertical slice of the table.
While referencing the Book table, we need to display a listing of call number and title values. From the previous instructions, create a new query in Design View. In the Show Table dialog box, select the Book table and close dialog box. Double-click the callNo field and title field to be displayed in the grid.
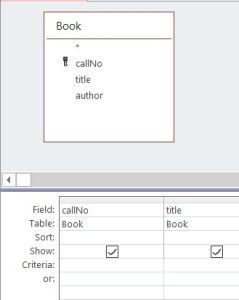
Figure 4.9 Query design showing specific fields
The definition of the query is now complete. The grid area identifies the selected Book table fields. Both of these fields will be displayed because the check box has been selected in the Show row for these fields. Only fields with selected check boxes on the Show row are displayed in the results. Running this query yields:
| callNo | title |
|---|---|
| CB 351 M293 1983 | Atlas of medieval Europe |
| HQ 1143 P68 1975 | Medieval women |
| PC 14 V48 1965 | Medieval miscellany |
| QA 76.73 S67C435 2004 | Joe Celko’s Trees and hierarchies in SQL for smarties |
| QA 76.73 S67C46 1997 | Joe Celko’s SQL puzzles & answers |
| QA 76.76 A65P76 2011 | Programming Android |
| QA 76.9 D26H355 2008 | Information modeling and relational databases |
| QA 76.9 D26H39 1996 | Data model patterns : conventions of thought |
| QA 76.9 D35C45 1999 | Joe Celko’s data & databases : concepts in practice |
| R 141 E45 2006 | Medieval medicine and the plague |
| R 487 T35 1967 | Medicine in medieval England. |
Save the query in the Library database using a descriptive query name for the library callNo and title fields.
4.3 Criteria Added To Select Query
A select query is one of the most common types of Access queries. Similar to the previous query, select queries may include criteria to limit the subsets of displayed data.
Query designers have options to view all of the displayed records stored in a table or include criteria in a query to identify a limited number of records to include in the query results. In this query example, let us refer to the Book table in the Library database to apply query criterion. We want to create a query listing information about books where the paperback field has a value Yes. Requirements like this are placed on the criteria row of the pertinent field(s).
To develop this new query, we need to select the Book table and then add fields to the query design grid. Include the callNo, title, author, and paperback fields from the Book table. In chapter 2, the paperback field was added to the Book table with a Yes/No data type. For the paperback field query criteria, we would also enter the value Yes on the criteria line. When the query is executed, Access will compare the paperback field values to determine whether or not the record contains the Yes record value. Save your query as paperbacksQuery.
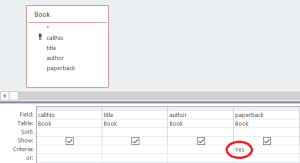
Figure 4.10 Query with selection criteria
When we run the query, we receive the following results listing paperbacks:

Figure 4.11a Query results with selection criteria
When a query runs, the query processor accesses the underlying table(s), and displays results where the data meets the criteria specified. For a query accessing a single table consider that the query processor is performing these actions:
For each row in the table:
- Retrieve the row from the database.
- Test the row to see if it meets the criteria specified. A query can compare values in a:
- Text field by using quotation marks (ie: “Donald Matthew”) as the criterion for the field.
- Numeric field by placing the number (without quotes) as the criterion for the field.
- If the row meets the criteria, the fields marked for show will be displayed.
Select queries allow you to apply criteria (similar to formulas) for specific records you want to be displayed in the query results. The saved query object does not store data instead queries display data stored in your tables as a horizontal subset. Most queries are a combination of selection and projection which can be created from multiple tables. It is typically the case that queries can also be used as a data source for another query, form or report.
LIKE Operator
Sometimes we need to retrieve information based on partial character comparison information. To find matching criterion, we can use the Like operator where we specify an appropriate pattern. These patterns are defined using one or more wildcard characters. By default our Microsoft Access databases use the ANSI-89 standard for special wildcard characters.
You can change the standard your database is using by examining and changing the Microsoft Access Options for Object Designers/Query Design.
The ANSI-89 wildcard characters are:
|
Wildcard Character |
Matching criteria |
Example |
|
* |
Matches any number of characters |
Like “1*” matches all text strings that start with “1” |
|
? |
Matches any single character |
Like “a?c” matches “aac”, “abc”, “acc”, etc. but does not match longer strings such as “aacc” or “xabc” |
|
# |
Matches any single numeric character |
Like “b#b” would match “b2b” and “b7b” but not “bam” |
|
[] |
Matches any single character within the brackets |
Like “j[ai]m” matches “jim” and “jam” but not “jaim” |
|
! |
Used with [ ] when you do not want to match any of the enclosed characters |
Like “b[!ao]b” matches “bim” and “bub” but not “bam” or “bob” |
|
– |
Used with [ ] to specify a range of matching characters (given in ascending sequence) |
Like “b[0-9]b” would match to “b2b” but not to “bam” Like “b[a-c]b” would match “bab”, “bbb”, and “bcb” |
Figure 4.11b ANSI-89 Wildcard Characters
4.4 Sorting Data In A Query
Sometimes an end user wants to view data in a particular field sort order. Fields can be sorted in ascending order (A-Z) or descending order (Z-A). Access will also allow queries to contain either a single sorted field or multiple sorted fields.
Let us extend the previous example to have books sorted in ascending order by title. Create another query similar to the paperbacksQuery. Now, place the cursor in the Sort line beneath the title field. Click and select ascending from the drop-down menu choices. Save this query and run it.
From the query results, notice that all paperbacks records are displayed. Since they are all paperbacks, we will not need to display the paperback field in our final query results. In this query, we are seeing callNo, title and author in the Book table and having the paperback field displayed may be redundant information.
Access allows you to sort and hide fields in your query results. To hide the paperback field in our query, click the Show check box to turn Show off.
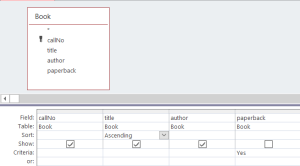
Figure 4.12 Sorted query results with hidden field
Save this query and run it to notice how the results are sequenced by title without displaying the paperback field.
4.4 Sorting Data In A Query Exercises
Use the Library database that is open for this query session.
Create and save the following queries:
- List the titles of books in descending order.
- List the titles of books written by Joe Celko.
- List all members of the library.
- List the members in sequence (ascending order) by last name.
- List the members sequenced (ascending order) by last name and then by first name. (If members have the same last name they appear on consecutive lines, and those lines are in sequence by first name.)
- Which of the above are a) simple queries, b) selection queries, c) projection queries, d) both selection and projection queries?
4.5 AND Operator
Suppose, we want to apply multiple criteria using the Library database to list Celko’s books in your Access query. There are two criteria a book must meet:
-
- Criteria 1: the author’s name must end with “Celko”.
- Criteria 2: “SQL” must appear in the title.
In this case, Criteria 1 must be true to display records containing “Celko” author names and Criteria 2 must be true to display books that have “SQL” in the title. The Access query design would use AND logic in the query Criteria row to support multiple criteria. When using QBE, we must place these two criteria on the same criteria row in order that Microsoft Access finds rows that match both criteria conditions.
We are also looking for titles that have the text “SQL” anywhere within the title. Access provides a way for us to define such a pattern. The asterisk (*) wildcard character can be used in a text string that matches these specific letters or combination of letters. This wildcard character can be used to find “SQL” text that is located either at the beginning, end or in between the text title values. Refer to Chapter 6.2.1 Like Operator for additional ANSI-89 wildcard characters.
For Criteria 1, we need two wildcard characters. We specify the pattern that title must match: Like “*SQL*”.
For Criteria 2, we specify the pattern that author must match: Like “*Celko”.
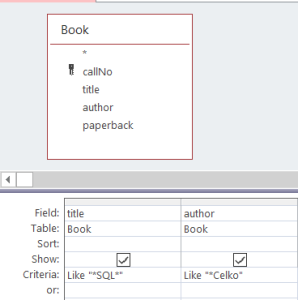
Figure 4.13 AND Criteria on one criteria line
4.6 OR Operator
Instead of books with titles containing “SQL” and authored by Celko, suppose the end user wants a list of books with “SQL” in the title or where Celko is the author. In this situation, we place the criteria on separate QBE lines. Access finds records that matches any “or” criteria to be true. A row is selected for the result set if either or both of the criteria are true for a row.
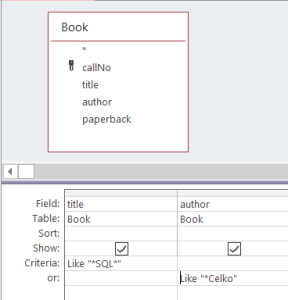
Figure 4.14 OR Criteria on different criteria line
4.6 AND/OR Operator Exercises
Use the Library database that is open for this query session.
Create and save the following queries:
- List the titles of books where the author name ends with “Celko”.
- List the titles of books where the author name ends with “Celko” and the text “data” appears in the title.
- List the titles of books where the author name ends with “Celko” or the text “data” appears in the title.
- List titles of books where the title contains the word “medieval”.
- List the titles of books where the title contains the words “medicine” and “medieval”.
- List the titles of books where the title contains the words “medicine” or “medieval”.
4.7 JOINS
From our queries, we have included criteria displaying a primary key field along with a selection of fields from a single table. By recalling basic table design concepts, each table has a defined primary key field. With the relationship between two tables, there is a defined one-to-many relationship between the key fields.
In the creation of queries, we will want to display data from one or more tables. These defined table relationships are represented by different types of query joins. If a query must be answered using data that appears in more than one table then the query requires a database join.
By continuing to use the Library database, suppose we wish to produce a list of member names and the call numbers of books they have borrowed. Important points about this query:
- The Loan table has the loan information we need
- The Member table has the member names we need.
Before we compose the query, consider how you would produce the results if you were to do this manually. If you had two listings showing the rows of each table in front of you on your desk, you could proceed as follows going through the Loan table listing row by row starting with the first row:
- For the current row in Loan:
a) Write down the call number of this loan.
b) Let N stand for the value of the member`s id for this loan.
c) Now look at the Member listing row by row starting with the first row:
-
-
- Examine the row to determine if the row is for member N.
-
-
-
- If this is correct, write down the member`s name beside the call number.
-
- If there are more rows in Loan, advance to the next row and go back to step 1.
In the above algorithm, we have determined a member id at step 1. b) and we next look for a matching member id in step 1. c). For a human, the process is simple but tedious. We could say we are trying to go from a row in Loan to a row in Member based on rows having the same value for member id. In database terminology, we say we are joining Loan to Member based on a common value of member id. A tedious but well-defined task is something a computer can excel at, and fortunately, we can get the database system to do the job of joining rows, based on values of a common attribute, for us.
Construct this query as follows:
- Create a new query.
- Select both the Member and Loan tables from the Show Table window:

- Note the line connecting the two tables. This is called a relationships line which causes Access to join pairs of rows. A row in Member is joined to a row in Loan where the two rows have the same value for id.
- Select the call number, first name, and last name fields by double-clicking them to obtain:
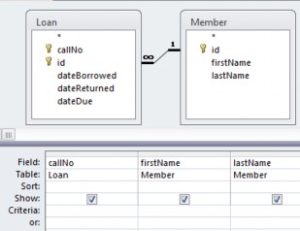
- Run the query and you see the results:

Chapter 4 – Query Exercises
Use the Library database that has been used for this query session. In each of the following exercises, the necessary data is in more than one table. Verify and/or specify a Join (default Inner Join type) is applied to your queries.
Create and save the following queries:
- For each loan, show the title of the book and the date it was borrowed. Note that the title is in the Book table and the date borrowed is in the Loan table.
- Modify the previous query to produce a listing that is in order by title and then by date.
- Produce a list that shows for each loan the book title, the name of the member who borrowed the book, and the dates the book was borrowed and then returned. Note: 3 tables are needed for this query.
- Produce a list of members and the books they have taken out on loan. Include the member’s last name, first name, and titles of the books. The information to be displayed is in 2 tables, but it is necessary to specify 3 tables for this query: Member joins to Loan Book joins to loan
- Modify the previous query to produce a listing that is in order by last name and then by first name.
- For member id 2, list the person`s name and the titles borrowed.
- Produce a list of book titles and member names for those books that are due back May 18, 2014.
- Produce a list of book titles and member names for those books that have not been returned. In this case you must give the criteria for dateReturned as null. Null is a special keyword that represents no value.
