56 Chapter 36.1: MLA Formatting
Part 6: Chapter 36.1 MLA Formatting
This section will explain how to format a paper in MLA style.
MLA style format requires the use of a word processing program with high functionality, such as Microsoft Word. Microsoft Office 365 (which includes MS Word) is free to CNM students. Follow this link to download MS Office: https://www.cnm.edu/depts/information-technology-services/its-services-catalog/software/free-microsoft-office-365
While other word processors, such as Google Docs, are very helpful, they do not have the full formatting capabilities.
Example Papers in MLA Style
As you go through the next sections, it is helpful to look at examples of other papers in MLA style. Follow this link to see sample papers. https://style.mla.org/sample-papers/
General Format Guidelines
To correctly format your MLA paper, please adjust your settings to:
- Double space
- 12pt font
- Margins at 1 inch on all sides
A few more guidelines:
- First line of each paragraph indented 1 tab (.5 inch)
- No extra spaces between paragraphs
- One space only after periods
Format of First Page
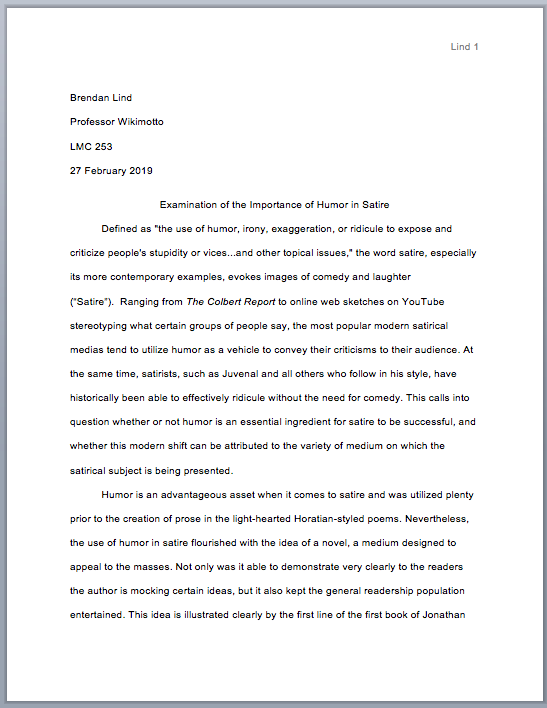
Example First Page
Here is an example of a first page formatted in MLA style. Your first page should look like this.

Heading
The heading should be left-justified at the top of the first page (in the main part of the page, not the header):
- Your first and last name
- Your instructor’s name
- The name of the class
- The date
Here’s an example:
Sally Student
Dr. Terrific Teacher
ENGL 1110
14 May 2020
Title
You never get a second chance to make a first impression, and your title makes an impression on the reader. Spend some time working on an interesting title that captures the reader’s attention.
When you have developed a great title, it must be correctly formatted. After the heading, leave a double space. Then type your title and center it. Use proper title capitalization.
Do not use all capital letters for the title, and it should not be bolded, underlined, or italicized (unless it includes the name of a book, in which case just the book title should be italicized). But, it should be centered. Remember: do not center the entire paper; only center the title.
After you have centered your title, leave a double space. Then, begin your essay (at the left hand margin).
Page Numbers
Create a right-justified header 0.5 inches from the top edge of every page. This header should include your last name, followed by a space and the page number. Your pages should be numbered with Arabic numerals (1, 2, 3…) and should start with the number 1 on your title page. Most word-processing programs have the ability to automatically add the correct page number to each page so you don’t have to do this by hand.
Other Formatting Specifications
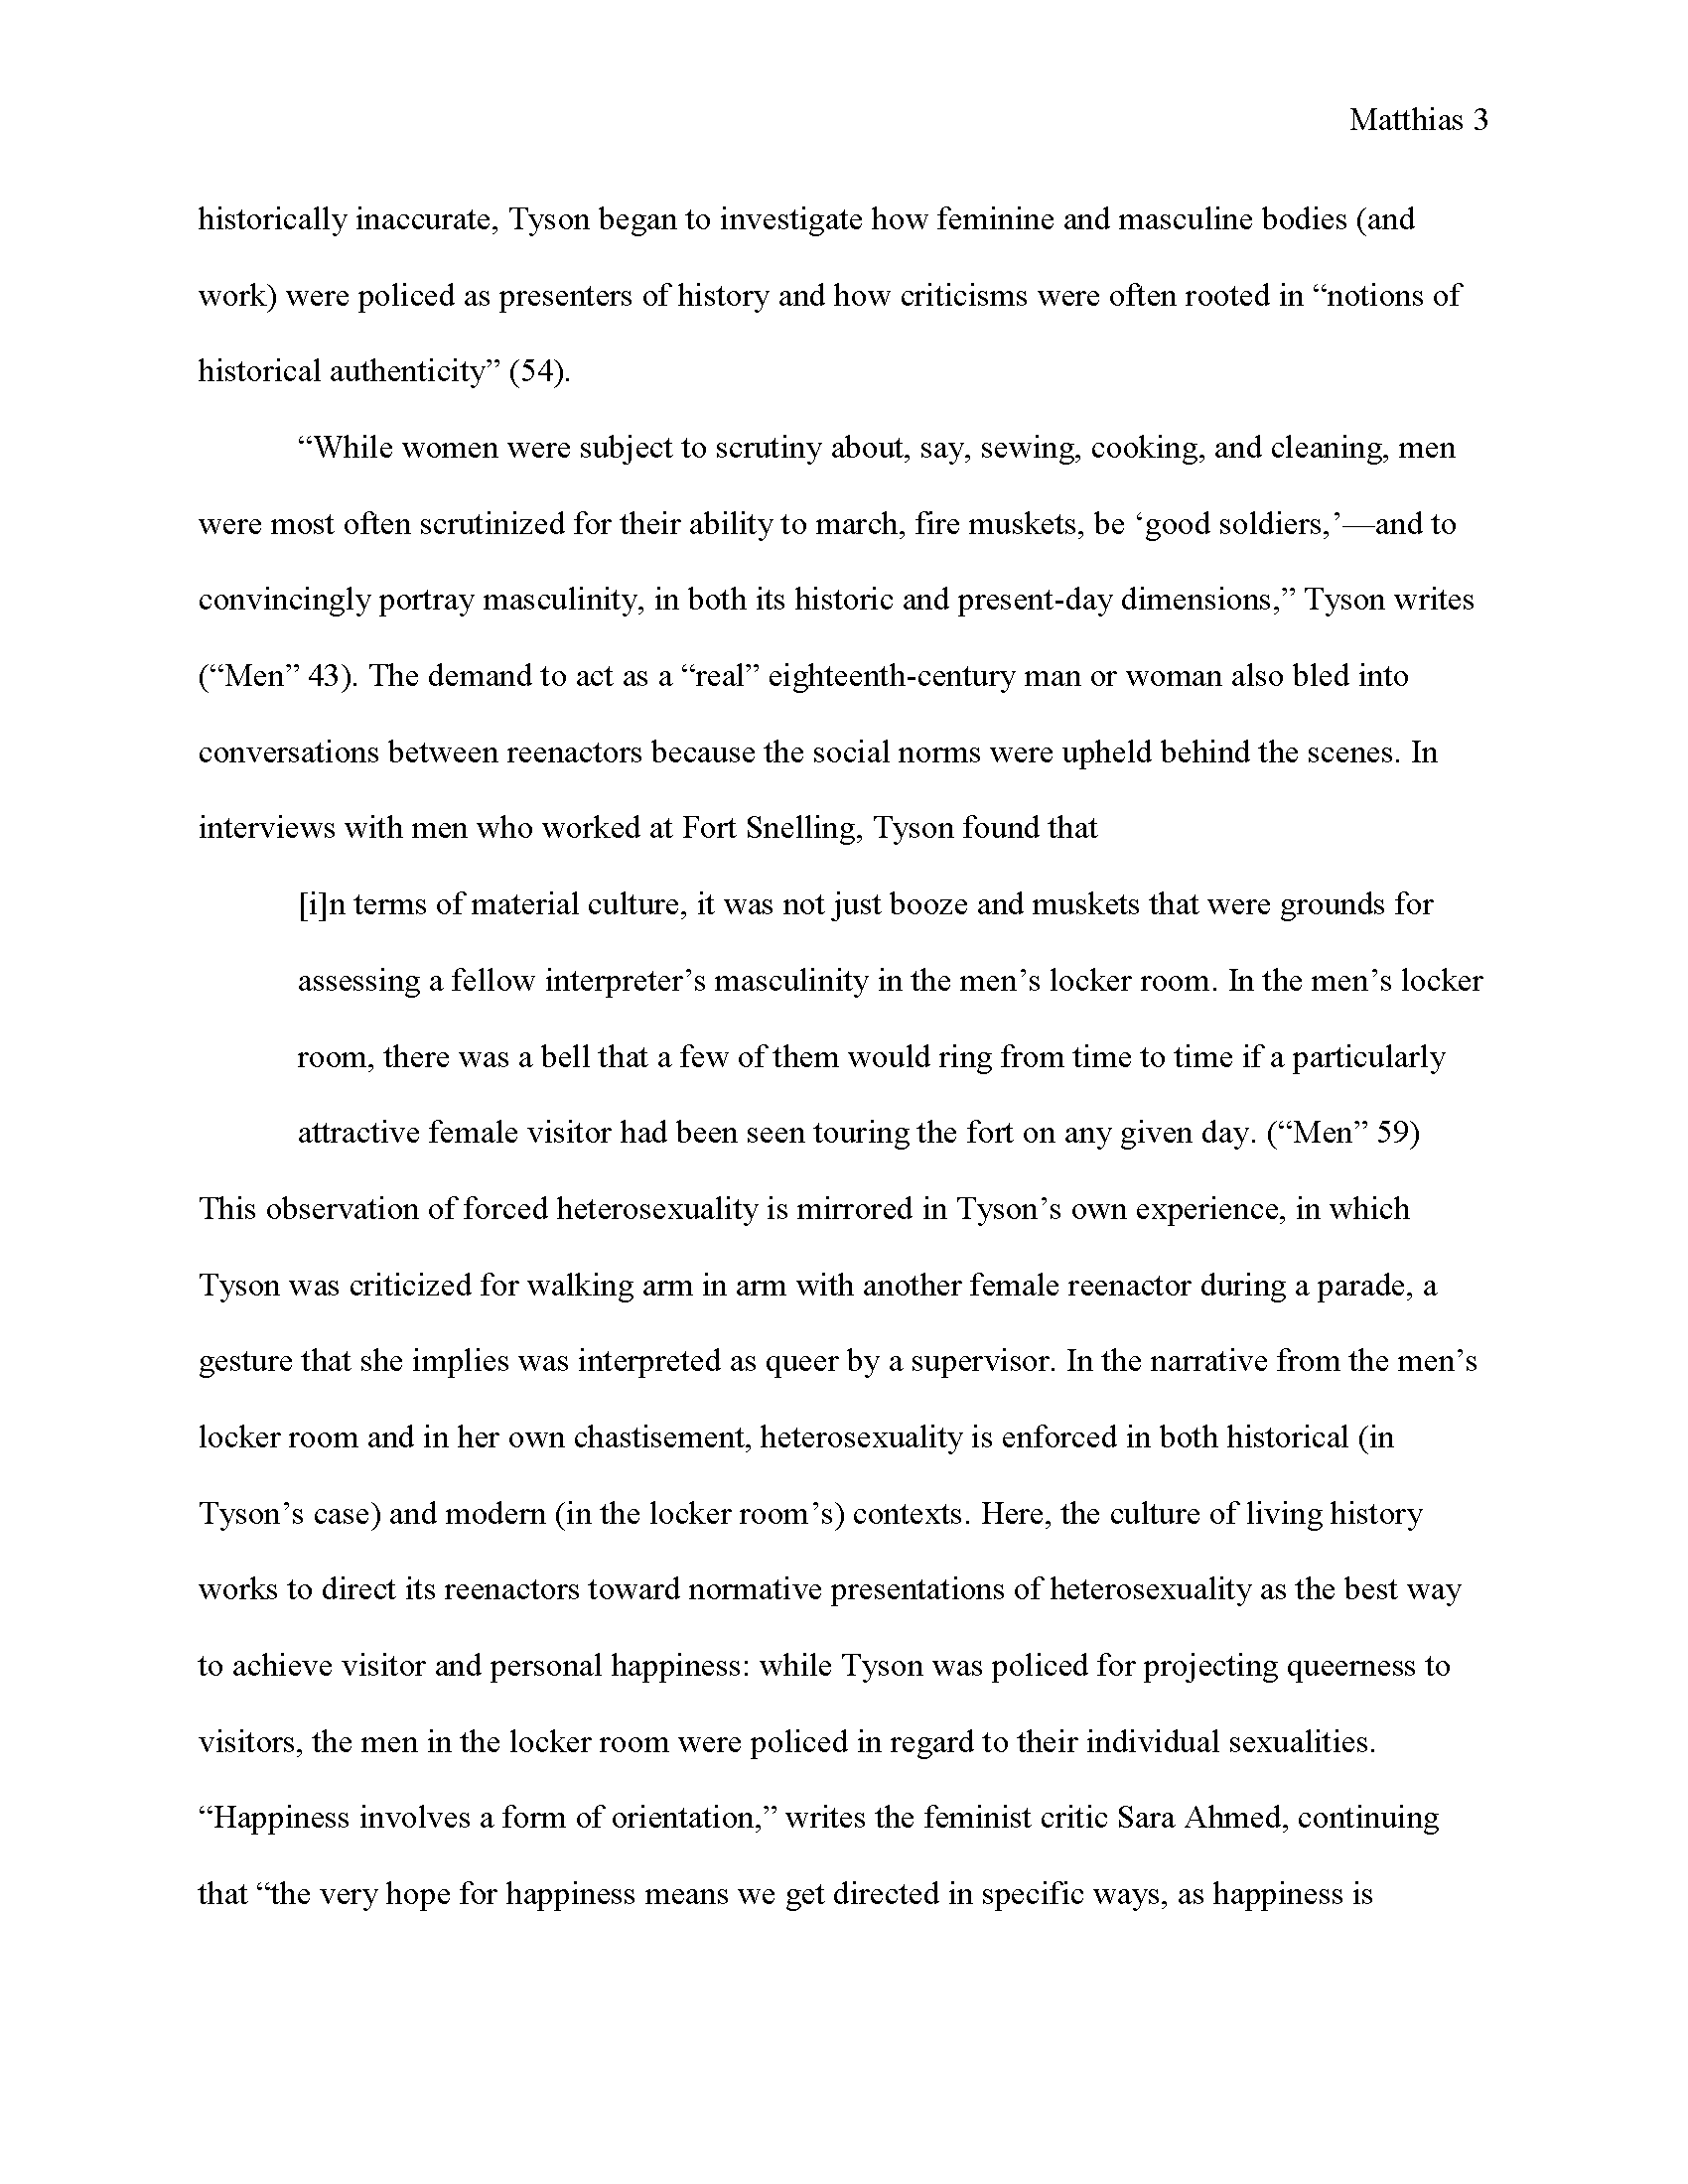
After you have formatted your first page, the rest will be simple! The heading only appears on page 1. Since you have already set up your page numbers (right justified, with your last name and the page number), then the rest of the paper is already formatted and ready for your essay. See this example:

Block Quote Format
A typical quotation is enclosed in double quotation marks and is part of a sentence within a paragraph of your paper. However, if you want to quote more than four lines of prose (or three lines of verse) from a source, you should format the excerpt as a block quotation rather than as a regular quotation within the text of a paragraph. Note the block quotation in the example above.
To format a block quote:
- Indent right .5 inch (or 1 tab)
- Do not enclose in quotation marks
- Put the in-text citation after the ending punctuation, not before it
Date Format
When writing a date, use either the International or US style. Be consistent and use the same style throughout your paper.
International style: 18 May 2020 (day/month/year)
US style: May 18, 2020 (month/day/year)
Additional Information on Format
Here is some additional information on formatting in MLA:
Use of Italics
In MLA style, you should italicize (rather than underline) the titles of books, plays, or other standalone works. You should also italicize (rather than underline) words or phrases you want to lend particular emphasis—though you should do this rarely.
Section Headings
Longer papers sometimes benefit from the added organization of section headings. Unlike some other citation styles (e.g., APA), MLA style does not have specific rules for how to format such headings. However, they recommend that you title each heading with an Arabic numeral, followed by a period and a space, followed by the section title in title case. Subsections should follow the same pattern, with additional numerals after the period (e.g., 1.2, 3.9).
Series and Lists
MLA style does not have specific rules for the formatting of series and lists, beyond mandating the use of the Oxford comma (see explanation below). If your instructor does not give you additional specific guidelines, you should fold any series or list into the paragraph rather than giving each element its own line.
As is standard in most style guides, use semicolons rather than commas to separate the elements of the series if at least one of the elements includes a comma somewhere within it (known as an “internal comma”). For example: “Josie was so hungry she ate the brownie; the cupcake, wrapper and all; and the bowl of ice cream.”
Oxford Comma
The Oxford comma (also called the serial comma) is the comma that comes after the second-to-last item in a series or list. For example:
The UK includes the countries of England, Scotland, Wales, and Northern Ireland.
In the above sentence, the comma immediately after “Wales” is the Oxford comma.
In general writing conventions, whether the Oxford comma should be used is actually a point of fervent debate among passionate grammarians. However, it’s a requirement in MLA style, so double-check all your lists and series to make sure you include it!
Tables and Illustrations
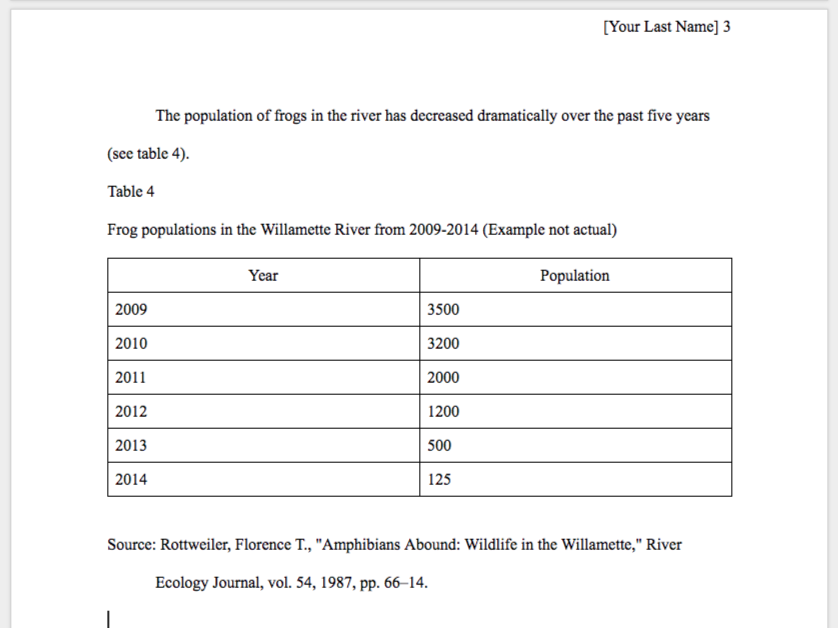
A table is a chart that presents numerical information in a grid format. In MLA style, you should present a table immediately after the paragraph in which you mentioned it. When you mention a table in the text of your paper, make sure you refer to it by its number (e.g., “table 4”) rather than with a phrase like “the table below” or “this table.” For example:
Tip
Place tables and illustrations as close as possible to the text they reinforce or complement.
MLA style specifies three ways of presenting images: tables, figures, and examples. We will focus on tables and figures here, since examples are used only for the presentation of musical scores.
Tables
A table is a chart that presents numerical information in a grid format. In MLA style, you should present a table immediately after the paragraph in which you mentioned it. When you mention a table in the text of your paper, make sure you refer to it by its number (e.g., “table 4”) rather than with a phrase like “the table below” or “this table.” For example:

The table itself should appear flush with the left margin. Follow these guidelines:
- Above the table: Write its number in the format “Table 1”, followed by a short but descriptive title on the next line; both should be flush with the left margin.
- Below the table, write the word “Source” (or “Sources”), followed by a colon, and then provide the source(s) of the information in the table.
- Include the citation information, with the same formatting, as in a note in MLA style (i.e., formatted the same as a citation in your Works Cited section, except using commas instead of periods).
- The citation should end with a period, and it should be formatted with a hanging indent (i.e., the first line should be flush with the left margin, and every subsequent line should be indented 0.5 inches).
- Since you have provided the full citation information here, you do not need to also cite this source in the Works Cited section at the end of your paper.
Figures
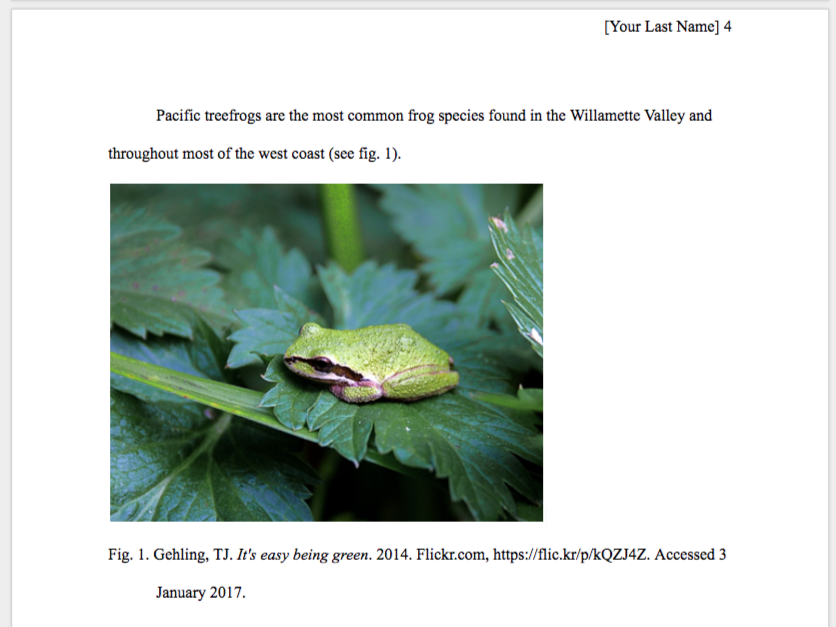
A figure, by the MLA’s definition, is anything that is not a table or an example. This is therefore the broadest category; it includes images, graphs, and anything else aside from a table or musical score.
Treat a figure much as you would treat a table, with two exceptions: (1) you may center it horizontally if you choose, and (2) all information about the figure, including its number (“Figure 1”; you may abbreviate to “Fig. 1” if you choose) and title (“Frogs in the Willamette River, 2012”) should appear on the line immediately below the figure. 
The source information should appear on the next line after the figure title and on the same line as the figure title after the word “from.” As with a table, present the source information formatted as a note and with a hanging indent, and do not cite it again in your Works Cited section.
Sections of this chapter were written by Anne Key and published by Central New Mexico Community College, and they are licensed CC-BY 4.0.
The latter part of this chapter is adapted from English for Business Success, 2012, used according to Creative Commons 3.0 cc-by-nc-sa
