Introduction to SolidWorks
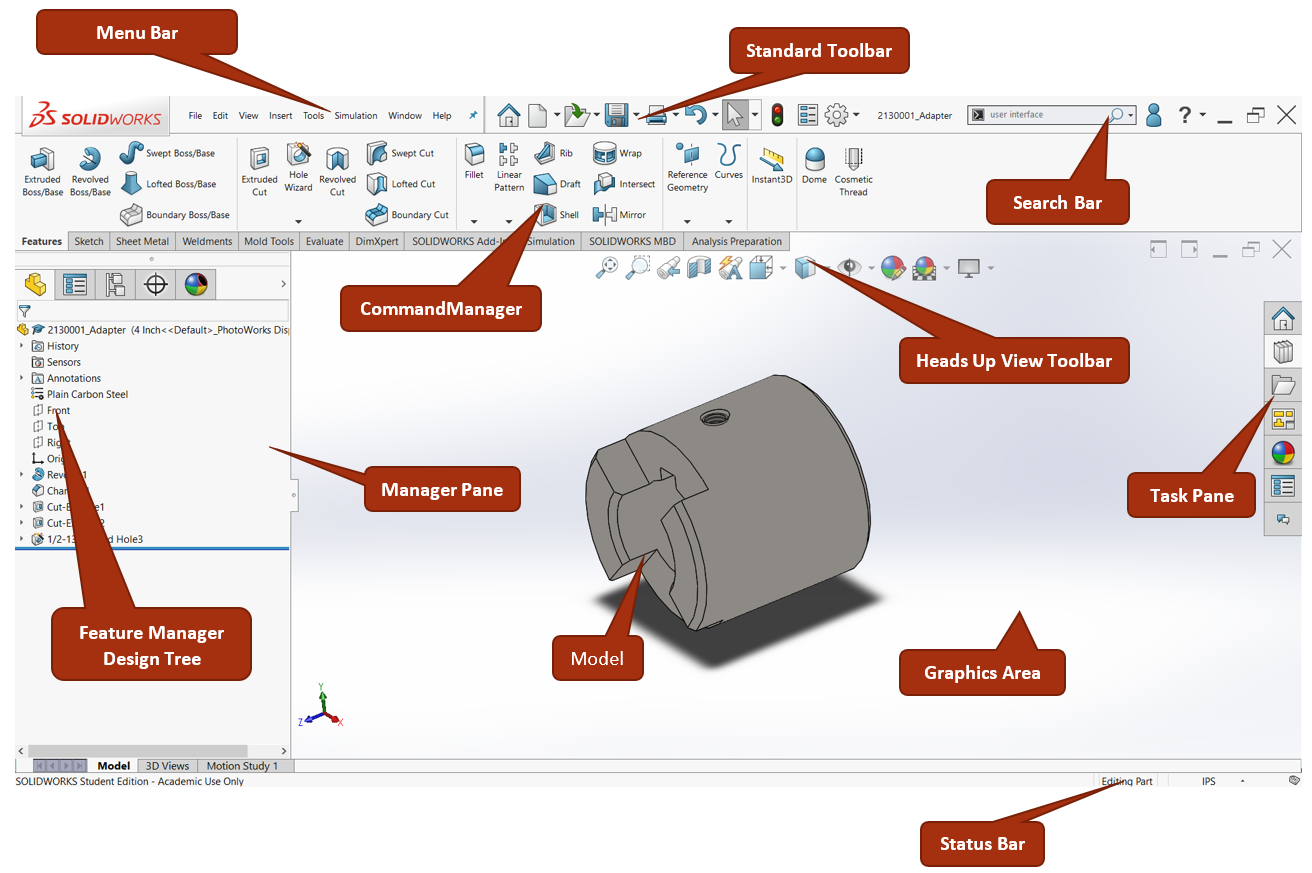
Parts, assemblies, and drawings are created by interacting with the commands in the user interface of SolidWorks. The user interface is composed of the menu bar, CommandManager, graphics area, manager pane, status bar, and task pane (See Figure 1.6).

Many of the features in SolidWorks® work like other Windows® programs you are familiar with such as Microsoft Office®, AutoCAD®. For example, if you hover over a button or item in the user interface, a pop-up message will tell you what it is you are hovering over.
More information can be found from SolidWorks Help user interface content. SolidWorks Help library will be very useful for you learning the SolidWorks software because it has answers to many questions on how to do things in SolidWorks. As we learn new terminology related to the SolidWorks software, this textbook will link to a place in the SolidWorks Help library where you can read more information than what this textbook provides.
Exercise 1.2: SolidWorks User Interface
Download and open the Coupler part file in SolidWorks and interact with it and the SolidWorks User Interface as is shown in the video below.
Menu Bar
The menu bar is located at the top left of the SolidWorks® user interface and looks very similar to the menu bar in other programs (Figure 5). All the SolidWorks® commands can be accessed through the menu bar. So, whenever you cannot find a command through any other means, you can find it via the menu bar.

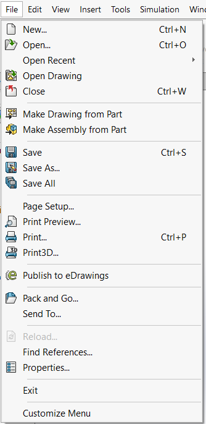
The menu bar has 7-8 tabs: File, Edit, View, Insert, Tools, and Help which is common to nearly all Windows® programs as well as custom tabs such as Windows and Simulation. When you hover over a tab with your mouse cursor, the tab expands. There are other expandable flyouts within each tab as well. Looking at the File tab may be familiar because the options in the file tab are very similar to other programs (Figure 1.7).

Standard Toolbar
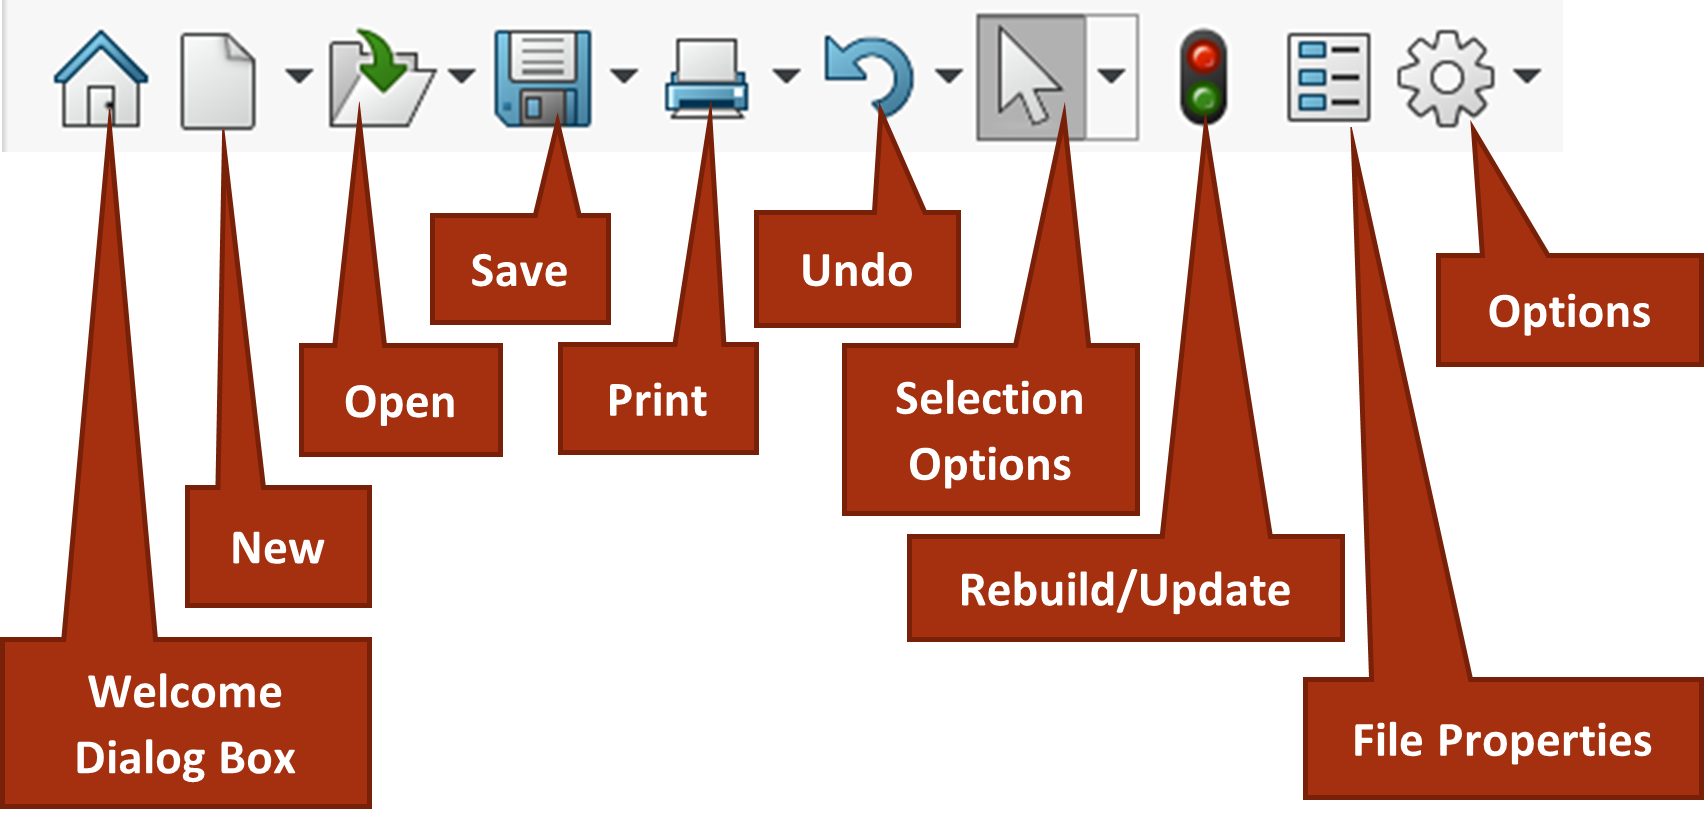
A part of the menu bar is also the Standard Tool Bar which has the most used commands related to file management of your SolidWorks® files (Figure 1.8).

The new, open, save, print, undo buttons work similar to other programs: starting new parts/assemblies/ drawings, opening existing SolidWorks® files, saving your work, printing screenshots of your model or 3D printing your model, undoing the last action in your modeling process.
Selection Options
The selection options allows you to filter what you are able to select in the model such as only edges, faces, vertex’s (points) and also let’s you choose between box window selection and lasso window selection (figure 1.9). The selection options have other specific selection capabilities which you can discover as you grow in your modeling skills.

Rebuild
The rebuild button updates the model to reflect most recent model changes. This will be a very often used button in your modeling because you will often make changes to a model and not see those changes reflected immediately. This is due to computer technology limitations. So, to see your model with the most recent updates, you will sometimes need to “rebuild” your model after making a change.
File Properties
The file properties button opens the file properties dialog box where you can insert metadata for your model such as the author of the model, the title, and custom properties such as material designation and weight.
Metadata is the data that is used to describe our 3D model: it is who made the model, the description of the model, the material of the model, the weight, part number, cost; it is pretty much all of the nongeometric data that we want to be attached to the geometric 3D model data. We insert this data using the file properties dialog box so that it can be attached to the model and used downstream in the product lifecycle for raw material ordering, cost projecting, and 2D drawing creation.
Options
The Options button opens the options dialog box where you can customize your SolidWorks user experience and set up your SolidWorks environment exactly how you want it. If you ever want a setting to be different, you probably change it via the Options dialog box. From the options drop down, you can also customize the Command Manager, add in SolidWorks® add ins – like Simulation or CAM – and change the size of your command buttons in the SolidWorks® user interface.
Search Bar
Another part of the menu bar is the Search Bar which includes a place to search up commands, SolidWorks Forum solutions, files and locations as well as a link to local SolidWorks® help files (Figure 1.10).

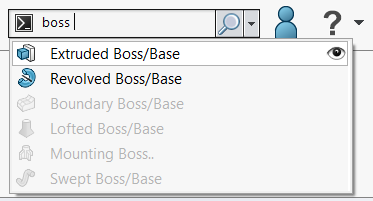
One particularly helpful part about the search bar is the Command Line drop down option when you can’t remember where a particular command is (Figure 1.11). The eye to the right of suggested commands in the command bar mode will also show you how to access the command via the menu bar or command manager.

Exercise 1.3: Exploring the Interface
Get familiar with various components of the SolidWorks User Interface just by trying things out! Some instructions and a tutorial video are below to help you get moving.
- Try hovering over the different tabs of the menu bar with your coupler part file open and seeing all of the different options in each tab of the menu bar.
- Try out each of the buttons in the standard toolbar: New, Open, Save, Selection, Print, Options, Rebuild, File Properties and explore what is within each and what you can input into each.
- Pay particular attention to the Options dialog box when you open options and all of the properties you can enter in the File properties dialog box.
- Try out the SolidWorks search bar with the general search and the command line drop down.
