Extruded Features
To apply the tools, we learned in this chapter we will model CAE1001 which incorporates Cut Extrude, Hole Wizard, Circular Pattern, Linear Pattern, Fillet, and Chamfer. You can find the design specifications for the part in the CAE1001 Drawing. This tutorial will also be accompanied with the CAE1001 Video Tutorial at the bottom of this page.
Base Rectangle
Open SolidWorks and start a new part being sure that the units for the part are inches (IPS) and the drafting standard is the one you desire (ANSI or ISO). Start a new sketch on the top plane and sketch a center rectangle that is 4 inches by 4 inches. Feel free to use an equal relation to make the rectangle a square. Extrude the rectangle to half of an inch.

Offset Pocket
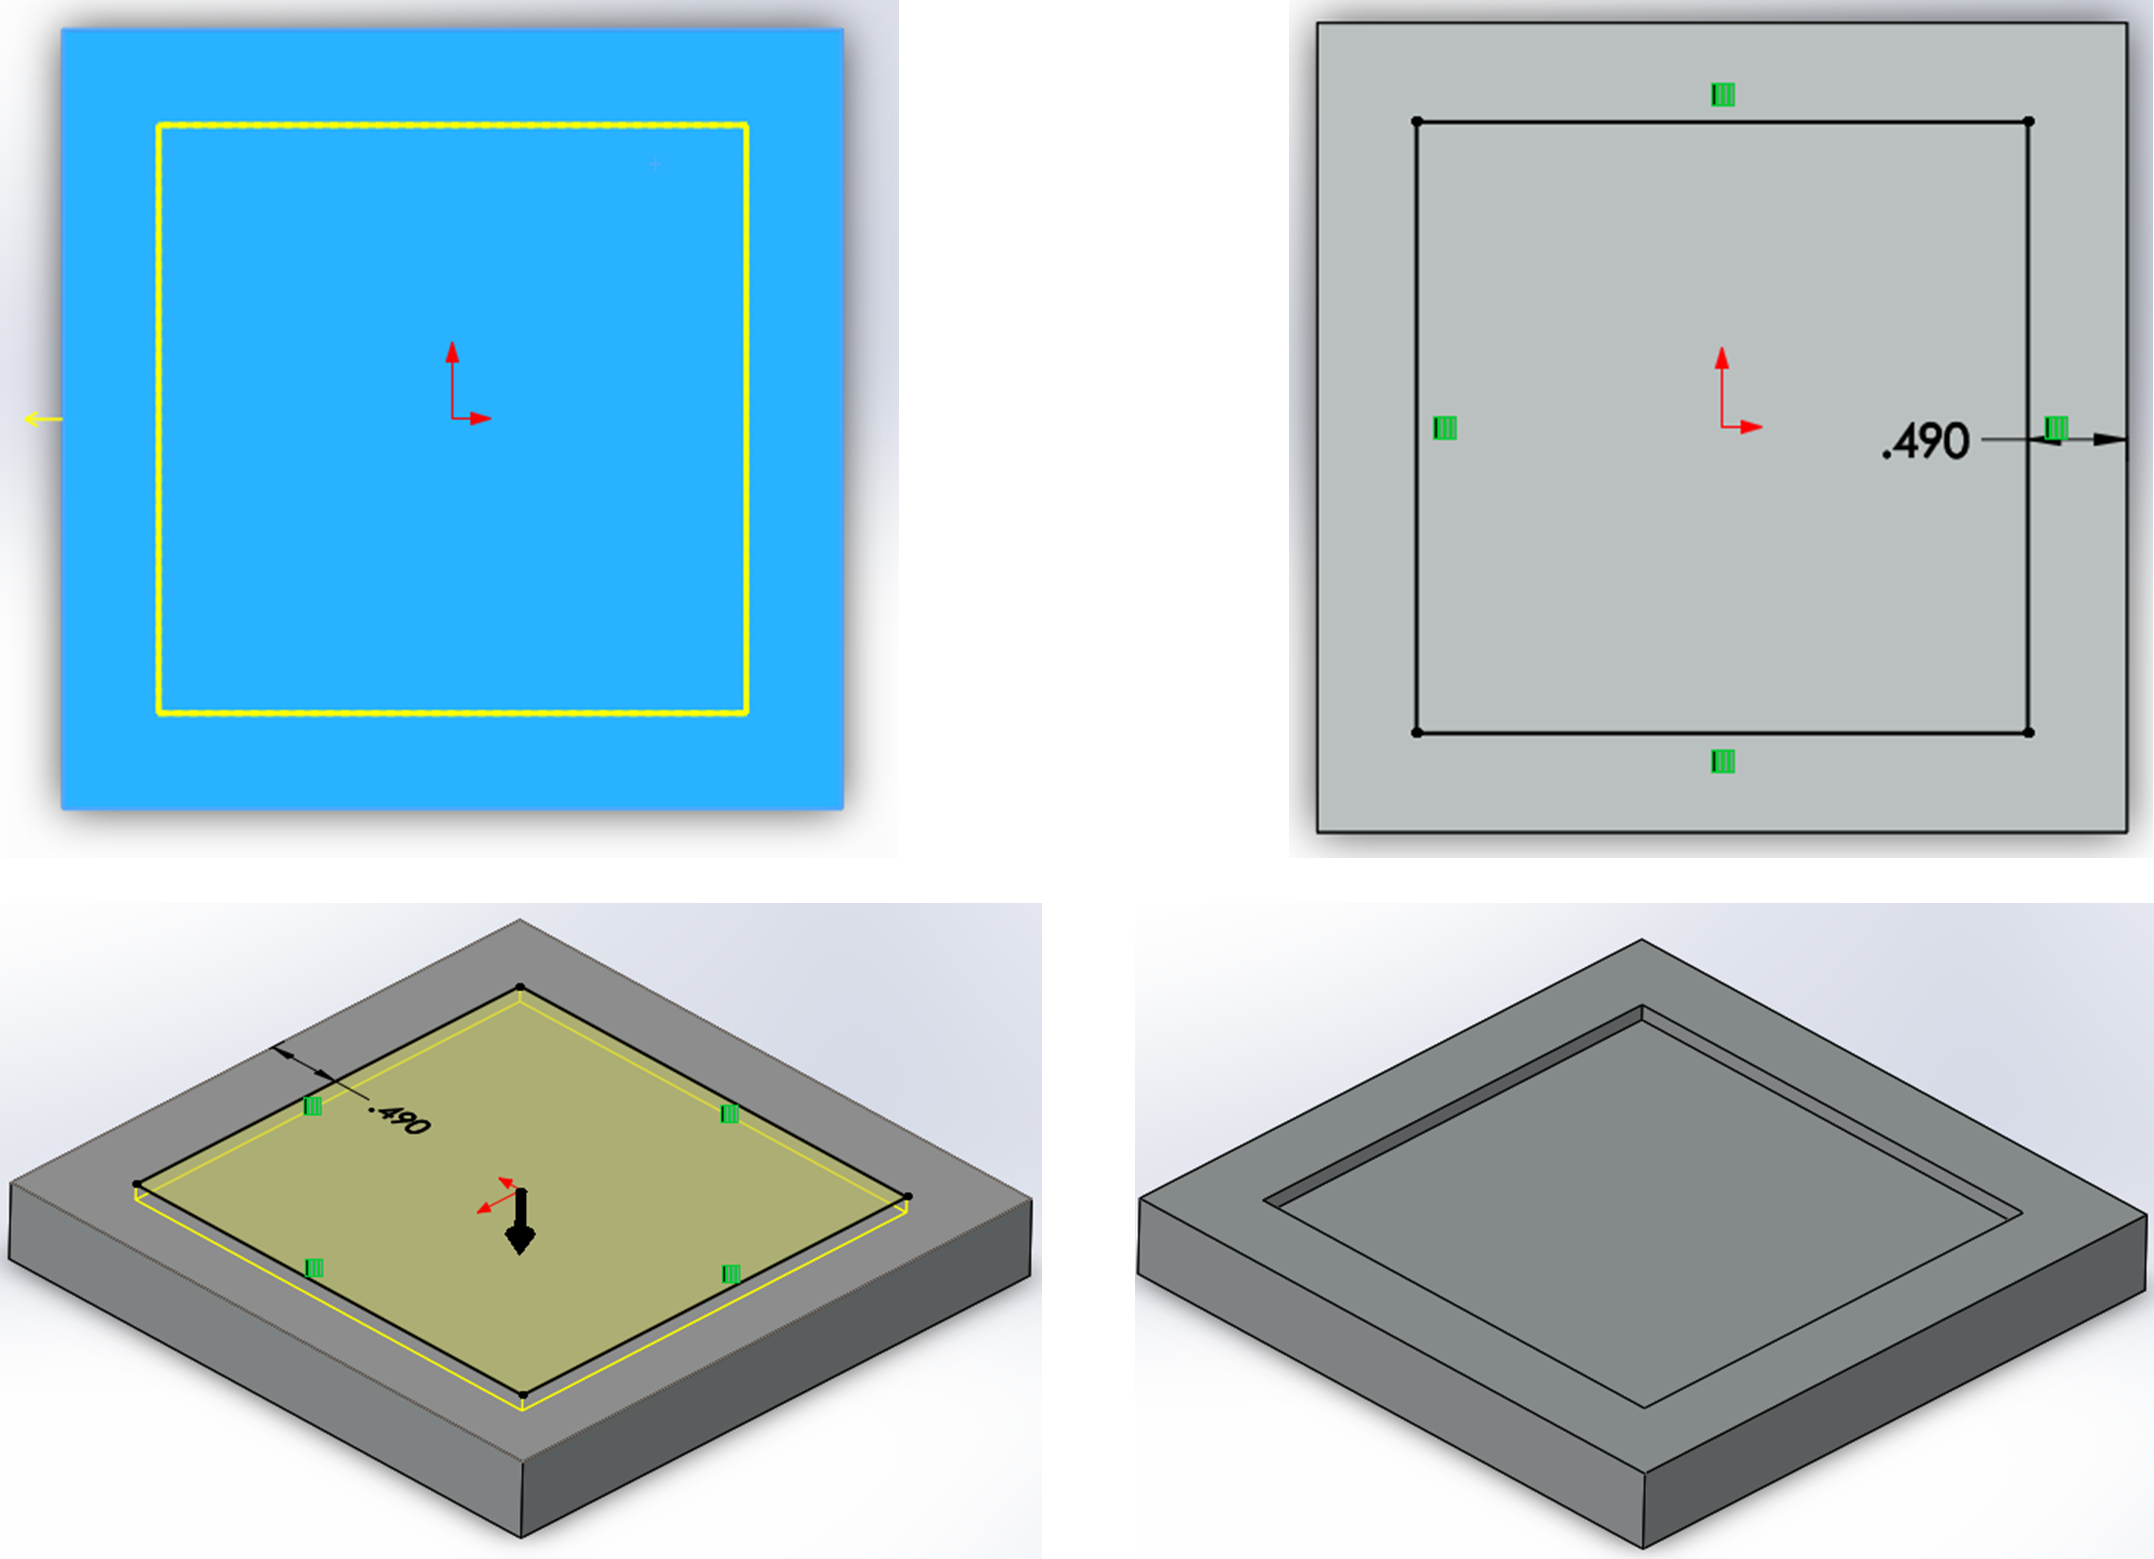
Start a sketch on the top face of the rectangle, select the top face of the part (it will highlight blue), then choose the Offset Entities tool. Offset the exterior edges of the face inward by 0.49 inches (you may have to check the reverse option). When finished, select the Extruded Cut command from the CommandManager and cut your sketch to a depth of 0.100 inches.
Engrave Text
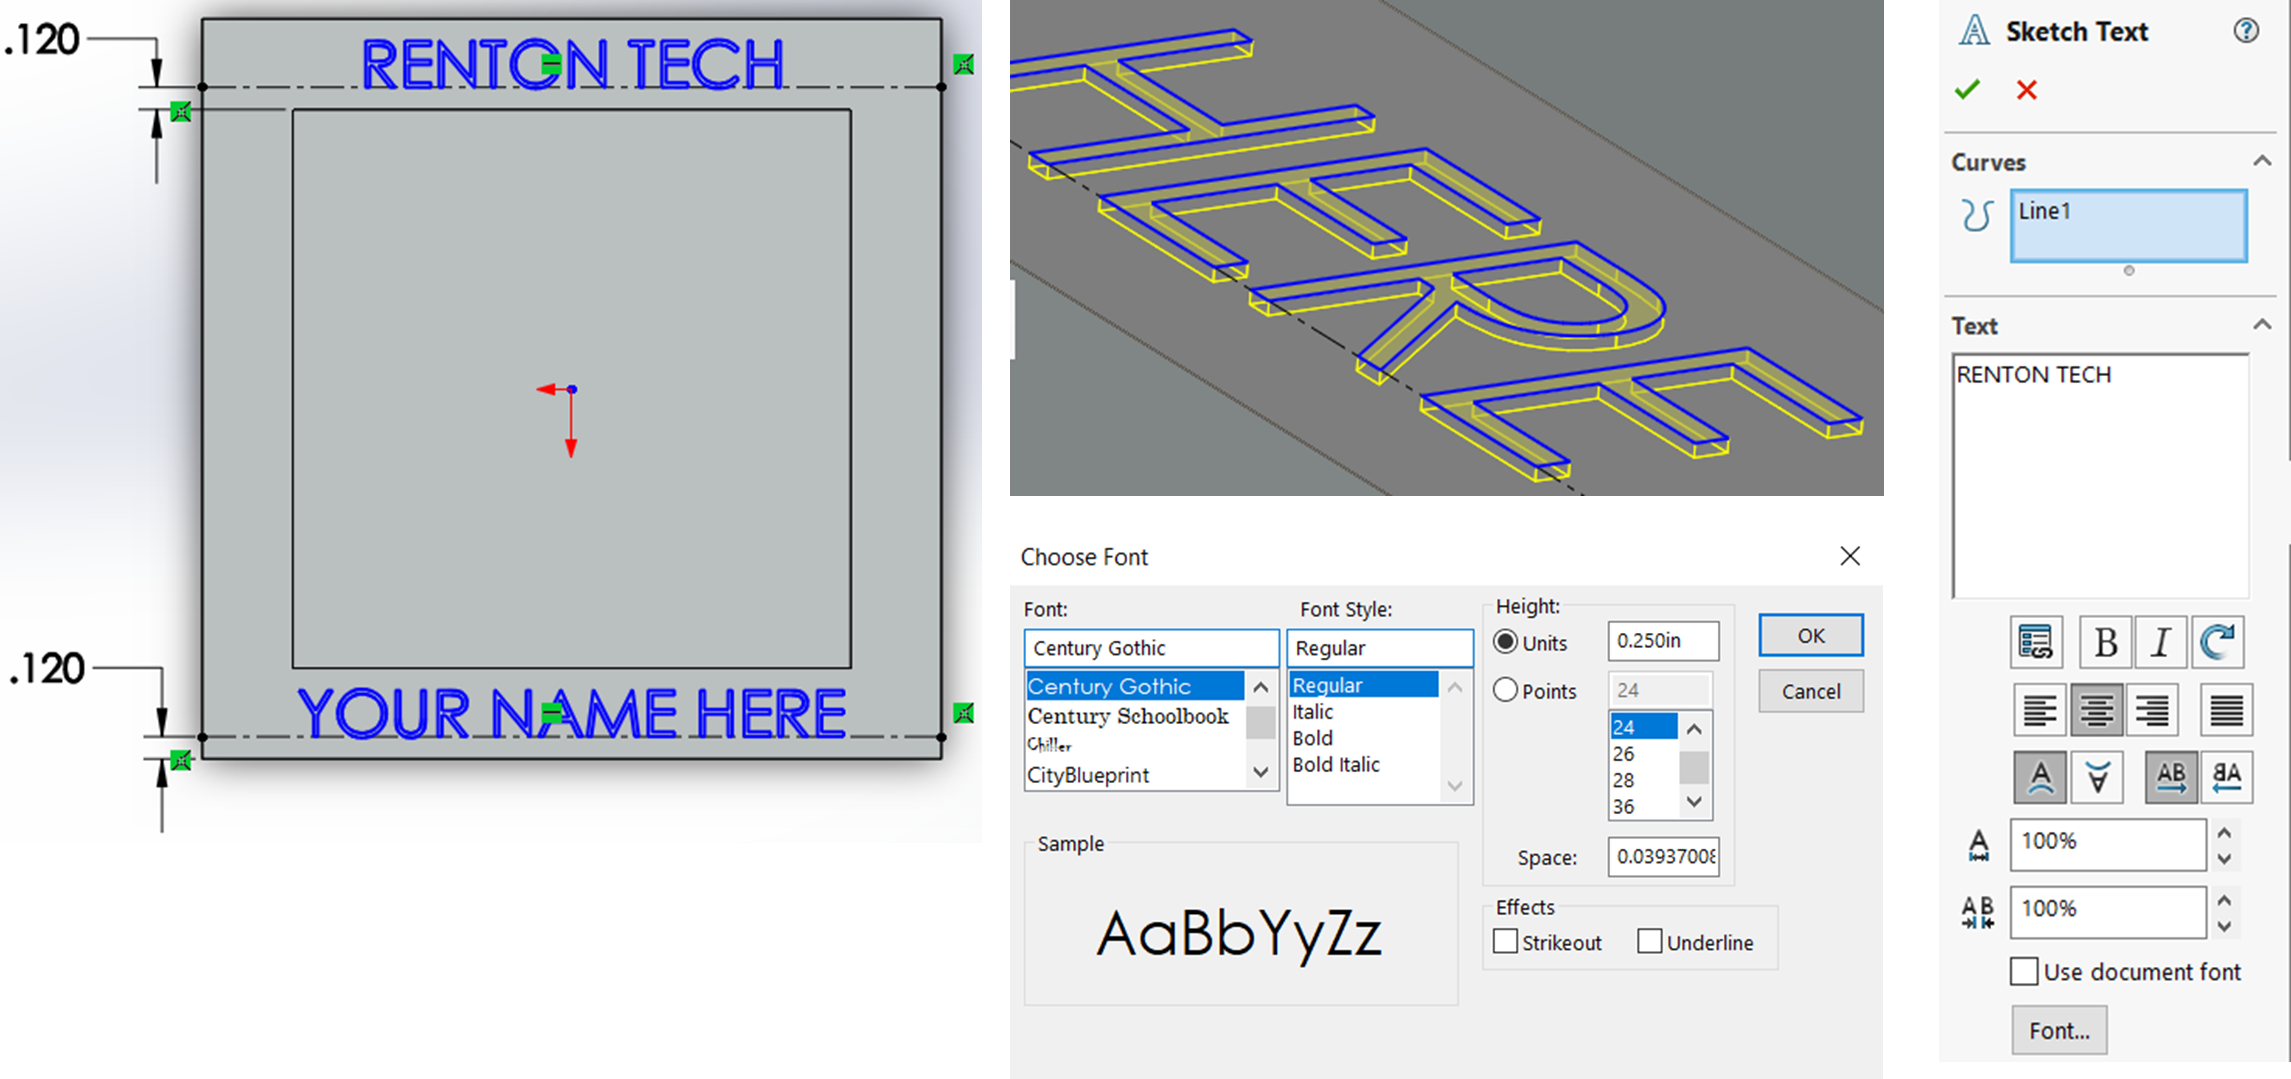
Start another new sketch on the Top face of the part, draw two centerlines .120-inch (using smart dimensions) from the bottom edge and the top edge of the cut out making sure that the lines start and end on the edges of the part. Activate the “Text” Sketch Tool, Click the top centerline, specify Center justify in the property manager, type “RENTON TECH”, change the font to .250 inch text height and “Century Gothic” font (you will have to uncheck the “Use document font” box. Repeat for the bottom centerline but with your name. Cut extrude the sketch to a .010-inch depth.
Hole Wizard Holes
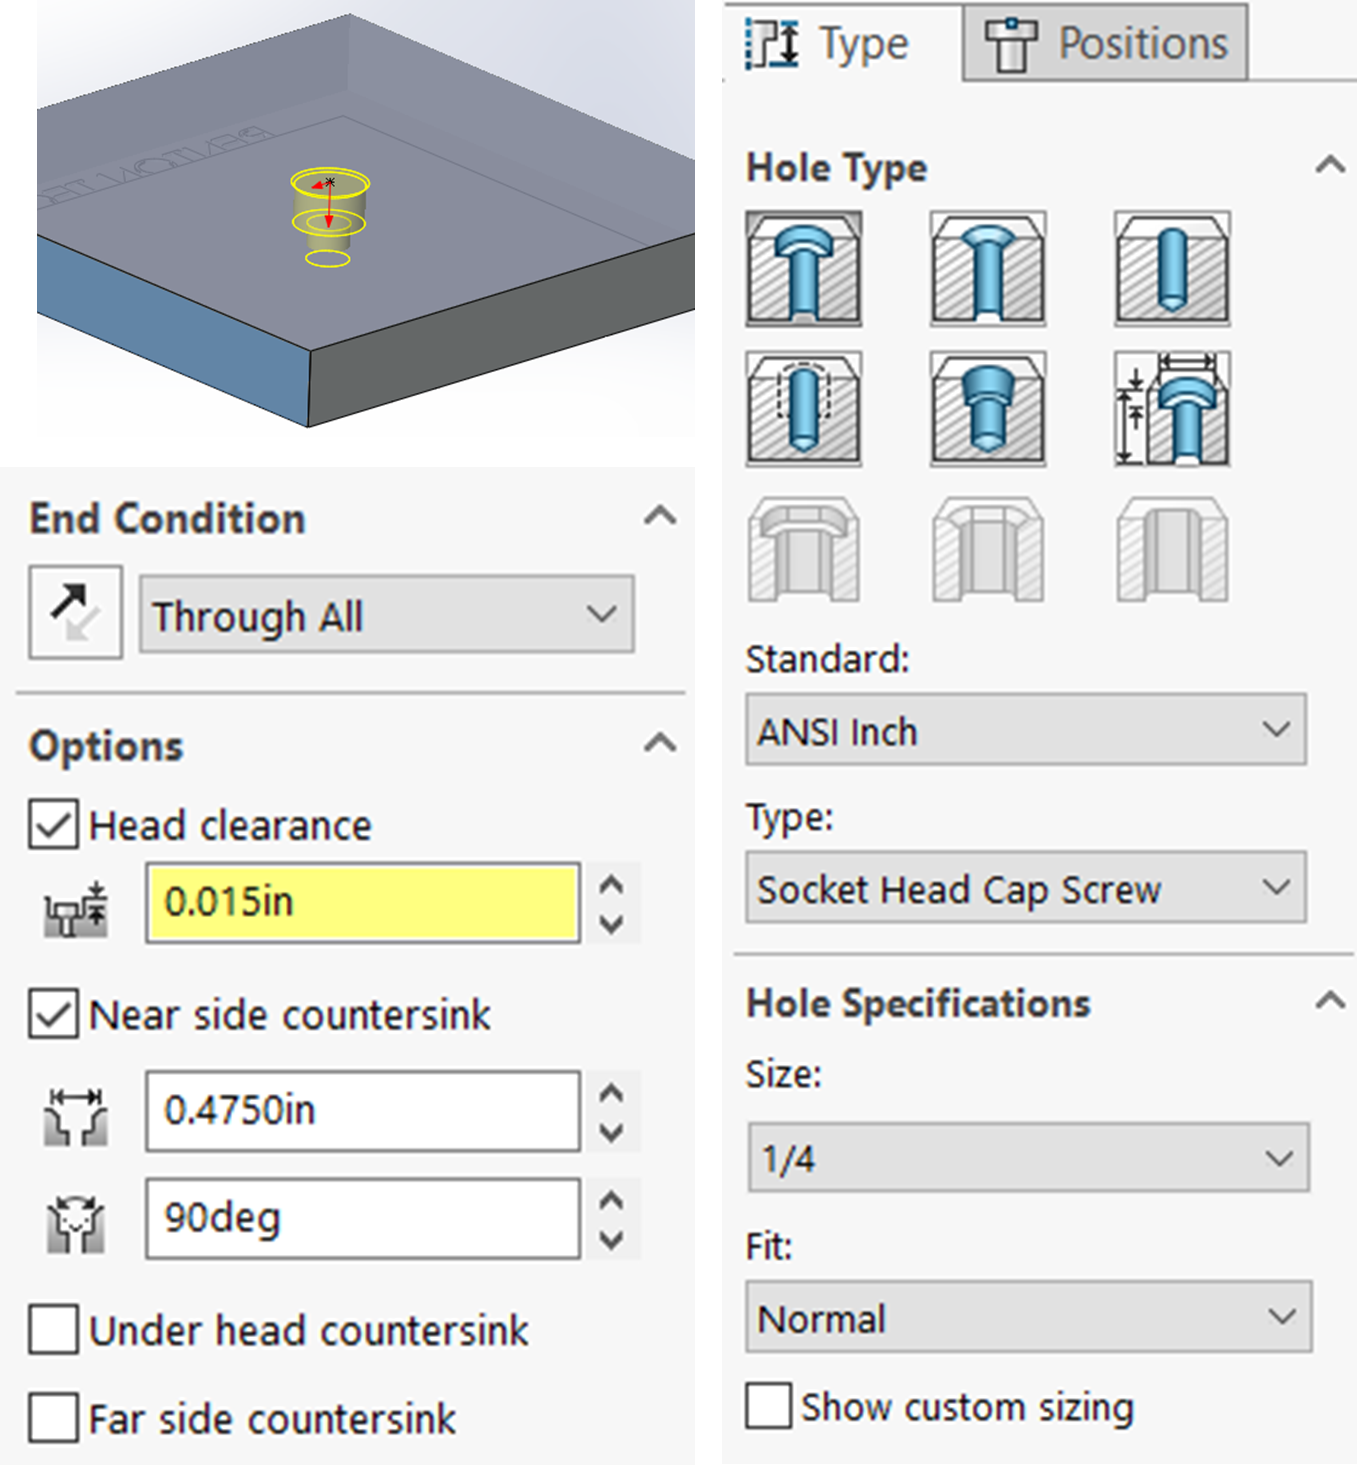
Activate the Hole Wizard command and specify on the “Type” tab an ANSI Inch counterbore hole for a Socket Head Cap Screw that is a ¼ inch normal fit and goes through the entire part (Through All). Also specify a head clearance of .015 inches and a Near side countersink of .4750 inches at 90 degrees under the options section.
Flip your model over to the bottom side, switch to the Positions tab of the Hole Wizard Property Manager, select the bottom face of the part and then click the origin of the part. Confirm the hole wizard tool.
Activate the Hole Wizard again and specify on the “Type” tab an ANSI Inch Hole for a Fractional Drill Size of 3/8 of an inch and depth (End Condition) of .200 inches. Also, in the Options section of the property manager, specify a Near side countersink of .400 inches at 90 degrees.
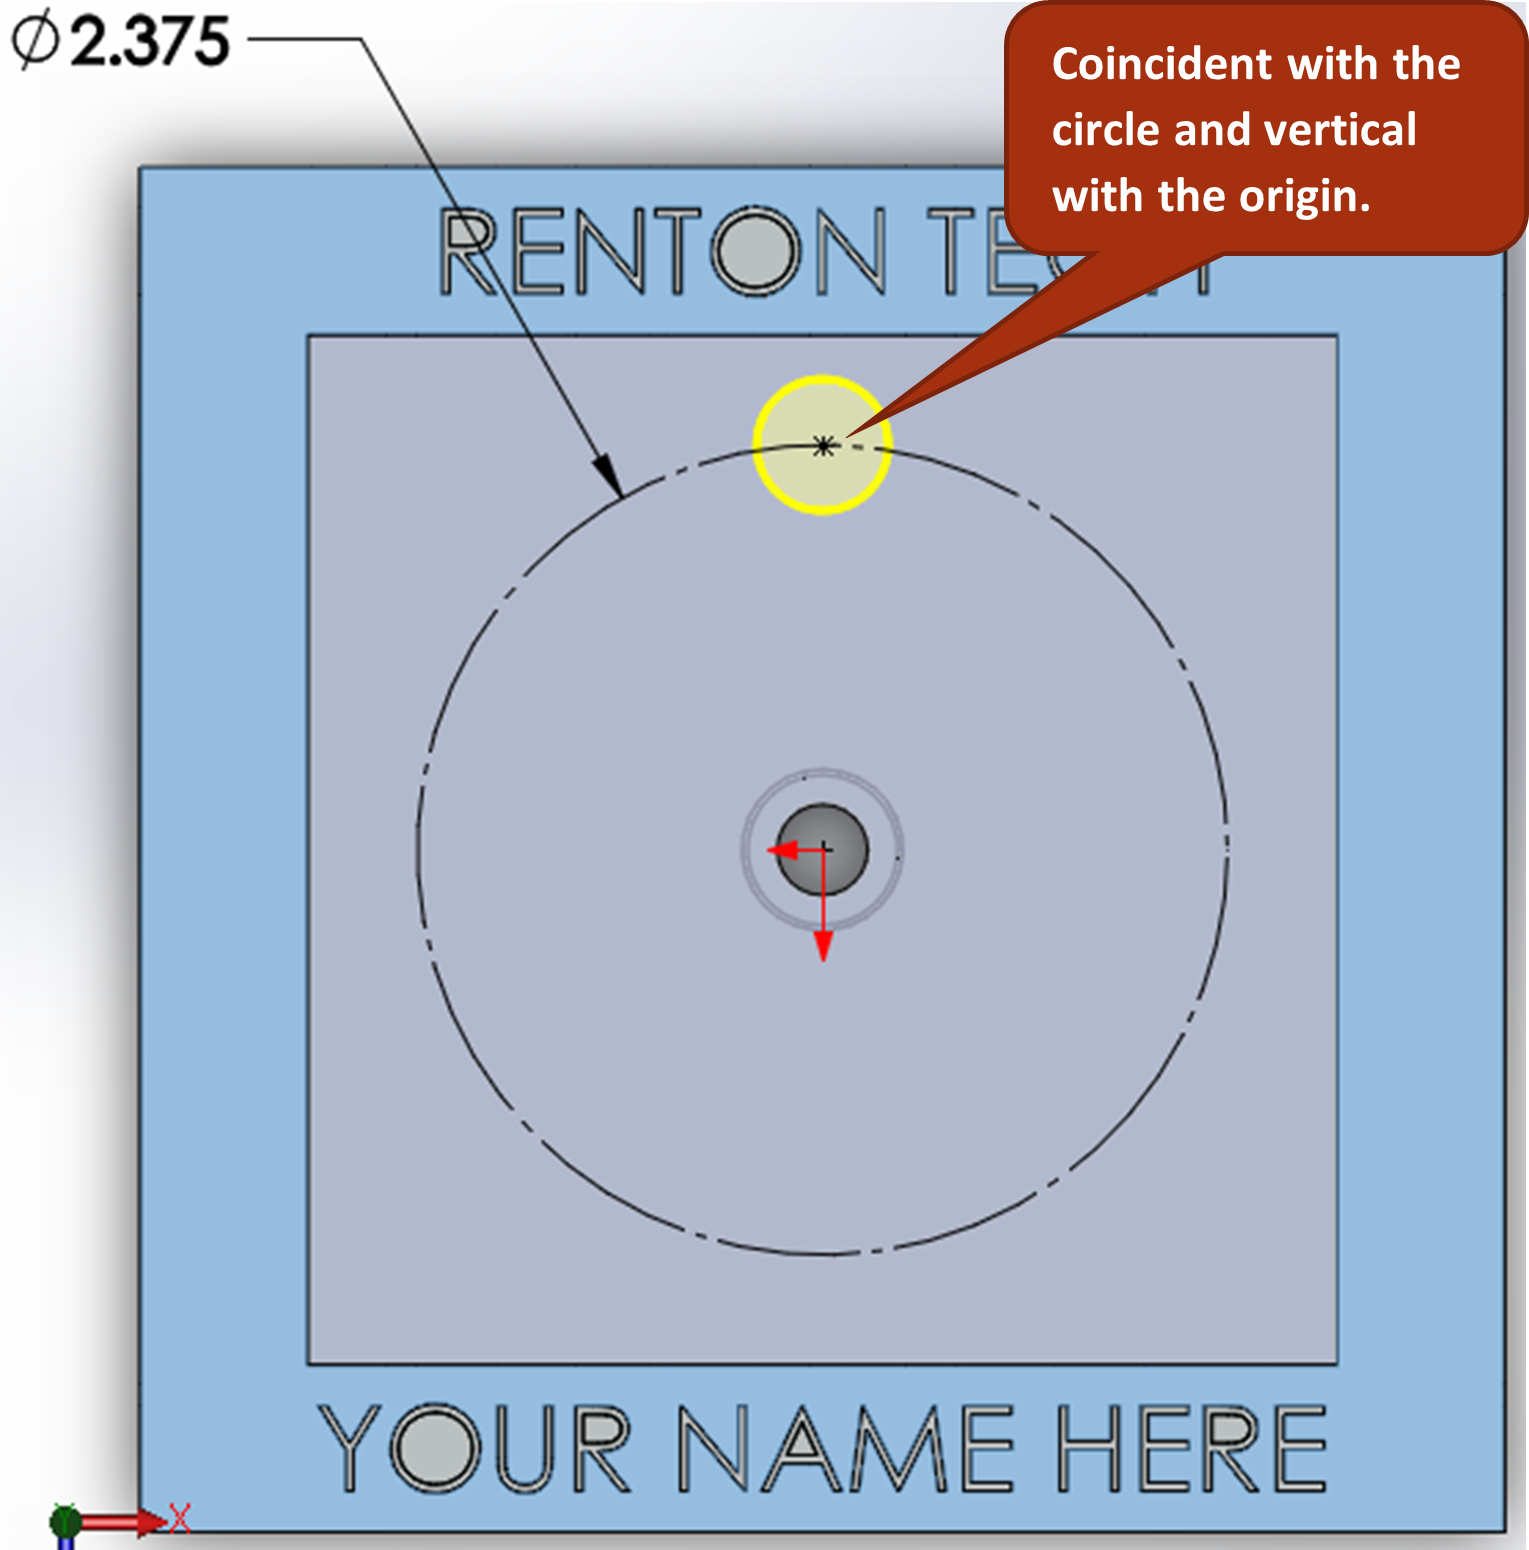
Flip the model back over to the upright top side and switch the Hole Wizard to the Positions tab. Unselect the point tool from the CommandManager, activate the circle command and draw a circle from the origin. Add a smart dimension of 2.375 and switch the circle to be a construction circle. Re-Activate the sketch point command and place the point (which is the hole) at the Top quadrant of the circle. Confirm the Hole Wizard.
Circular Pattern
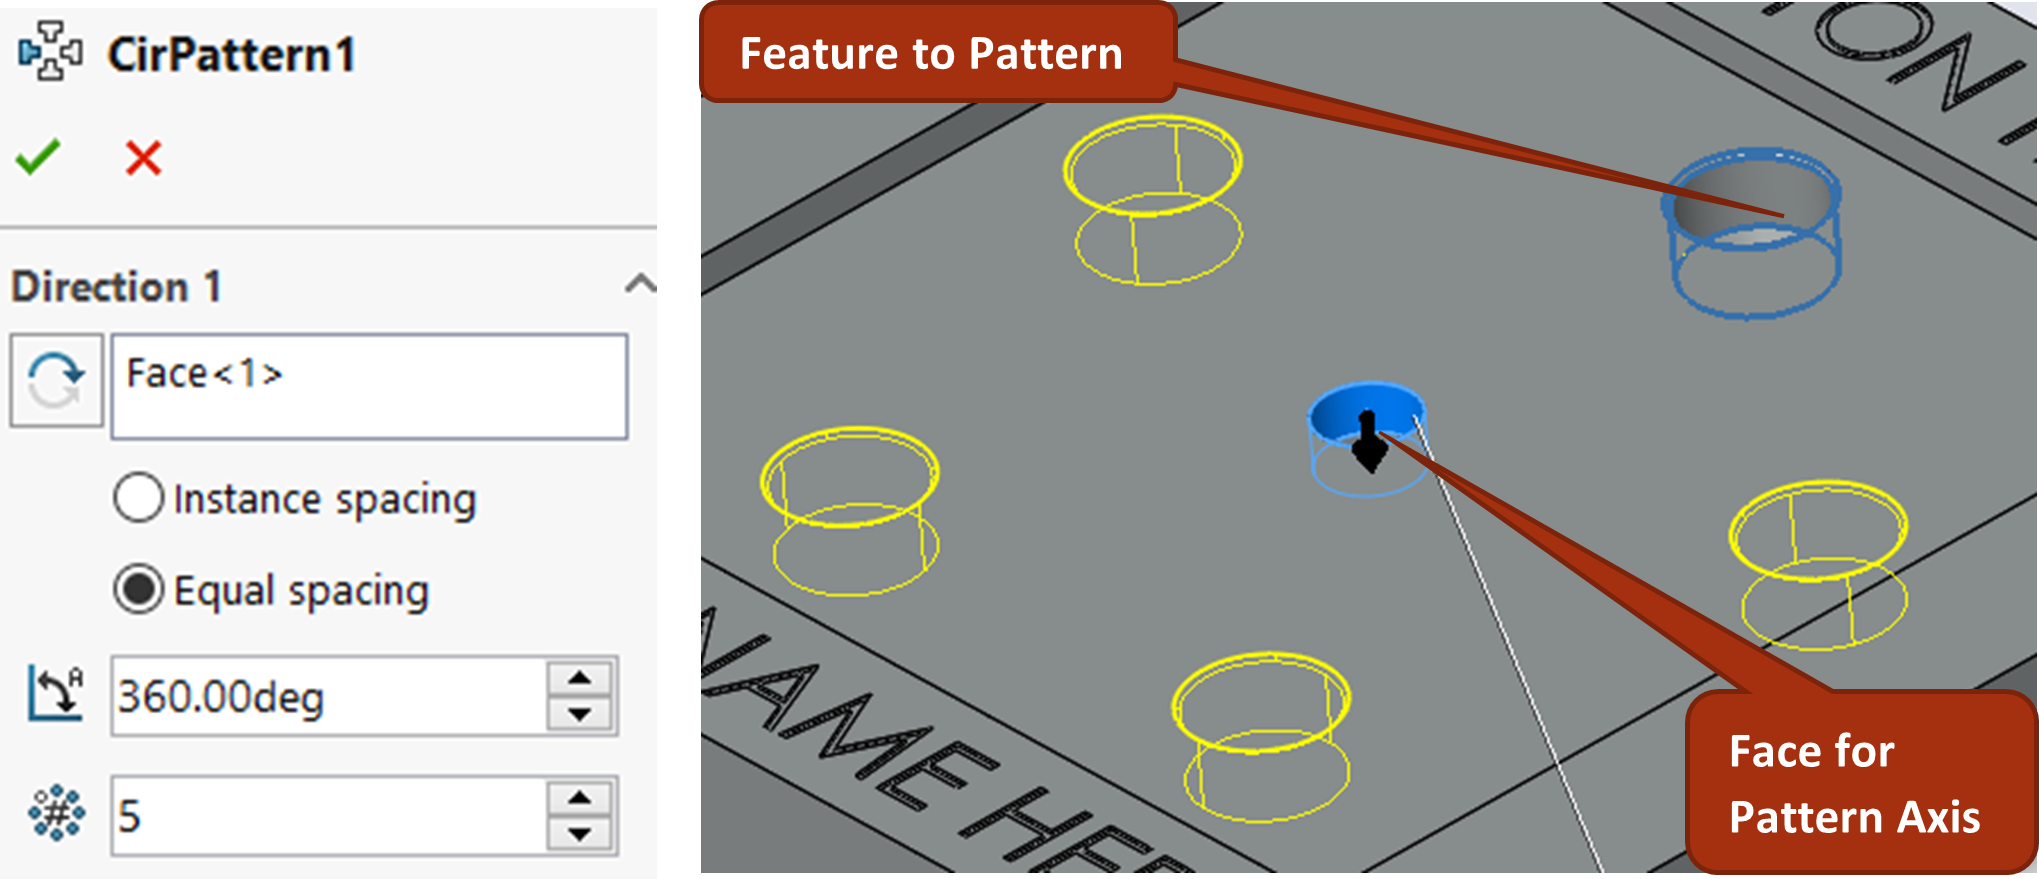
Activate the Circular Pattern command from the Linear Pattern drop down. Select the 3/8 hole for features to pattern. Then, click into the top selection box of the property manager for specifying the axis of the pattern; select the center counterbore hole from the graphics area. Be sure to specify five for the number of instances and to check the equal spacing check box.
Square Pocket Linear Pattern
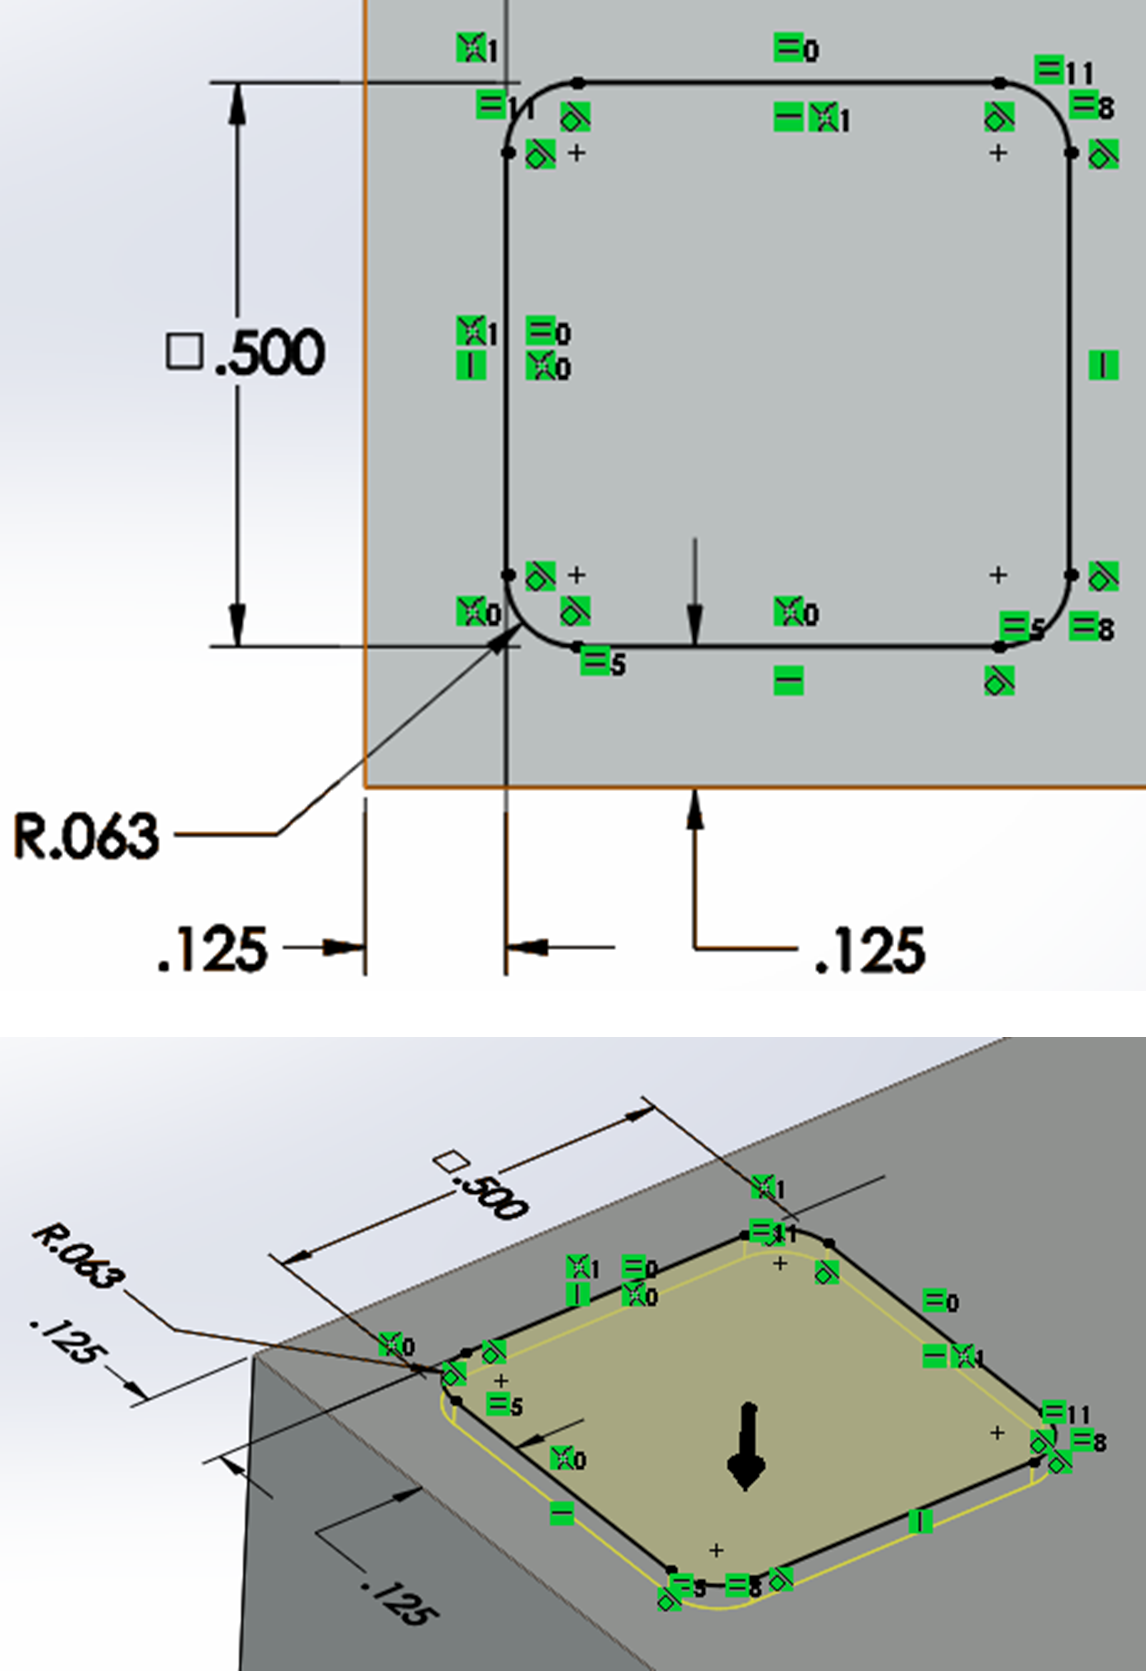
For creating the linear pattern feature on the bottom side of the part, flip the part over to the bottom, start a new sketch and draw a .500-inch square that is .125 inches from the bottom and left edge. You will need to add Smart dimensions and potentially relations. Also, fillet the four corners of the rectangle to have a radius of .0625 inches. Cut extrude the sketch .030 inches into the bottom of the base.
Activate the linear pattern feature from the CommandManager on the Features tab. Click the horizontal bottom edge to specify direction 1 and then click the vertical left edge to specify direction 2; then click inside the square cutout to specify the square cutout to be patterned.
Under the direction 1 and direction 2 settings in the property manager, choose the “Up to Reference” option, specify the opposing edges (right side edge for direction one and top edge for direction 2) in the selection box with green next to it. Specify the offset distance for both as .125”. Choose “Selected Reference” and choose the right and top face of the square pocket, switch the pattern option to “Set Number of Instances” and specify 5 for the number to pattern for both direction 1 and 2.
Also in the property manager near the bottom, click inside the “Instances to Skip” box (you may have to expand it first) then click the very middle instance’s pink dot to remove it from the pattern.
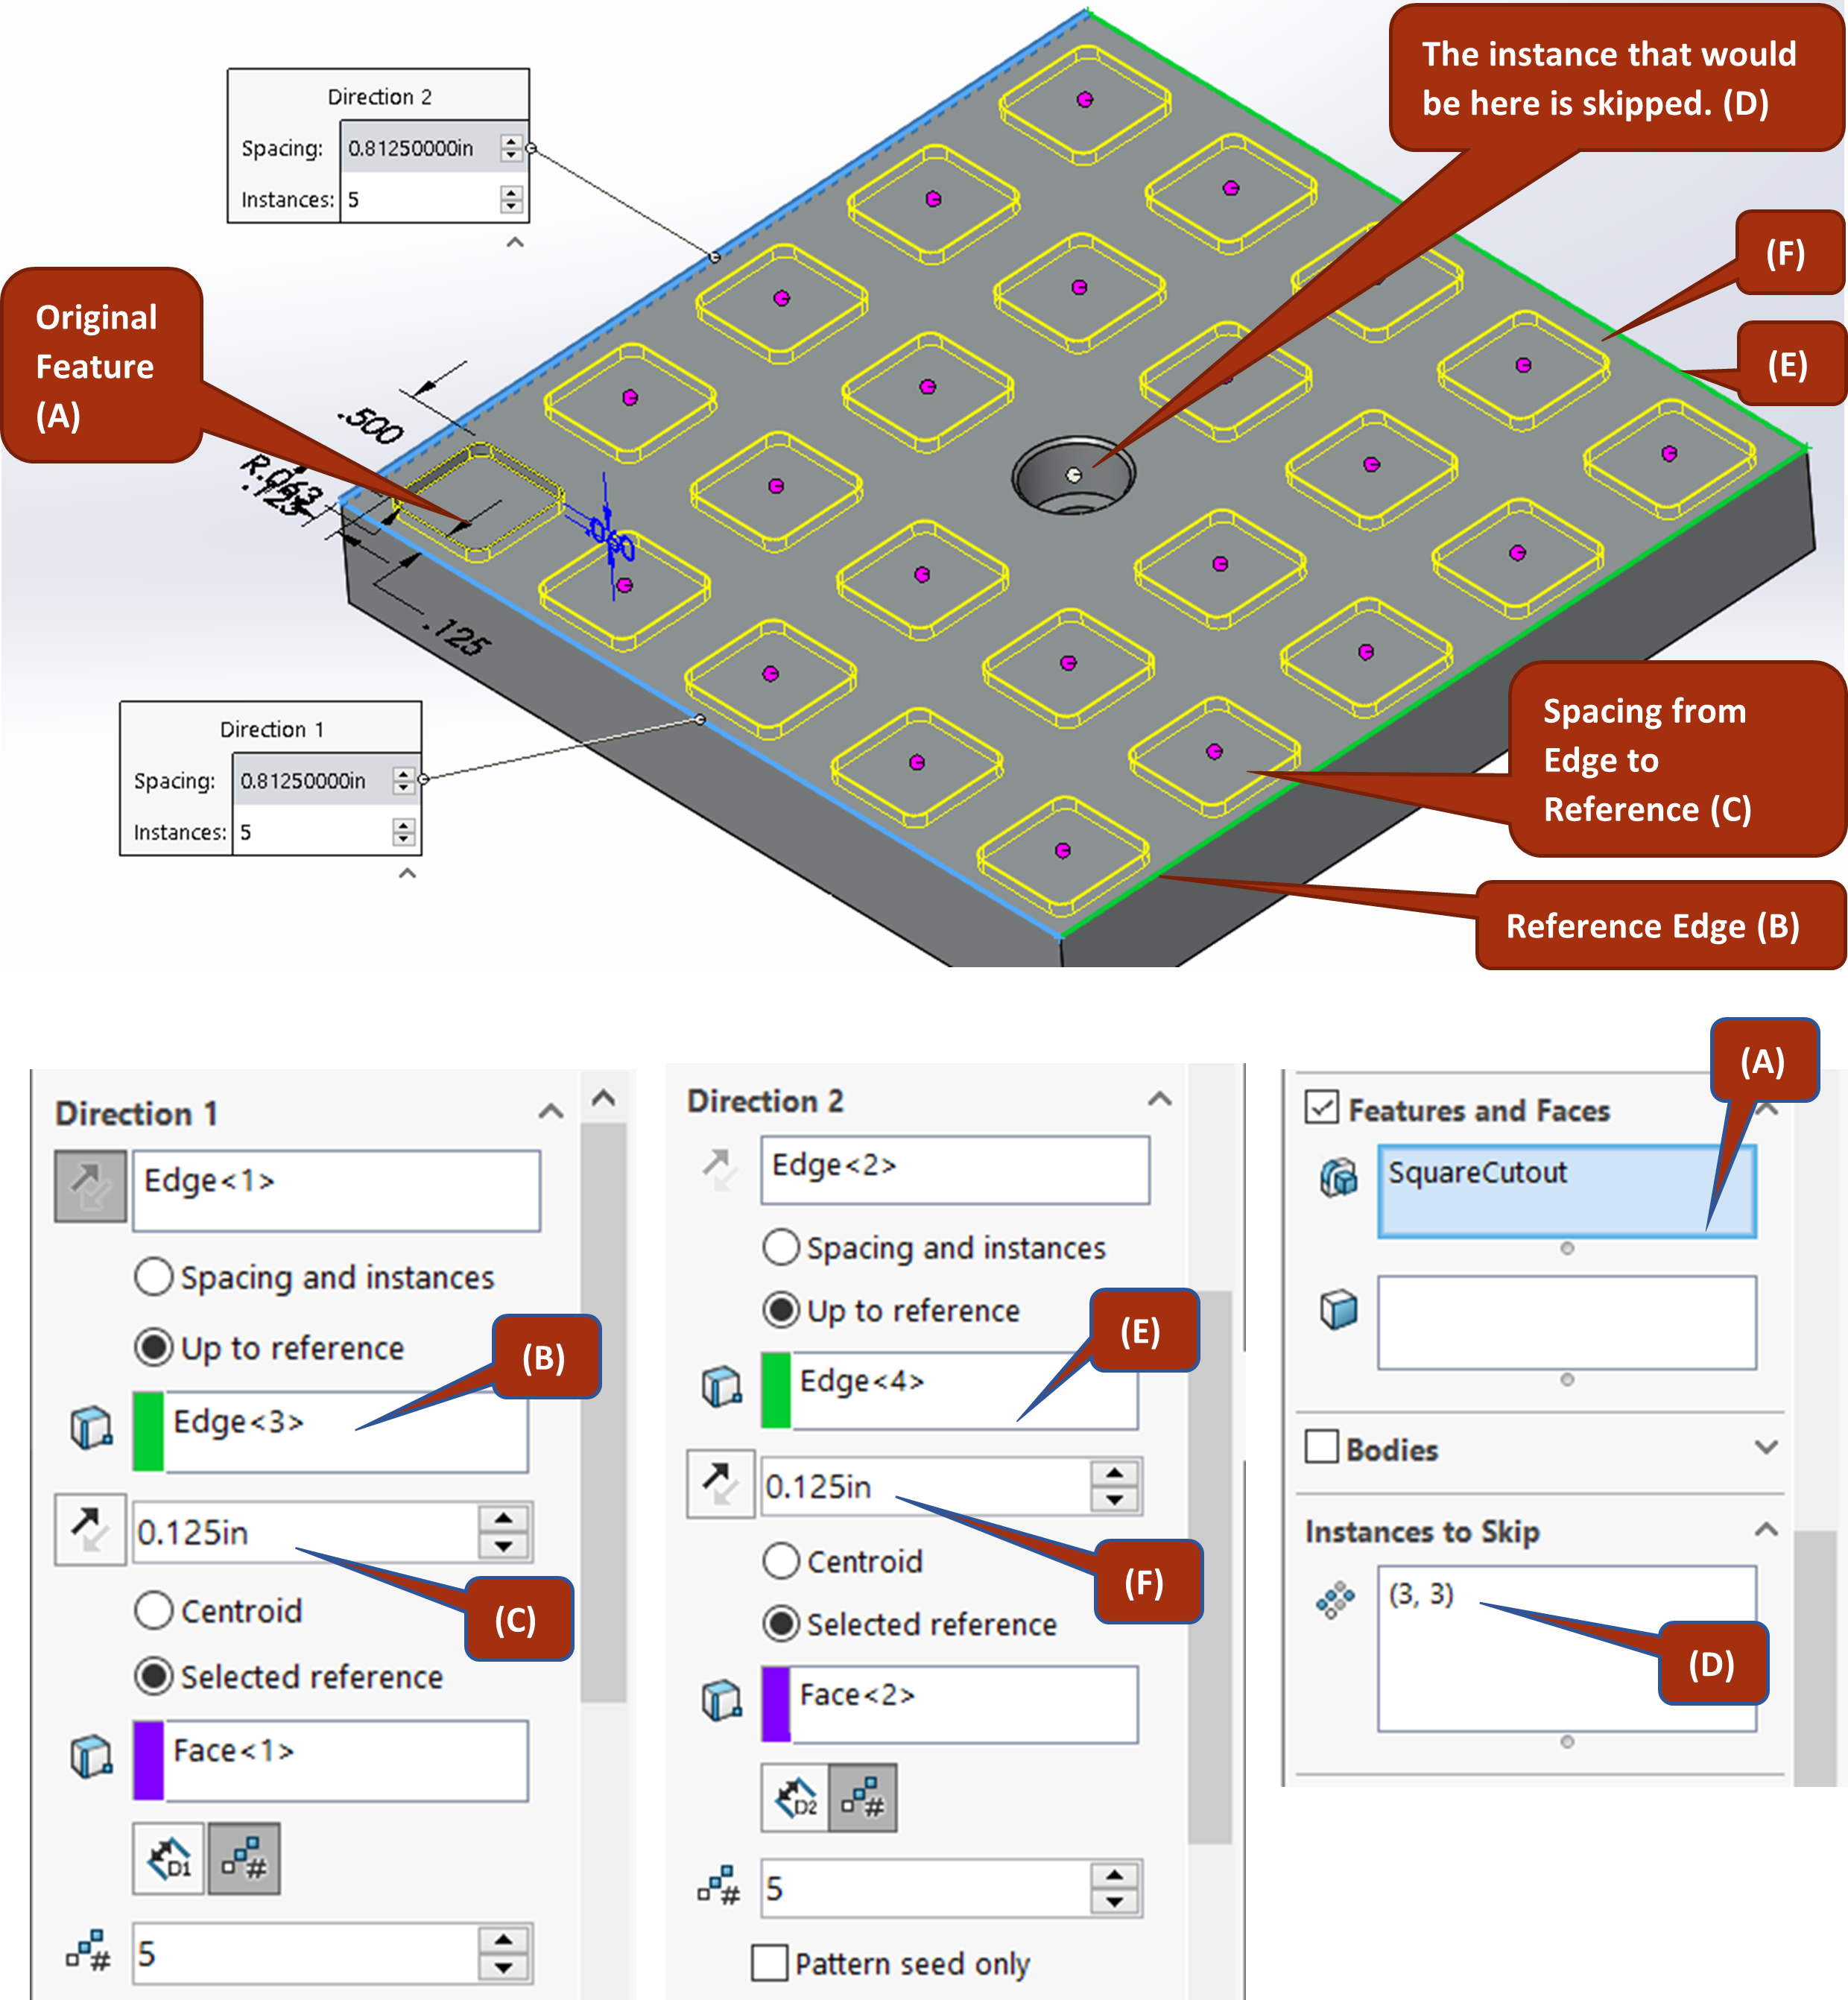
Before confirming the pattern, experiment with the “Pattern Seed Only” option which is right underneath Direction 2 settings to see the effect. We will leave it checked off for our tutorial, but it helps to know what that button does to the pattern.
Fillets and Chamfers
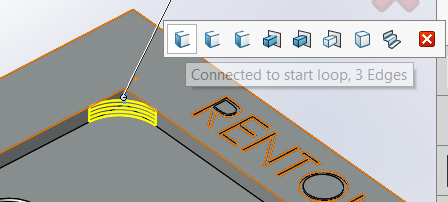
Next, Activate the fillet command from the CommandManager, set the fillet radius to ¼ inch, and select one of the inside corners of the top rectangular cutout. When the context toolbar appears, choose the first leftmost option to automatically select the other three corners at once. Confirm the command.
Activate the Chamfer command from the CommandManager, set the size to .030 inches and 45 degrees, and select the top edge of the rectangular cutout. Confirm the command.
Right Click on “Material <Not Specified>” in the FeatureManager Design Tree, select “Plain Carbon Steel” for the material, check your mass via “Mass Properties (should be 1.895 pounds), then save your part!
CAE1001 Video Tutorial
If you are struggling to follow along with the written instructions, feel free to follow along with the video tutorial as well to make sure you are getting everything.
