Chapter E2 – Installs Exterior Doors
Key Competencies (NOA)
- Select and use tools and equipment such as levels, chisels, hole saws, screwdrivers, cordless drills, drill bits and routers with templates
- Select door type and size, and determine swing according to door schedule and project drawings
- Mark door slab and jamb for hinge location
- Mortise hinge gains on slab and jambs
- Secure door to jamb using fasteners such as screws and hinges
- Install weather protection devices such as weather stripping and door sweeps
- Install door accessories such as astragals, kick plates and stops
- Verify proper operation such as latching, spacing and alignment (NOA, p. 56)
Exterior Doors are constructed from:
- Wood
- Fibreglass
- Steel
- Vinyl
- Aluminum
Other types of exterior doors include:
- Sliding Patio Door – two more glass units within a frame that slide past each other
- Hinged Patio Door – two door units within a frame. If both doors can swing open it is a French door. If only one door opens it is a garden door.
- Storm Door – an outer door which protects the main door which can provide ventilation
Door swing is determined by which side the hinges are located facing the door from the outside and the direction the door opens.

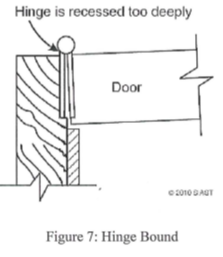
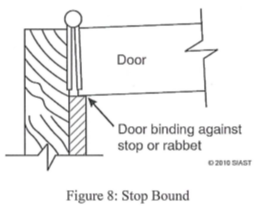
Doors can be hinge bound either through improper installation or building movement requiring the hinges to be shimmed. A door that is stop bound can be repaired by moving the door stop.


Cylindrical locksets act as both a doorknob and door lock. For easier accessibility lever handles are used in place of knobs. The striker plate will keep the door closed when latched. If the striker is installed too far out the door will rattle. If the plate is installed too far inward the door will not latch properly. Exterior doors may be ordered with the frame built, pre-hung and ready to install. Exterior doors must come often come with a door viewer, windows, or sidelites to provide a view to the outside.

Source: https://www.homedepot.ca/en/home/categories/windows-and-doors/exterior-doors/front-doors.html
For more information please review:
- Carpentry, Chapter 61, “Exterior Door Installation”
- Carpentry, section “Setting Door Frames in Masonry Walls,” from the chapter “Door Frame Installation.”
- From the textbook, Keeping the Heat In, Chapter “Materials,” study the section “Weather-stripping”
- From the textbook, Keeping the Heat In, “Upgrading Windows and Doors,” study Part 2
Review Brightspace Instruction Sheets:
EXFN 201/221 Windows and Exterior Doors
- IS 1.2 Exterior Doors, p. 34-38
- IS 1.3 Install an Exterior Door, p. 38 – 40
DOOR 300 – Doors and Hardware
- IS 2.2 Weather stripping, p. 145-159
 Review Questions
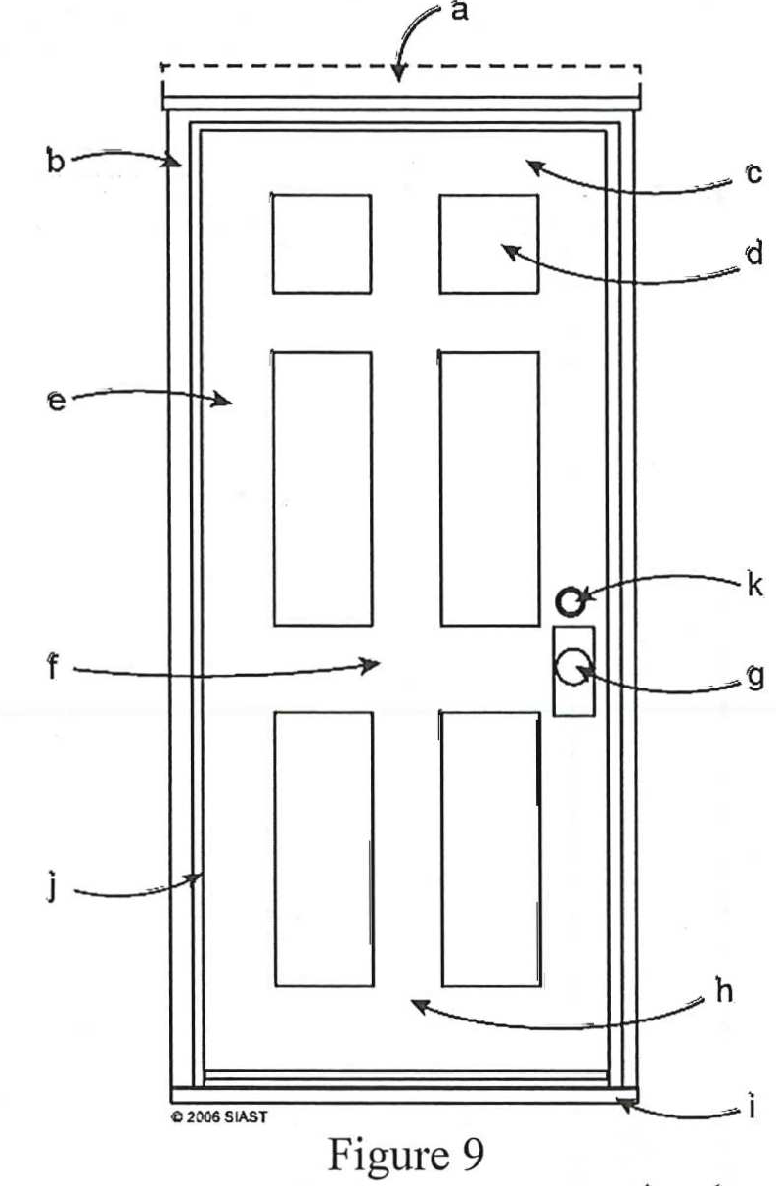
- Name the parts of the given door unit:
- The style of jamb used with exterior doors is a _____.
- The exterior brickmould or casing is applied to the door jamb with a reveal or setback of _____”.
- How much larger than the door unit should the height and width of the rough opening be?
- What should be done with the house wrap or building paper at the rough opening before the door unit is installed?
- When you set the door into a rough opening, what should be the first place you check for level or plumb?
- What should be placed under the sill to prevent water and air infiltration into the building?
- If the exterior door swings outward, what type of hinges must be used?
- What must be provided between the door jambs and the trimmer studs at the lock height?
- After centering the door unit in the rough opening and levelling the sill, what is the next step in installing the unit?
- How is insulation installed between the framing and the jambs?
Answers:
-
- Flashing
- Brickmould
- Top rail of door
- Door panel
- Door stile
- Lock rail
- Lockset
- Bottom rail
- Sill
- Door jamb
- Deadbolt
- Rabbeted jamb
- ½”
- ½” higher and 1” wider
- Wrapped into the rough opening and stapled to the trimmer studs and lintel.
- The sill should be level first.
- Two beads of caulking from trimmer to trimmer.
- Hinges must be designed so the pins cannot be removed when the door is closed (9.7.5.2-9)
- Solid blocking on both sides. (9.7.5.2-9)
- Plumb and fasten the hinge side with corrosion-resistant nails or screws; use shims to hold the jamb straight and plumb.
- Thin strips of fiberglass insulation is loosely packed in the space the full depth of the jamb. The vapor barrier should be sealed to the jamb. Foam backer rod and caulking may be used to provide a vapor barrier.
