Topic 2 – Layout Exterior Wall Plates
Rough Openings
Rough openings are often supplied by the manufacturer, however there are circumstances where the rough opening may need to be calculated by carpenters. Two measurements are given for rough openings, with the width always being written first. For example, an opening 1.2 m x 1.8 m is 1.2 meters wide and 1.8 meters high. When finding an R.O., always find the width first as it effects the lintel required, its bearing, and subsequently the lengths of the trimmers and cripples. It is also the measurement required when doing the wall layout.
Generally, the rough opening will always allow ½” of room on all sides around a fixture. This includes exterior doors and windows. This means 1” is added to the width, with 1” added to the height of windows and ½” added to the height of doors. The exception to this rule is vinyl windows which are recommended to have 3/8” of room on all sides (3/4” added to each dimension).
Rough Openings for Exterior Doors
Doors, both exterior and interior, are sized according to the door slab. A typical exterior door measures 32” x 80”. These measurements do not include the jambs on sides and top, the threshold at the bottom, or the ½” clearance for installation. To calculate the rough opening for exterior doors, these must be added.
To calculate the width of an R.O. for an exterior door, we will need to know (see figure 11 below):
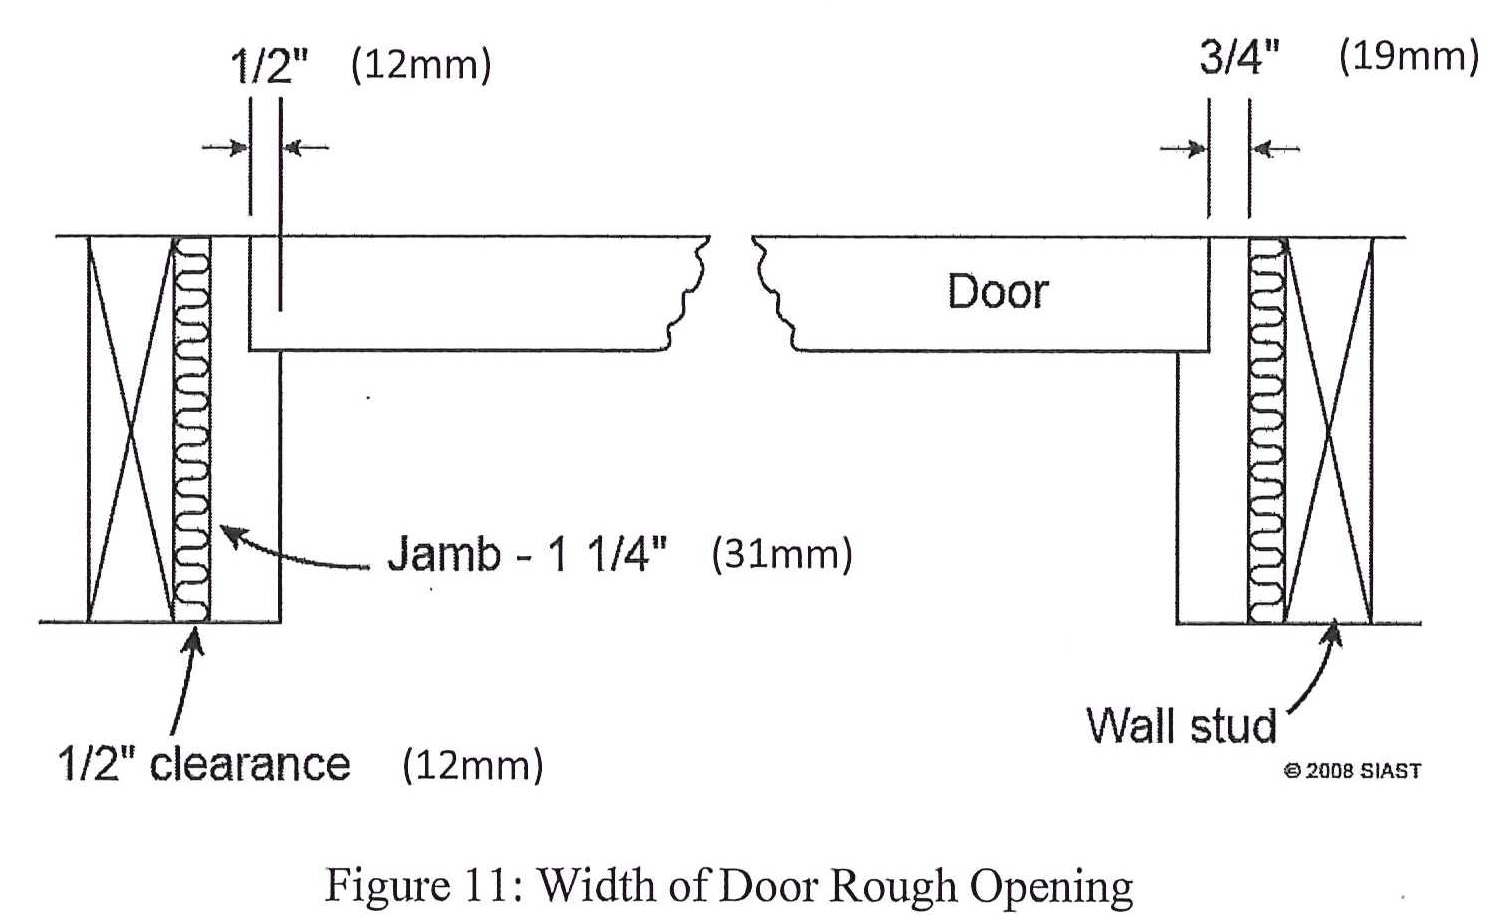
In the example above, we have 1 ¼” jambs with ½” rabbets. The jambs that remain beside the door are equal to ¾” (1 ¼” – ½”). Here, the rough opening would be equal to the door width plus 2 x ¾” plus 1” for clearance:
Example: Calculate the R.O. width for a 2’-4” door with 1 ¼” jambs with ½” rabbets.
*** Try to calculate the R.O. width of a 760 mm x 2082 mm exterior door with 19 mm jambs
Three pieces of information are required to calculate the rough opening height for exterior doors:
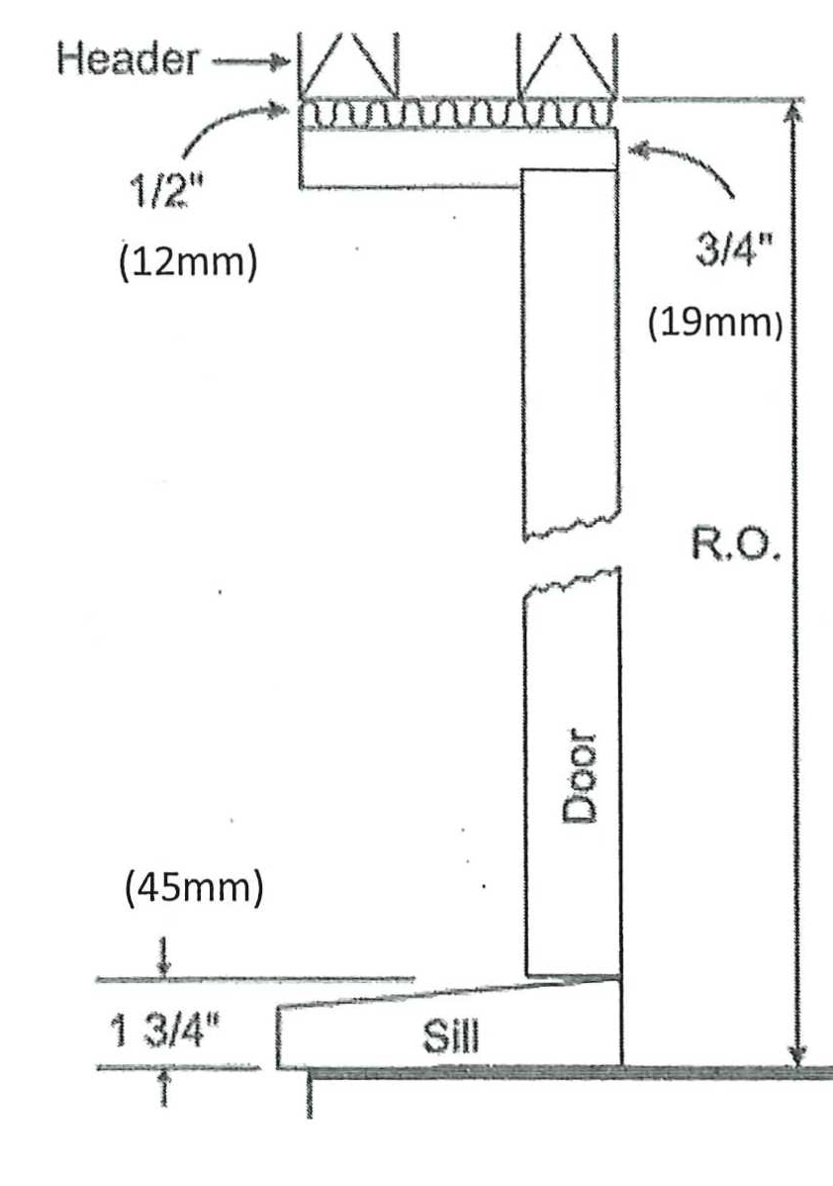
The formula for calculating R.O. height would be as follows:
Example: Calculate the R.O. height for a 2’-4” x 6’-8” exterior door with ¾” jambs and 1 ½” sill:
- R.O. height = 1 ½” + 80” + ¾” + ½” = 82 ¾”
***Try calculating the R.O. (width x height) for the following (both doors have ¾” (19 mm) jambs and 1 ¾” (45 mm) sills):
- Door size = 2’-8” x 6’-8”
- Door size = 910 x 2130
Windows are much more straightforward. As with doors, the rough opening required is often given by the supplier. If it is not, simply add clearance according to window construction:
***Try calculating the R.O for the following windows:
- 32” x 46” wooden window
- 986 mm x 1200 mm PVC window
- 4’-8” x 2’-6” wooden window
Laying Out Exterior Wall Plates
Laying out exterior wall plates should be done in the following steps:
- Cut plates to length
- Deduct sheathing thickness at each end
- Butt joints on plate should be on a stud center
- The tape is cut a wall thickness on intersecting walls
- Mark partition centers
- Indicated to centerlines, mark edges of partition
- Some partition centers may not be indicated. A bathroom required 5’-0 ¼” for the bathtub.
- Mark window and door rough openings
- Indicated to centers from plans
- Mark R.O dimensions on plate
- Measure ½ of R.O. width each way to mark the trimmers (marked with a “T”), measure 1 ½” over to mark adjacent studs (marked with an “X”)
- Be sure to double check if two trimmers are required (opening greater than 3 m)
- Mark stud centers
- First stud flush, L block on intersecting wall
- Mark cripples between openings
- Double check for 16” or 24” centers
- Mark blocking where required at intersecting partitions or add a stud at edge of partition
Calculating Building Perimeter
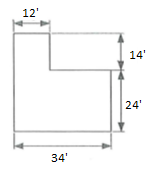
When calculating the lumber required to frame a wall, the first measurement required is the perimeter of a building. Both plate and stud quantities are directly calculated from this measurement. The primary consideration when finding perimeter is a buildings shape. Below are a few examples of different buildings. Your instructor will discuss how to find the perimeter:

Figure 4: From left to right T-shaped, L-shaped, U-shaped, and Square/Rectangular Buildings
***Example: calculate the perimeter of the following building:
Calculating Stud and Plate Quantities
Using the perimeter, we can calculate the lineal feet of plate material required. To the result, we add 5% for waste:
***Using the example building above (with double top plate):
LF of plate material = (144’ x 3) + 5% = 432’ + 5% = 453.6’ or 454’ of material
We also use perimeter to directly calculate the quantity of studs required. The first step is to simply divide the perimeter by the stud spacings. Note that because the perimeter is in feet and the spaces are in inches, the perimeter must be changed to inches first.
For example, a square building with a 144’ perimeter and 16” stud spaces:
This number only give us the number of spaces, however, and we must add studs to start, and for corners, openings, and partitions:
For example, let’s say the square building with 144’ perimeter has 2 doors and 5 windows, two intersecting partitions, and 3-stud corners:
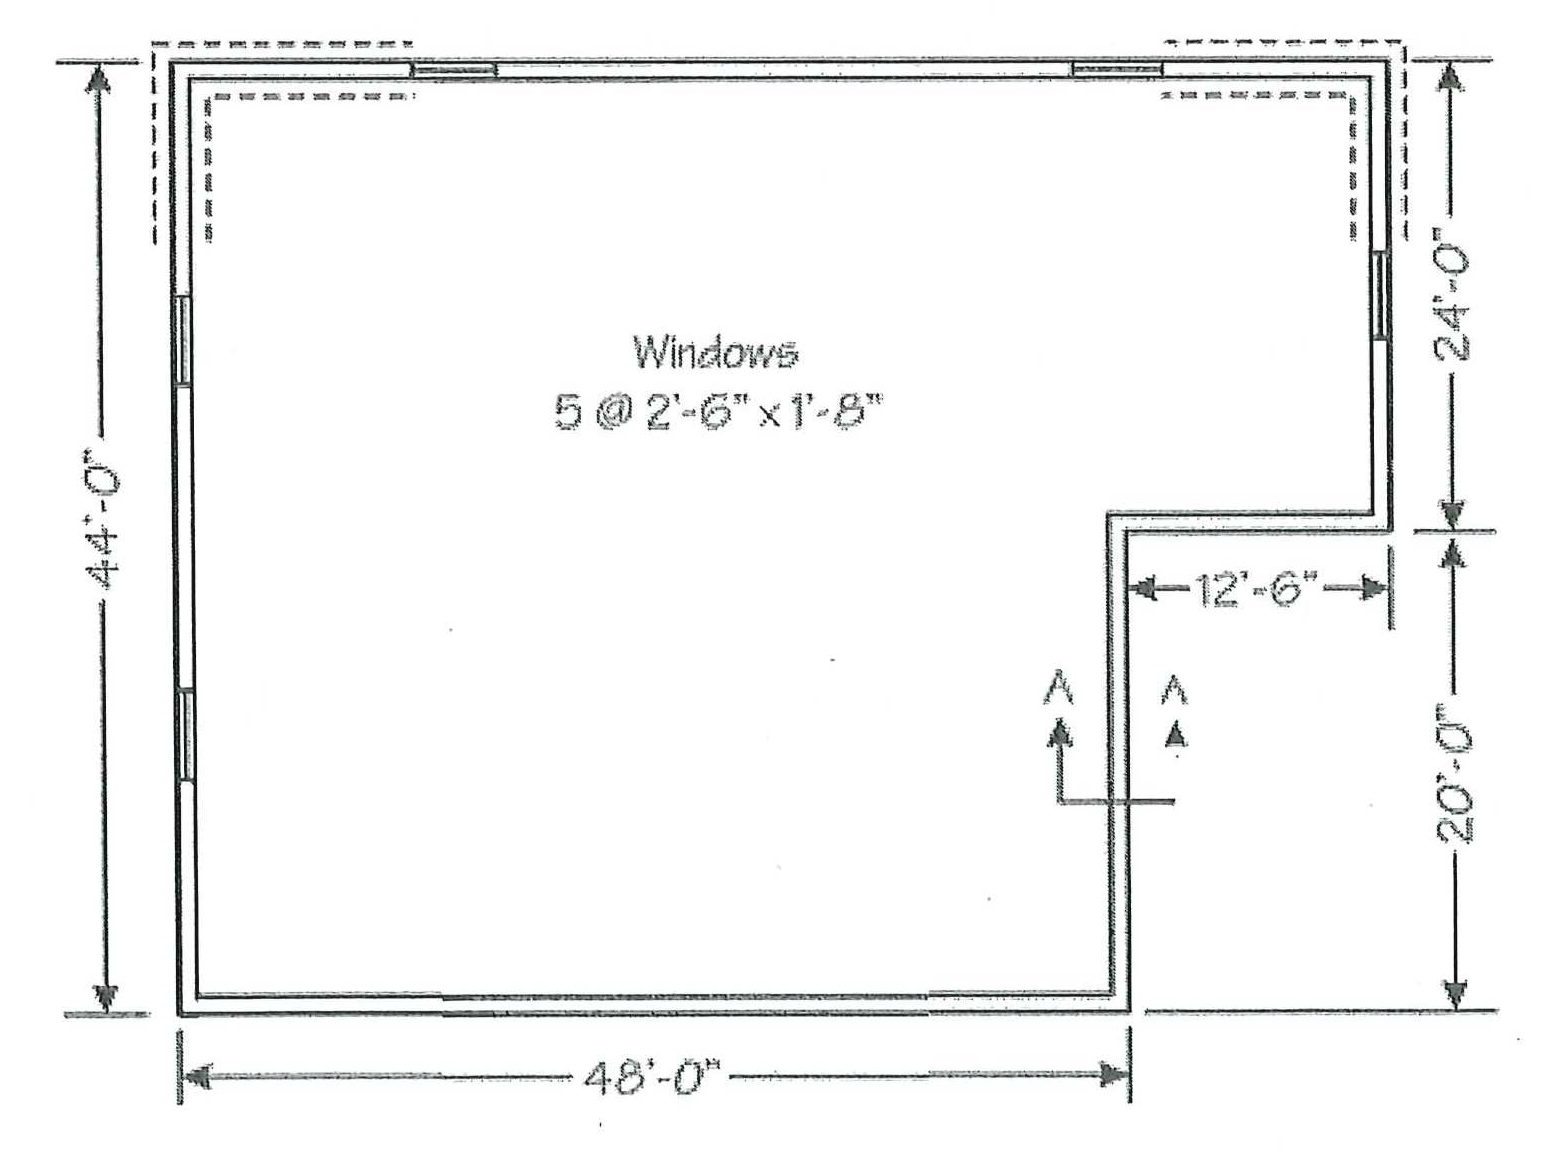
***Use the following example to calculate plate and stud quantities:
- 3-stud corners
- 24” O.C. studs
Framing Exterior Walls
After the wall plates are laid out, the wall can be assembled. The order of assembly is as follows:
- Nail the trimmers to studs and the king stud to the header
- Nail unit to top and bottom plate
- Install the sill and cripples
- Joints must be staggered with top plate
- Extend past or cut short a wall thickness at exterior corners
- Watch for intersecting partitions (omit double top plate)
After the wall is assembled, it can be sheathed or braced, which must follow a specific procedure:
- Match diagonal measurements from bottom to top corners
Review Questions
- When laying out studs on an exterior wall, the layout should be:
-
- Started over at each opening
- Continued from one end of the wall to the other
- Centered on the wall
- Marked on one plate at a time
- List at least two reasons why openings should be laid out before laying out regular studs.
- What is the maximum spacing of 2×4 studs in a one-storey building for exterior walls? In a two-storey building?
- Determine the rough opening for a 2’-8” x 6’-8” exterior door using 1 ¼” jamb material with ½” rabbet and 1 ¾” sill.
- Determine the rough opening for an 813 mm x 2032 mm exterior door with 19 mm jambs and 38 mm sill.
- Why is it good practice for studs to line up on top of the floor joists?
- List the steps, in order, for cutting and laying out wall plates for a house.
- Calculate the perimeter, plates, and studs for the following structure:
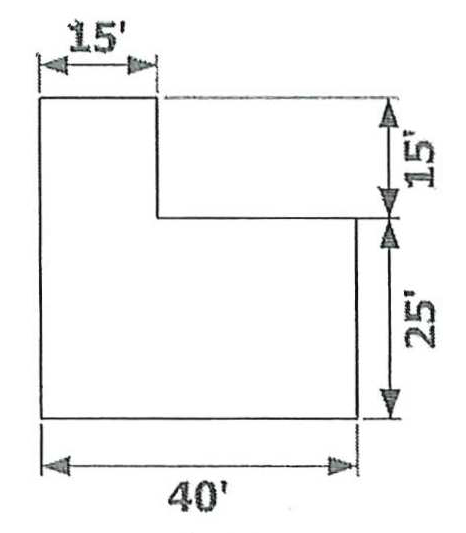 L-shaped building
- 1 sole plate and 2 top plates
- 3 walk-in doors and 2 garden doors
- 12 windows
- Studs @ 24” o.c.
- “L” corners
- Calculate the perimeter and stud and plate quantities for a rectangular building 21.5 m x 18 m:
- Single top plate
- 2-stud corners
- 2 doors and 9 windows
- 5 intersecting partitions
- Studs 400 mm O.C.
- After the wall is assembled, the next step is that the wall be _____.
- Erected
- Straightened and squared
- Sheathed
- Nailed to the floor
- What is done if the studs are a different width than the top or bottom plate?
- The bottom plate in exterior walls shall not project more than _____ the plate width over the support (floor or joist). Why would the wall hang over?
- Joints in top plates must be staggered at least?
Answers:
- B
- Studs may interfere with openings, studs may cause confusion, and it is easiest to do the complex operation first.
- 600 mm for one storey, 400 mm for two-storey (9.23.10.1)
- 2’-10 ½” x 6’-11”
- 875 mm x 2101 mm
- To allow clear passage for ducts, wires, etc.
-
- Measure and cut plates to length
- Mark out partition centers (and edges)
- Mark opening centers (mark R.O. widths and trimmers, studs)
- Mark regular studs
- Indicate where blocking or an L is required
-
- Perimeter = 160’
- Plates Required = 504’
- Studs Required = 127
-
- Perimeter = 79 m
- Plates Required = 166 meters
- Studs Required = 235
- B
- Nail it flush with the bottom (inside) of the plates.
- 1/3 (9.23.11.2-2) – To allow rigid insulation to be installed over floor joist header.
- One stud spacing (9.23.11.4-1)
