42 Ergonomics
Learning Objectives
Dramatize safe ergonomic practices
Key Takeaways
Ergonomics is a science that matches work to the worker. Poor ergonomic conditions at work, home, school, or play can negatively affect our health. Ergonomics literally means “laws of work.” The word ergonomics is made up of two Greek words: “Ergos” meaning “work” and “Nomos” meaning “laws.” These “laws” of work are simple:
- Your physical capabilities must match the demands of the task you are doing. When this matching is in balance, it helps us stay healthy.
- Poor ergonomic conditions at work, home, school, or play can negatively affect our health.
Human Capabilities
When determining the physical capabilities of a person, several factors must be taken into account. These include:
- Physical fitness,
- Age,
- Size (height, weight, body dimensions),
- Psychosocial (Level of fatigue, mood, and stress), and
- Gender
[h5p id=”1″]
Job Demands
Job demands are determined by examining five major characteristics of a job. These are:
- Force – The amount of physical effort exerted (lifting, pushing, pulling, etc.).
- Posture – the position of the body. Good posture places the body’s structures (bones, ligaments, muscles) in positions to handle the most stress, and to ensure that tasks that require more force are completed by largest muscle groups
- Repetition – Refers to the number of times a particular task must be completed
- Environmental Conditions – such as being exposed to vibration, heat, or cold.
- Time – which could refer to how long it takes a person to perform 1 task once, or it could refer to how long the worker’s day is.
As a worker becomes exposed to more of these factors while completing a given task, their likelihood of exceeding their physical capabilities exponentially increase.
[h5p id=”2″]
Balance
Once human capabilities and job demands are analyzed, these factors need to be weighed against each other to determine the most appropriate solution for the individual. Our bodies experience strain when the demands of our work exceed our capabilities. Prolonged strain results in pain and injury which may cause impairment and disability. Other aspects of matching worker capabilities to job demands include cognitive, perceptual, and motor skill capabilities.
Injury is the result of imbalance between job demands and human capabilities. Injuries tend to progress in stages:
- The first indication of stress on the body is local muscle fatigue and soreness.
- As we continue doing the same tasks, the pain progresses into aching, tiredness, loss of sleep, and difficulty in moving the body parts affected.
- As the pain becomes an injury, we may not be able to do the work we normally do.
When you experience aches and pains from performing tasks, you should seek medical attention.
[h5p id=”3″]
Stress
Sometimes stress can be a contributor to worsening the pain we can feel from poor ergonomic conditions. When our bodies are under stress, situations that would not normally cause muscle pain may cause injuries. Stress can come from school, personal or job pressures. These could be related to:
- threat of violence
- peer pressure
- fear
- pressure to do well at school
- lack of job opportunities
- parental conflicts
- lack of exercise
- changing world
When you are under stress everything seems to go wrong. That is true with ergonomics as well. Stress causes you to lose focus or concentration on your work, resulting in the use of poor postures and work techniques.
Prevention
Some of the most common types of injuries that happen in the workplace are called RMIs or repetitive motion injuries. The best way to prevent an RMI is to avoid situations or activities that cause RMI’s. Common situations that cause RMI’s include:
- Working in awkward postures for long periods of time can lead to RMIs. Try to use a workstation that is the right height for you.
- Working in the same posture (static postures), awkward or not, for long time can also lead to RMIs. Try to stretch or go for a walk (such as the kitchen for a drink).
- Doing highly repetitious movements is an obvious cause of RMIs. Try to vary the types of movements you do and make sure that you use a variety of muscle groups. (For example: typing then playing the piano would not be a good break!)
- Applying excessive force repetitively and for long periods of time can cause injury. Try to use only the amount of force necessary.
- Pace your work. Working at a fast pace for a short amount of time may be worse than a slower pace for a longer period of time.
- Long working hours without taking time to recuperate (rest breaks) can also lead to injury. Make sure your body has time to recuperate.
| Exercise helps prevent RMIs from developing or worsening. | Repetitive Motion Injuries (RMI) are painful injuries of the muscles and joints. These are also known as work-related musculoskeletal disorders (WRMDS) and repetitive strain injuries (RSI). |
The Causes of RMI
-
Job Demands
Posture: Awkward postures or prolonged standing or sitting in a fixed position.
Force: Use of excessive force which overloads muscles and tendons, such as pushing, pulling or lifting heavy objects.
Repetition: Use of the same muscles and joints over and over again while doing a repetitive task, such as operating computer keyboard, or data entry work.
-
Workplace Components
Manual Materials Handling: lifting, loading, carrying
Workstation Design: bending, overreaching
Equipment and Tools: vibration, grip force
Environment: heat, noise, lighting
Work Organization: too much to do, too many types of jobs to do, poor equipment design.
Symptoms
Symptoms of Repetitive Motion Injuries (RMI) are pain, numbness or tingling in the wrist, hand, shoulder or neck; and clumsiness or loss of grip in fingers.
The onset of RMI is usually gradual and progressive.
| Causes | Symptoms |
|---|---|
| Repetitive manual tasks | Pain in the hands and wrists |
| Awkward postures | Pain in the neck, back and legs |
| Improper lifting and transferring of loads | Back pain, back injury |
| Carrying heavy loads, frequently reaching above shoulder level | Pain, weakness and numbness in the shoulders, arms and fingers |
| Inadequate lighting | Eye strain, headache, pain in the back and neck due to awkward position while performing visual tasks |
[h5p id=”4″]
Suggested Work Practices to Prevent RMI
-
Posture
- Work should be organized in such a way that your body is in an unstrained, comfortable position with your arms and forearms relaxed.
- Shape tools to maintain a comfortable straight wrist position and a comfortable grip.
Cutting one wall of the box eliminates bending of the wrist
-
Repetitive Work
- Position hands and wrists comfortably.
- Use two hands instead of one.
- Reduce repetition as much as possible by pacing your work at a comfortable rate, and by varying tasks.
- Use ergonomically designed tools.
- Maintain tools in good working condition to avoid the need for excessive force.
- Wear gloves and use tool handles with good grip.
- Hand, wrist and upper body exercises can help prevent problems. Ask your doctor or therapist.
- Perform different tasks during the day to avoid undue stress and repetition of any one kind.
-
Reaching
Proper Bending - Don’t overstretch yourself. Reach only as high as is comfortable.
- Use a stool or ladder to reach high objects.
- When reaching down, support your body with one arm.
-
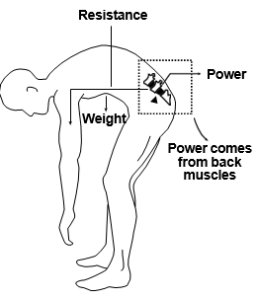
Bending
- To bend safely, kneel down on one knee.
- Bend your hips and knees, not your back.
- When reaching forward, move your whole body, not just your arms.
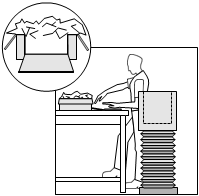
Standing
Work Surfaces:
- The desirable working height for standing is 5 to 10 cm below elbow level; between 95 and 100 cm for most men and 88 to 93 cm for most women.
- Tools and materials should ideally be located about 10 to 15 cm below elbow height.
- For heavy work the working surface needs to be lower – about 15 to 40 cm below elbow height.
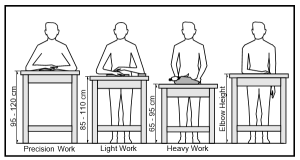
Table Heights for Standing
Computer Workstations
Workstations
Workstations should be adjustable to suit the individual who is using them. This means that every time you sit down at one, if it is not your own station, you must perform minor adjustments to make the workstation suit you. People should be able to work in neutral (no strain) posture by properly adjusting the height of their workstations and chairs.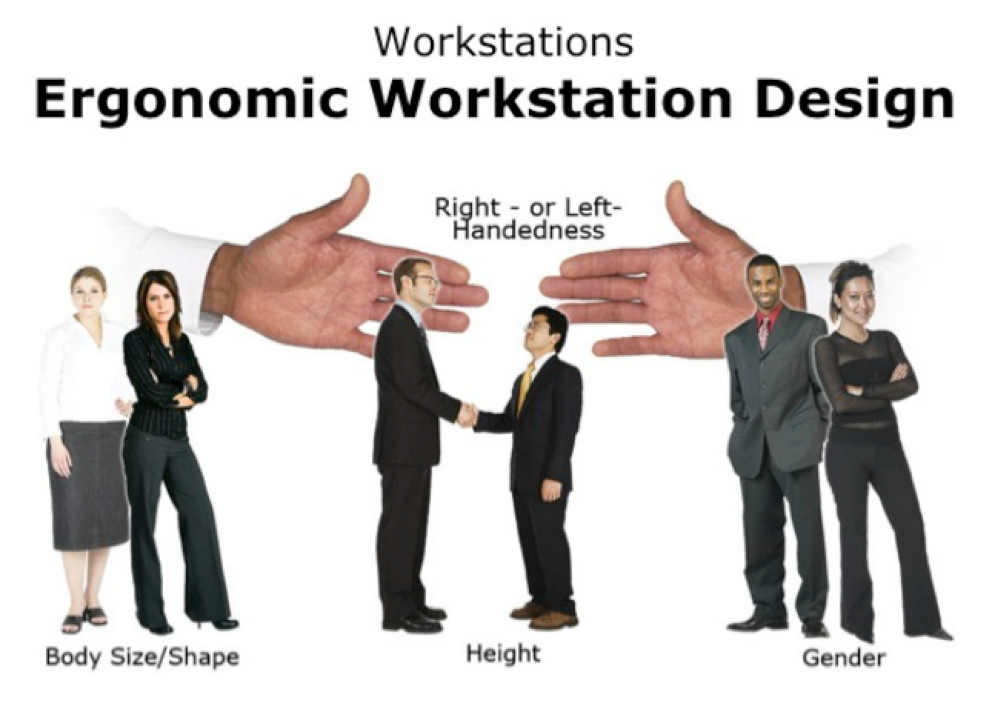
Factors to consider in workstation design and setup are:
- body size
- height
- gender
- left- or right-handedness
Computer Workstations
Most people work with a computer workstation either in the classroom, at work, or at home. Learning good habits and proper working conditions now are important to ensuring a healthy life.
The screen should be at a height that doesn’t require you to bend your neck and should be positioned to reduce glare. Your feet must rest on the floor or on a footrest. Many of the adjustments will depend on your own body type and size. Injuries can be the result of any one element of a workstation being out of position.
Important things to remember when sitting at a computer workstation include:
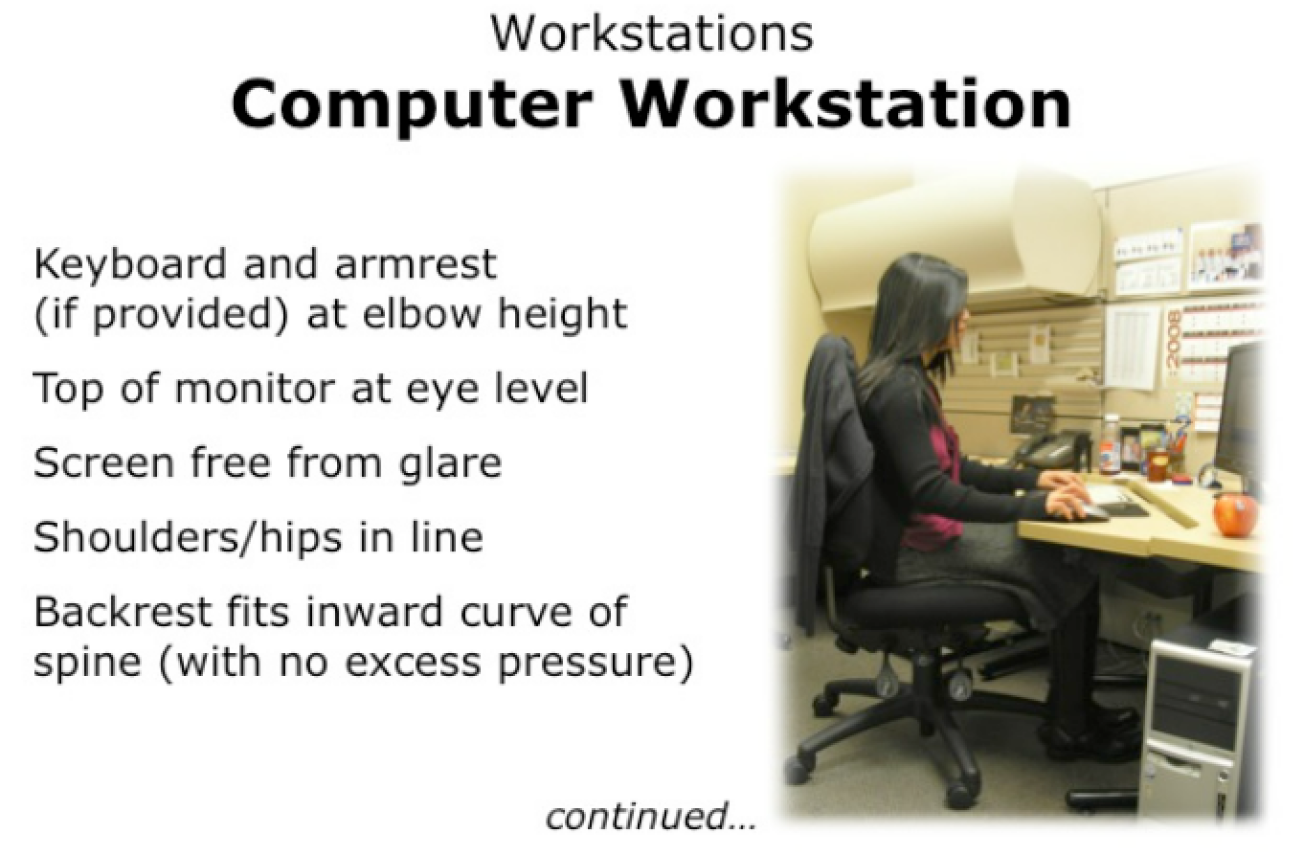
- Wrist is not bent (in neutral position)
- Keyboard directly in front of the user
- Keyboard is at elbow height
- Top of screen (monitor) is at eye level
- Viewing distance is 30-60 cm from the monitor
- Screen is free from glare
- Consider using a document holder (not shown) to bring the work to the same level as the monitor
- Mouse close to the keyboard and at the same level
- Shoulders and hips should be “in line”
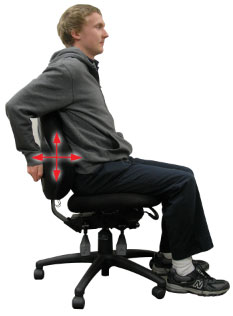
- Back rest fits the inward curve of the spine with no excessive pressure on the back (this is a pressure point)
- Armrest (if provided) at elbow height
- Seat pan height just below the knee cap with no pressure on the back of the knee or leg (this is a pressure point)
- Thighs should be horizontal to the floor
- Feet flat on the floor or the footrest
- Knees slightly lower than hips
Computer Workstation Layout
When sitting at a computer workstation it is important to lay out materials for easy and convenient reach: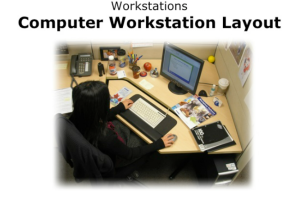
- ARRANGE that a space for your usual work is available directly in front of you.
- POSITION objects you need occasionally further away but still within arm’s reach.
- USE a swivel chair to reduce body twisting and to allow easy movements from side to side.
- THINK about how you arrange forks and knives on the table. Have you noticed that the utensils are arranged so that the ones you use the most are closest to you? Your work desk should be organized in a similar way.
- AVOID having too much clutter on your desk.
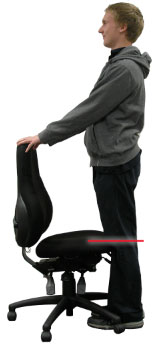
Chair Adjustment
- STAND in front of the chair.
- ADJUST the height so the highest point of the seat (when in the horizontal position) is just below the knee cap.
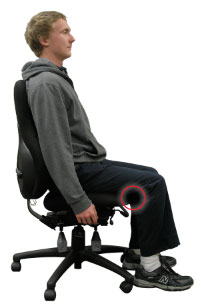
- SIT on the chair and keep your feet flat on the floor.
- CHECK that the clearance between the front edge of the seat and the lower part of the legs (your calves) fits a clenched fist (about 2 inches).
- ADJUST the back rest forwards and backwards as well as up and down so that it fits the hollow in your lower back.
- SIT upright with your arms hanging loosely by your sides.
- BEND your elbows at about a right angle (90 degrees) and adjust the armrest height until they barely touch the undersides of the elbows.
- REMOVE the armrests from the chair if this level cannot be achieved or if armrests, in their lowest adjustment, elevate your elbows even slightly.
- TILT the seat itself forwards or backwards if you prefer.
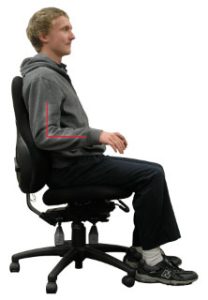
4. Sit upright with your arms hanging loosely by your sides. Bend your elbows at about a right angle (90 degrees) and adjust the armrest height until they barely touch the undersides of the elbows. Remove the armrests from the chair if this level cannot be achieved or it armrests, in their lowest adjustment, elevate your elbows even slightly. Tilt the seat itself forwards or backwards if you prefer.
[h5p id=”5″]
Standing Workstations
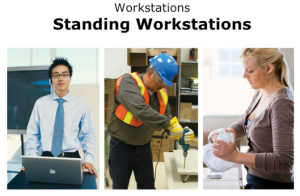
- 5-10 cm below elbow level for precision work such as reading, looking at a map, standing at a lecture podium, etc.
- 10-15 cm below elbow level for light work such as arranging light objects (crafts), or working at a kitchen counter.
- 15-40 cm below elbow level for work requiring downward force such as cutting, drilling in the
workshop, or cutting meat on a butcher block counter.
Tools
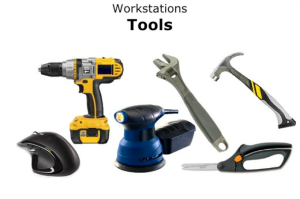
Ergonomically designed tools are designed to make our jobs easier. Tools often help the worker avoid excessive force or awkward postures. In this way, work is done efficiently and with less risk of injury. Hand tools should allow the operator to grasp, hold, and use the tool with the wrist held straight.
When selecting tools:
- SELECT tools that can be used without bending the wrist.
- SELECT the tool with the workplace layout and job design in mind.
Note: Sometimes a tool is correct for one operation and incorrect for another
Using the Telephone
- PLACE the telephone close to you on your right side if you are right-handed. It reduces repetitive reaching.
- TALKING on the phone while typing or writing notes forces you to cradle the receiver between your shoulder and chin. This results in tension in the shoulder and neck causing discomfort and risk of musculoskeletal injury.
- REPLACE the conventional telephone handset with a head set. In noisy areas consider the use of headsets that cover both ears, or that have a noise reduction feature.
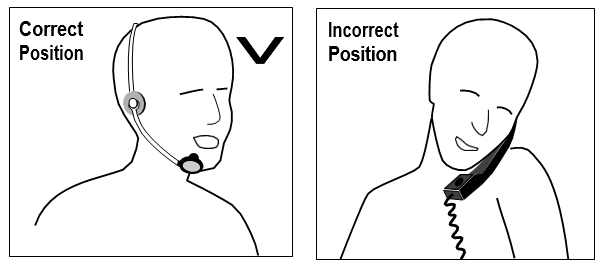
If you use your phone frequently, use a headset to reduce awkward neck postures
Feet
- AVOID standing for long periods on concrete or metal floors. Wooden, cork or rubber-covered surfaces are more comfortable to stand on.
- CHOOSE footwear according to the hazard at your workplace. Safety footwear, if required, must be approved and carry the proper ratings for the hazard. Your feet can only be as comfortable as the footwear permits.
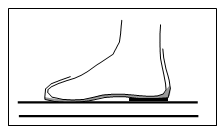
Proper Footwear - ENSURE footwear has adequate arch supports.
- WEAR footwear that allows freedom to move your toes.
- Shoes that are too narrow or too shallow cause pain and fatigue.
- USE a shock absorbing, cushioned insole when working on metal or cement floors.
- USE padding under the tongue if you suffer from tenderness over the bones at the top of the foot.
- CHOOSE safety shoes that provide a firm grip for the heel. If the back of the shoe is too wide or too soft the foot will slip, causing instability and soreness.
- DO NOT wear flat shoes.
- DO NOT wear shoes with heels higher than 5 cm (2 inches.)
Sitting
Pressure on the lower thighs can cause circulation problems and excessive fatigue. This may occur if a chair is too low or too high.
- USE a foot support if your feet do not reach the floor.
Lifting
Attempting to lift a heavy bag or box all at once may result in back injury. The first step in proper lifting is to assess the material to be lifted:
- How much does it weigh?
- Can the heavy load be made into a few lighter ones?
- Can I safely lift it myself?
- Is the object too awkward for me to lift and carry alone?
- Will I have to move the object through stairwells, on uneven ground or through narrow passageways that will cause further safety issues?
- Is there a way to minimize the amount of lifting and carrying I have to do (i.e. Is there a device, such as a wheeled cart to use to carry the object)?
General Lifting Principles
- LIFT by bending your legs, not your back.
- KEEP the object close to you (close to your centre of gravity to make carrying easier).
- USE handles if possible (better grip on object).
- GET assistance if the object is large or awkward (even if it is light).
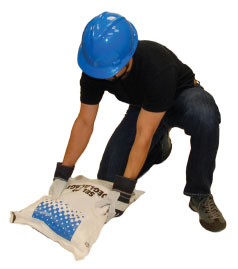
Lifting Heavy Objects
When there are no alternatives and where a heavy load can’t be broken into smaller units and where it is not possible or practical to use two people to lift, there are ways to protect yourself from injury.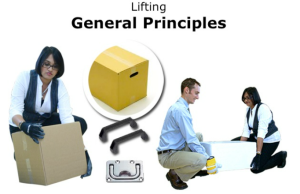
- BEND down to the object, bending your knees.
- RAISE the object to be lifted upright.
- PUT one knee against the object.
- PULL the object up the leg.
- REST the object on the knee of the other leg.
- STAND up, using your legs to lift, keeping your back straight.
- STAND upright and carry the object with your back in an upright position.
- CARRY the object as close to your body as possible.
 object to be lifted close to knee on the ground. |
 hands and slide object up to your mid-thigh. |
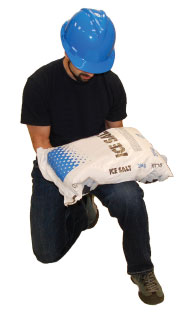 leg. |
 forearms under object and hug object to your stomach and chest. |
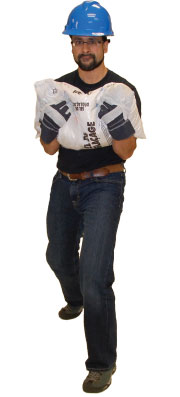 up using your legs to lift object, keeping your back straight, your buttocks out, breathing as you lift. |
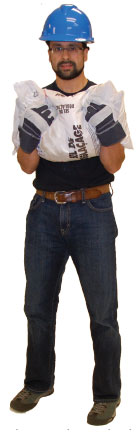 and object as close to your body as possible. |
[h5p id=”6″]
