1
chapter 1 prepare workplaces
Luyao Zhang
I. Be resourceful
The Internet Computer (IC) is the first frictionless blockchain with web speed and internet scale throughout the world. It extends the functionality of the public internet so that it can host backend software, thus transforming it into a global computing platform. To innovate on the IC, the first step is to be resourceful.
Figure 1.1 demonstrates the resources provided by two institutions that support innovation on the Internet Computer. First, the IC was initiated by the DFINITY Foundation. Answers to general questions about IC and DFINITY Foundation can be found here. Second, the Internet Computer Education Center, run by the Internet Computer Association, is a resource aimed at supporting Internet Computer research, education, and adoption, and it rapidly and efficiently provides suitable open-source course curriculum. Free and unlimited access is provided to online classes on blockchain and cryptocurrency, distributed systems, protocol design, etc. A community of educators, student leaders, and academic partners are also available to collaboratively help newcomers.
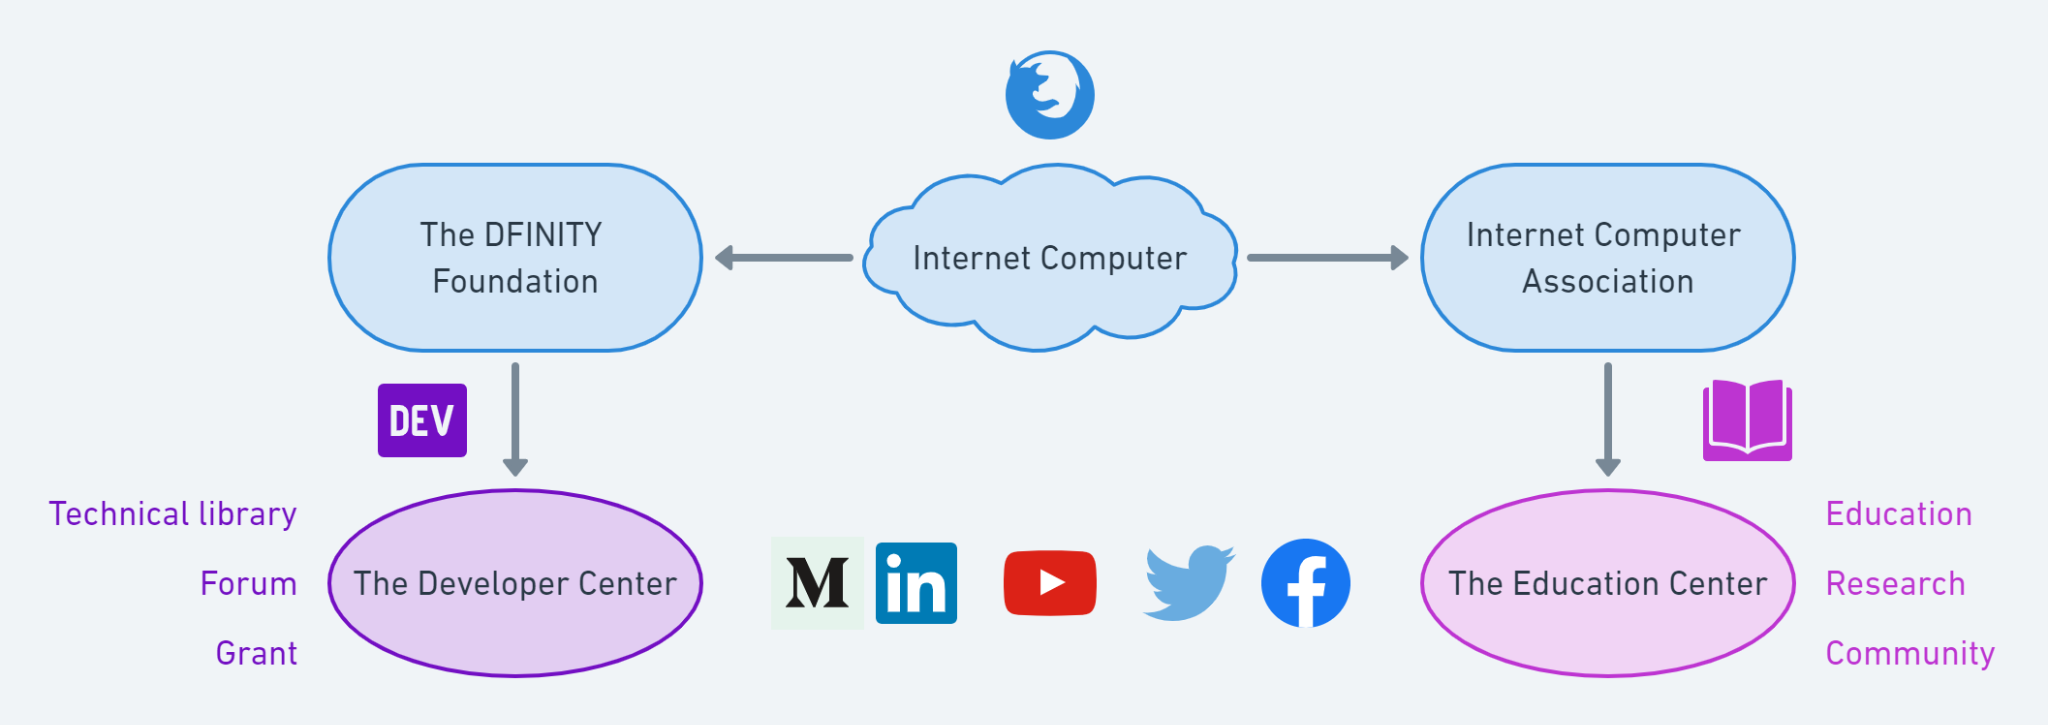
Figure 1.1. Resources
Where can I learn collaboratively with other developers?
In the developer center, technical documentation is provided for learners to dive deeper into the Internet Computer and (video) tutorials are available to build and deploy apps locally or on the IC network. A technical library is also developed to help understand the jargon encountered in the IC, such as network nervous system, Motoko, consensus, etc. In addition, forums have been developed to create a learning atmosphere for learners to highly engage with other developers. Developer grants are also available to help build out the Internet Computer ecosystem.[1]
Where can I keep updated with the latest release, events, and news?
The latest releases, events, and news are available in different traditional social media, including GitHub, Medium, LinkedIn, YouTube, Twitter, and Facebook.
Where can I find other third-party resources?
Tech Deep Dives, a branch of Coinmarketcap, is a platform for keeping up to date on news from the crypto world. The design and architecture of the IC is reviewed in an article on Tech Deep Dives. MIT Technology Review covers the landscape and significance of the IC in the future, and it emphasizes decentralization and the remaking of the internet.
II. Set up the environment
In this section, we will explain the steps for environment setup. Figure 1.2 demonstrates the general workflow. Experienced developers can refer to the quick-start documentation, while newcomers should note that the steps differ slightly for different computer operating systems. An on-premise virtual machine can also be installed with an ideal operating system and configuration or a cloud virtual machine can be rented. Moreover, scholars with academic affiliations can in general request a virtual machine from the IT department of their institution.
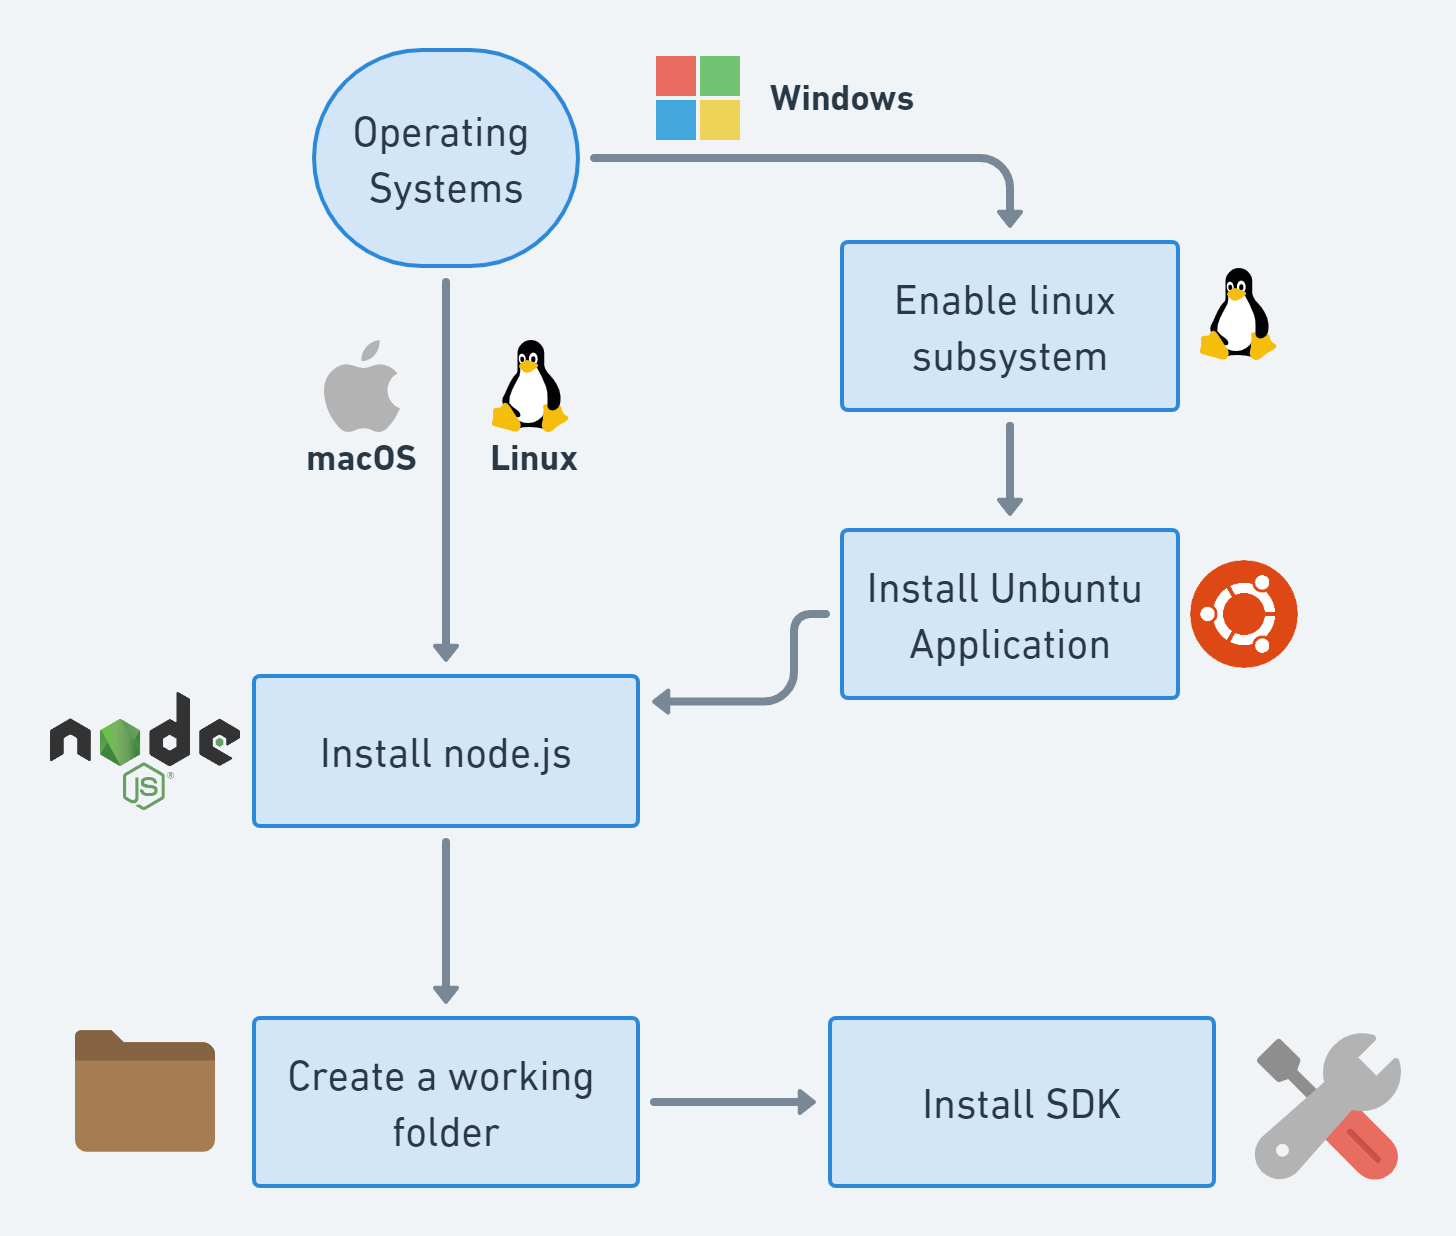
Figure 1.2.0: Environment Set-up
1. Accommodate the operating system
If the operating system is macOS or Linux, this step can be skipped. For Windows, enable the Linux subsystem and install Ubuntu.
1.1 Enable the Linux subsystem on Windows.
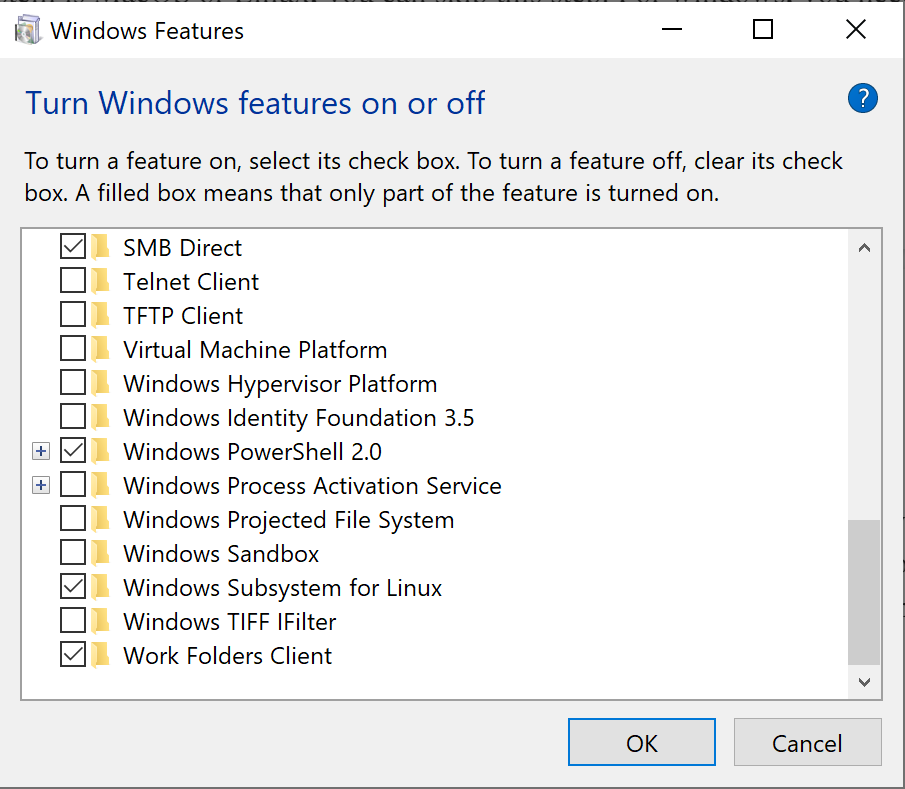
Figure 1.2.1: Enable the Linux Subsystem
Click on the Windows start button and search for “Turn Windows features on or off”, or navigate to Control Panel > Programs > Programs and Features > Turn Windows features on or off.
Then, as shown in Figure 1.2.1, scroll down the list of Windows features, select the Windows Subsystem for Linux, and press OK. This should open a new loading window. Then, a prompt to restart the machine for the changes to take place will appear.
1.2 Install the Ubuntu Application
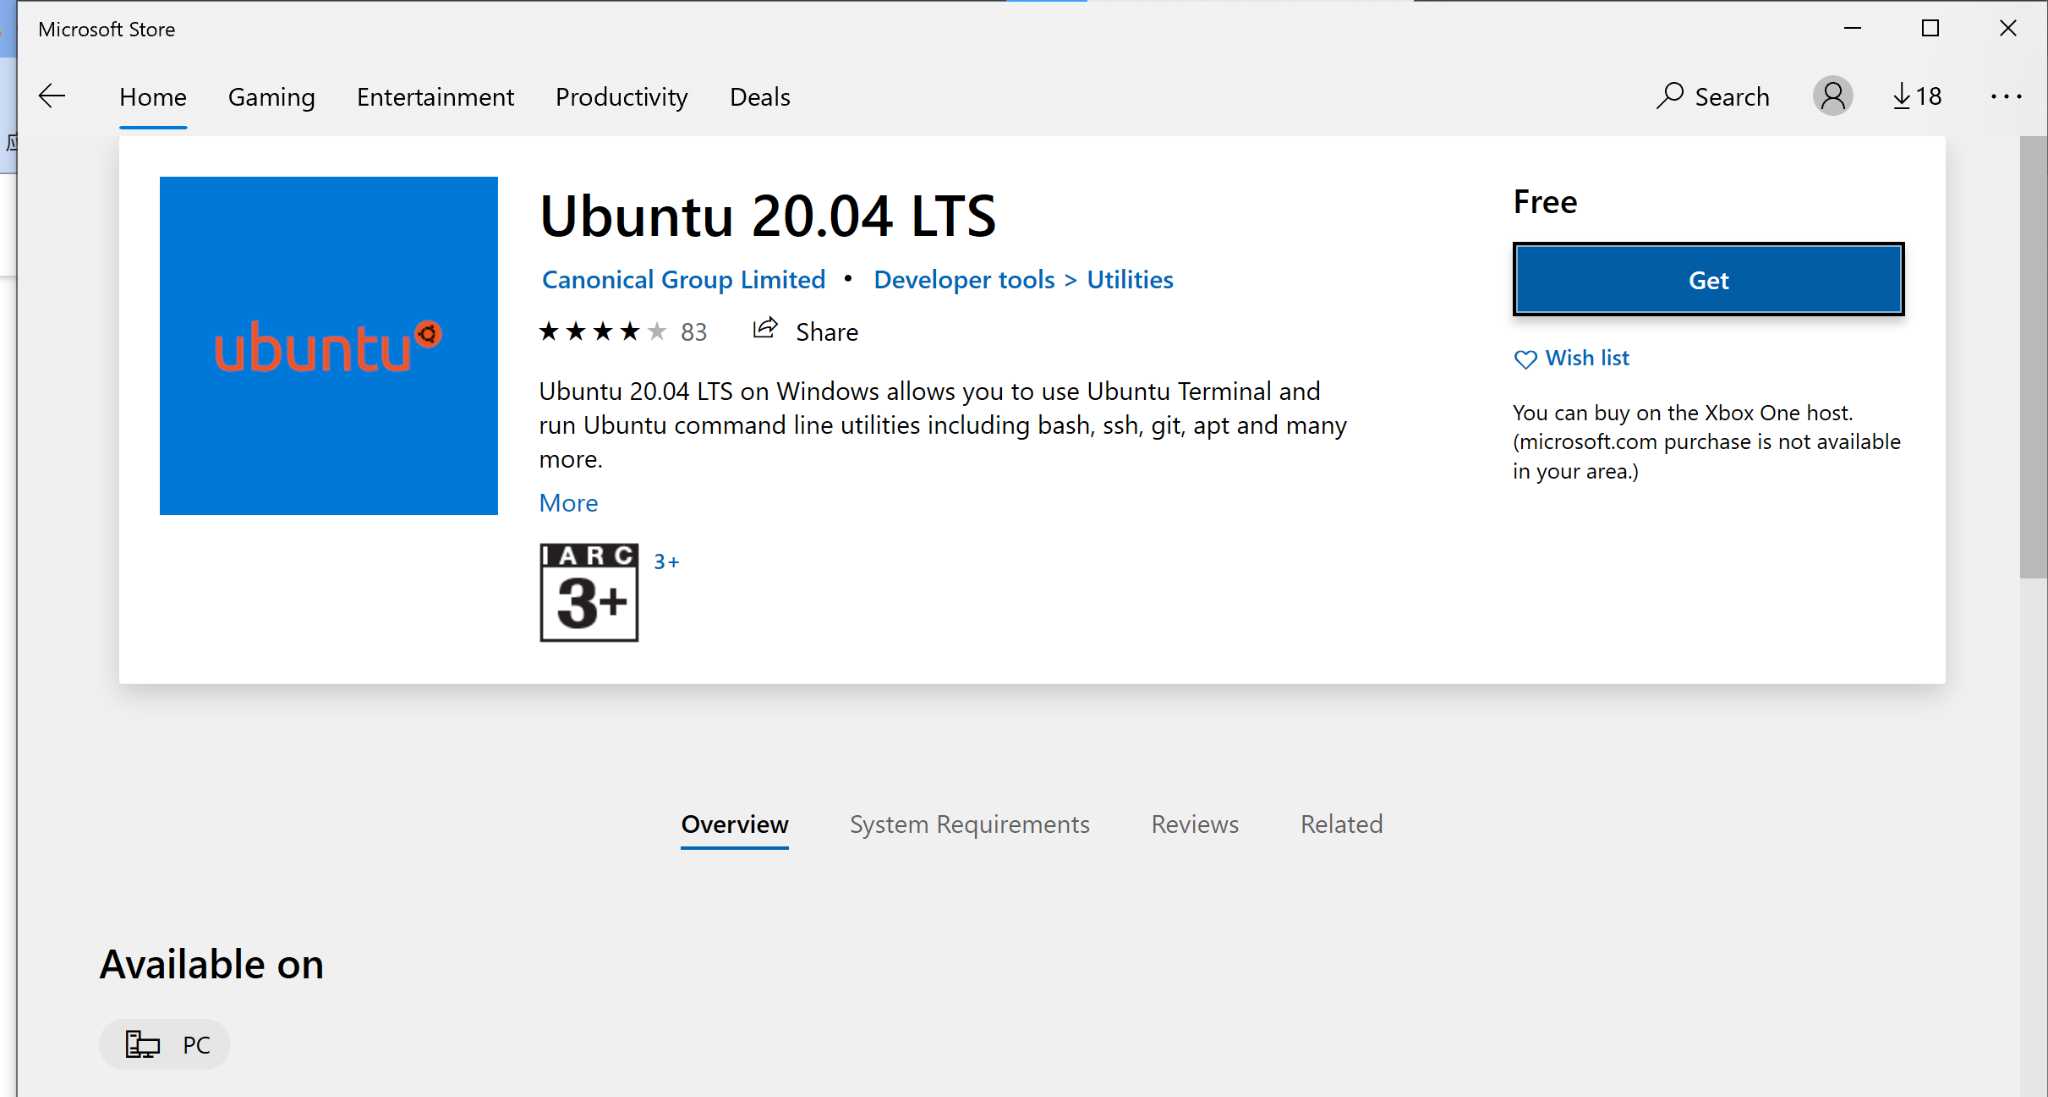
Figure 1.2.2: Install Ubuntu
After the machine is restarted, a Linux distribution must be installed. Enter Microsoft Store and search for Ubuntu. Choose the latest version of Ubuntu 20.04 LTS,[2] and the page shown in Figure 1.2.2 will open. Click on Get. Once Ubuntu finishes installing, Linux can be used on a Windows machine. Go to the Windows Start menu, search for and run Ubuntu. For the first time running Ubuntu, the installation will complete in several seconds, and then a UNIX default account can be created. This requires a UNIX username, which can be anything, and a password. Note that the password will not be shown on the Ubuntu console, even while typing. Re-enter the password one more time for confirmation, and the installation will be complete. Before moving to the next step, Ubuntu should be updated using the following command.
sudo apt-get updateor new users, to copy and paste the above command into the terminal window, click the Ubuntu icon on the top left of the terminal, select properties in the drop-down menu, and then select “Use Ctrl Shift C/V as Copy/Paste” in Edit Options, as shown in Figure 1.2.3.
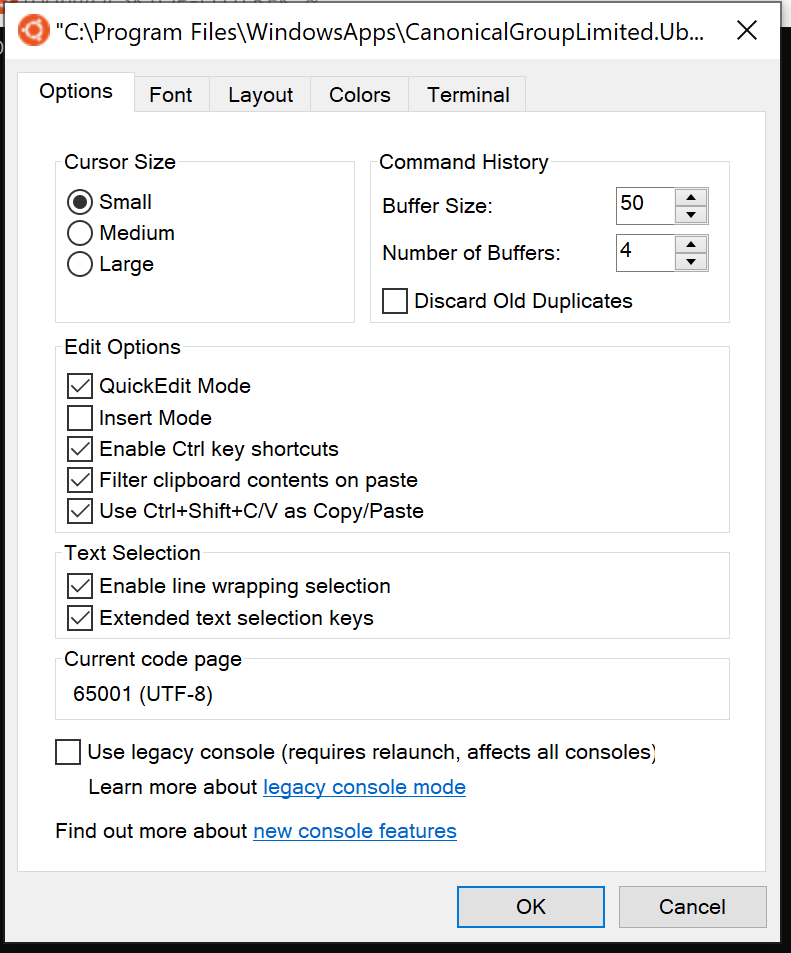
Figure 1.2.3: Properties of the Ubuntu Terminal
2. Install JavaScript runtime environment Node.js
For projects that include a frontend of graphical user interfaces, the JavaScript runtime environment Node.js should be installed.
2.1 For macOS
To install the Node.js package on a Mac, a package manager is required. We recommend using Homebrew for its simplicity. To check whether Homebrew is already installed, open a terminal either by navigating to Finder > Applications > Utilities > Terminal or by pressing the command and spacebar keys and then typing “terminal”. Then, run the following command:
brew --versionIf version information is returned, Homebrew is already installed. If not, it can be installed by running the following command:
/bin/bash -c "$(curl -fsSL https://raw.githubusercontent.com/Homebrew/install/master/install.sh)"Then, the installation of Node.js can be verified by running the following:
node --versionbrew install nodeAgain, if version information is returned, it means that Node.js is already installed and a working folder can be created. If not, copy and paste the following command:
2.2. For Linux or Windows with Linux subsystems
First, check whether Node.js is installed by running the following:
node --versionUninstall previous versions by running the following:
sudo apt remove nodejsThen, install nvm and list all current versions of Node.js by running the following:
sudo apt install curl
curl -o- https://raw.githubusercontent.com/nvm-sh/nvm/v0.38.0/install.sh | bash
source ~/.bashrc
nvm list-remote
Then, install a specific version Node.js by running the following:
nvm install <version number>The user will be prompted to enter the password previously set in Install Linux Subsystem and Ubuntu for Windows. In the window showing the message “Do you want to continue? [Y/n]”, type the letter “Y” and press enter. After a minute or two, the installation should be complete. To verify the installation, run the following:
node --versionIf the version number is shown, then the installation was successful, and the next step can be performed. For example, in Figure 1.2.4, the version number is v12.18.3.
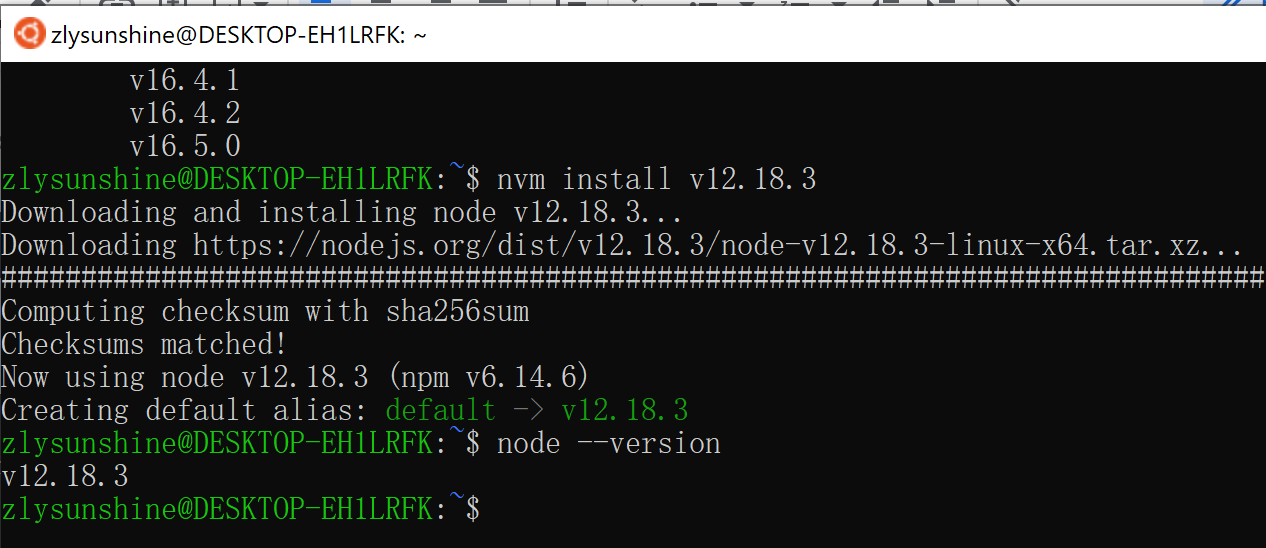
Figure 1.2.4: Node.js installation
3. Create a working folder
Now, a folder specifically for IC projects is created. To create a new folder called “ic-sunshine”, for example, open a terminal and run the following command:
mkdir ic-sunshinepwdTo show the current directory, run the following:
To navigate to the newly created folder, use the change directory command and specify the name of folder by running the following:
cd ic-sunshineThe ic-projects folder should be open, which can be verified by running the following command again:
pwdAs shown in Figure 1.2.5, the current path of the working directory is “ic-sunshine.”
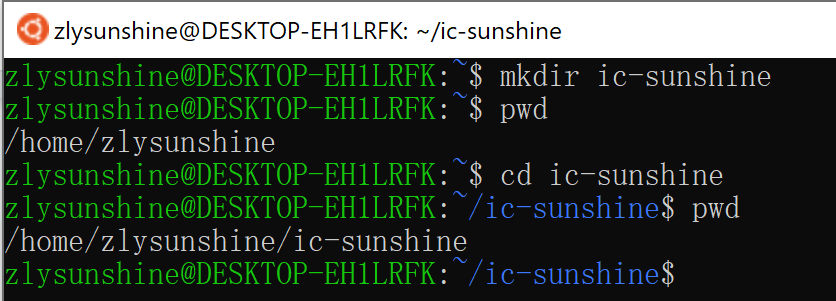
Figure 1.2.5: IC working folder
4. Install DFINITY Canister Software Development Kit (SDK)
4.1. Download and install SDK
A specific version of the DFINITY Canister Software Development Kit (SDK) can be downloaded directly from within a terminal on macOS, Linux or Ubuntu on Windows by running the following command:
DFX_VERSION=<version number> sh -ci "$(curl -fsSL https://sdk.dfinity.org/install.sh)"All historical versions can be checked under the release note of developer documents. For example, to install version 0.7.7, run the following command:
DFX_VERSION=0.7.7 sh -ci "$(curl -fsSL https://sdk.dfinity.org/installThen, type y and press return to continue with the installation. To upgrade the current version, run the following:
dfx upgradeTo uninstall and then install a clean new version, e.g., 0.8.0, run the following:
~/.cache/dfinity/uninstall.sh && DFX_VERSION=0.8.0 sh -ci "$(curl -sSL https://sdk.dfinity.org/install.sh)"Figure 1.2.6: Install DFINITY SDKAs shown in Figure 1.2.6, the command displays the directory where dfx is located.

4.2 View directories in the PATH
Finally, the inclusion of the command-line executable dfx among the directories in the PATH is verified.[3] MacOS users usually do not need to follow these steps because dfx is by default included in the set of paths. Linux users will need to view the set of directories in their PATH and check the location of dfx. If dfx is not in the PATH, update the PATH setting to include the executable, which can be done by running the following:
export $PATHTo view the set of directories in the PATH, run the following:
which dfxTo locate dfx, run the following:
export PATH=$PATH: <path-to-directory-for-dfx>
echo $PATH
For example, in Figure 1.2.7, the <path-to-directory-for-dfx>=’/home/zlysunshine/bin/.’ Subsequently, the script dfx can be executed anywhere on the system by just typing in its name with the inclusion of the full path.
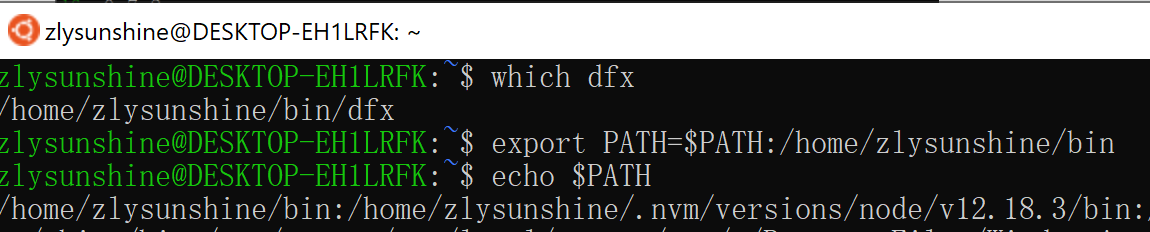
Figure 1.2.7: Install DFINITY SDK
4.3 Verify that SDK is ready to use
To verify whether the SDK is ready to use, run the following command:
dfx --version
If the version number is returned, then the DFINITY execution command-line interface (CLI) has been installed successfully and the dfx executable is available in the PATH.
III. Deploy the first application
Tutorials for both local and network deployment can be found on the developer center website. Dr. Enzo Haussecker also provides an instruction video for local deployment on YouTube. However, there is no testing subnet for network deployment. Thus, developers must deploy to the mainnet. To follow the steps on the DFINITY website for network deployment, developers must prepare the ICP utility token. The token can be purchased from a cryptocurrency exchange or requested from DFINITY Foundation or the Internet Computer Association as educational or developer grants.
To accelerate network deployment, in this section, we provide a step-by-step guide for a single frontend user interface so that an ICP token is not needed. Figure 1.3.1 demonstrates the workflow. There are three main steps to take: create a React App, deploy to Fleek, and update the deployment. Three platforms facilitate the process: 1) Fleek, a platform that provides web deployment services to decentralized networks such as IPFS and IC with a 50 GB free webflow; 2) Github, a provider of internet hosting for storing software and deploying code in repositories; and 3) VS code, a source-code editor made by Microsoft for Windows, Linux and macOS for customizing the app.
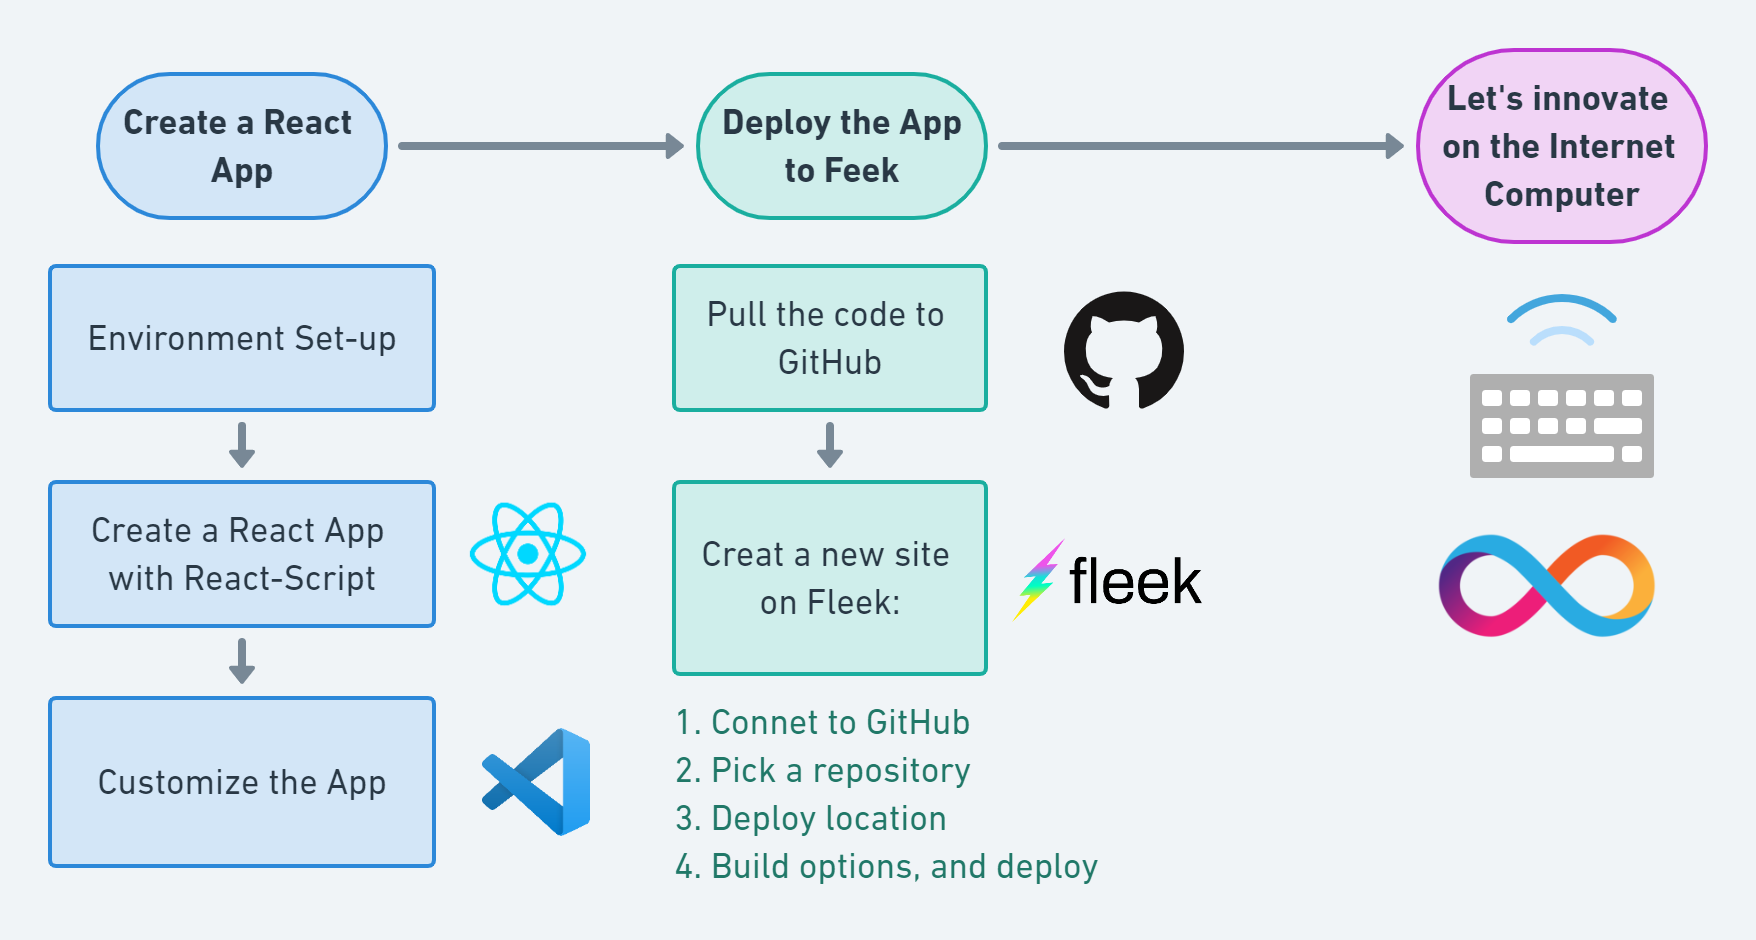
Figure 1.3.1: Workflow of deployment
1 Create a React App.
1.1 Environment set-up
Step 1: Node installation
To create a React App, start with setting up the environment. Run the following code to uninstall previous versions of npm, the Node Package Manager:
Uninstall previous versions by running the following:
Then, install npm as follows:
sudo apt install npmnpm --versionCheck the installed version as follows:
Then, npx, the Node Package Runner is installed by running the following code:
sudo apt install npx
Check the installed version as follows:
npx --versionFigure 1.3.1 shows that the npm and npx of version 6.14.4 are successfully installed, which can help manage the deployment of the application.

Figure 1.3.1: Install npm and npx.
The npm repository connection will automatically prepare the React library for building and compiling the user interface. Notably, in locations with limited access to the global internet, a virtual private network (VPN) may be required for this connection. For example, to connect to university VPN via Cisco AnyConnect, the following code can be run to install OpenConnect:
sudo apt-get install openconnectThen, run the following command to connect to the university proxy:
sudo openconnect <proxy-address>Finally, the authentication process can be followed to connect.
Step 2: Yarn installation
Before creating a react app, the package manager yarn must be installed and set up. Yarn is a package manager selected by react.js t as its project manager.
Run the following command to install yarn:
sudo npm install -g yarn
Then, the version of yarn can be checked to ensure that it works:
yarn --versionFigure 1.3.2 shows that yarn version 1.22.10 is installed successfully.
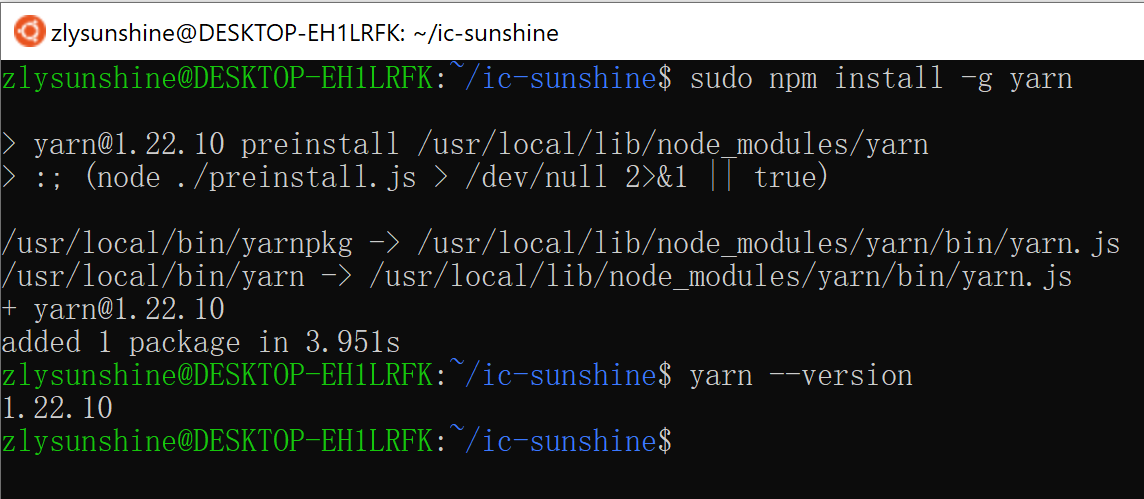
Figure 1.3.2: Yarn installation
1.2 Create a React App with React-Script
To create a React App and manage its content on a personal computer, the following code should be run:
npx create-react-app <project_name>Please replace <project_name> with the name of your choice. For example, in Figure 1.3.3, we create a React App with <project_name>=ic-oer.

Figure 1.3.3: Create a React App
Now, the user interface of the react app can be compiled and viewed by typing the following command:
cd <project name>
yarn
yarn start
Figure 1.3.4 shows that the app was compiled successfully and can be viewed locally or on the local network using the http address indicated.
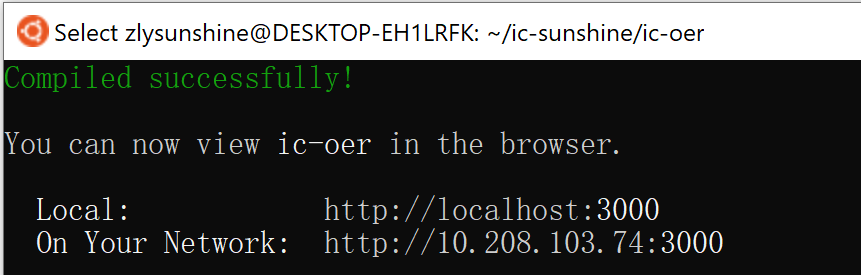
Figure 1.3.4: Compile the React App
1.3 Customize the App
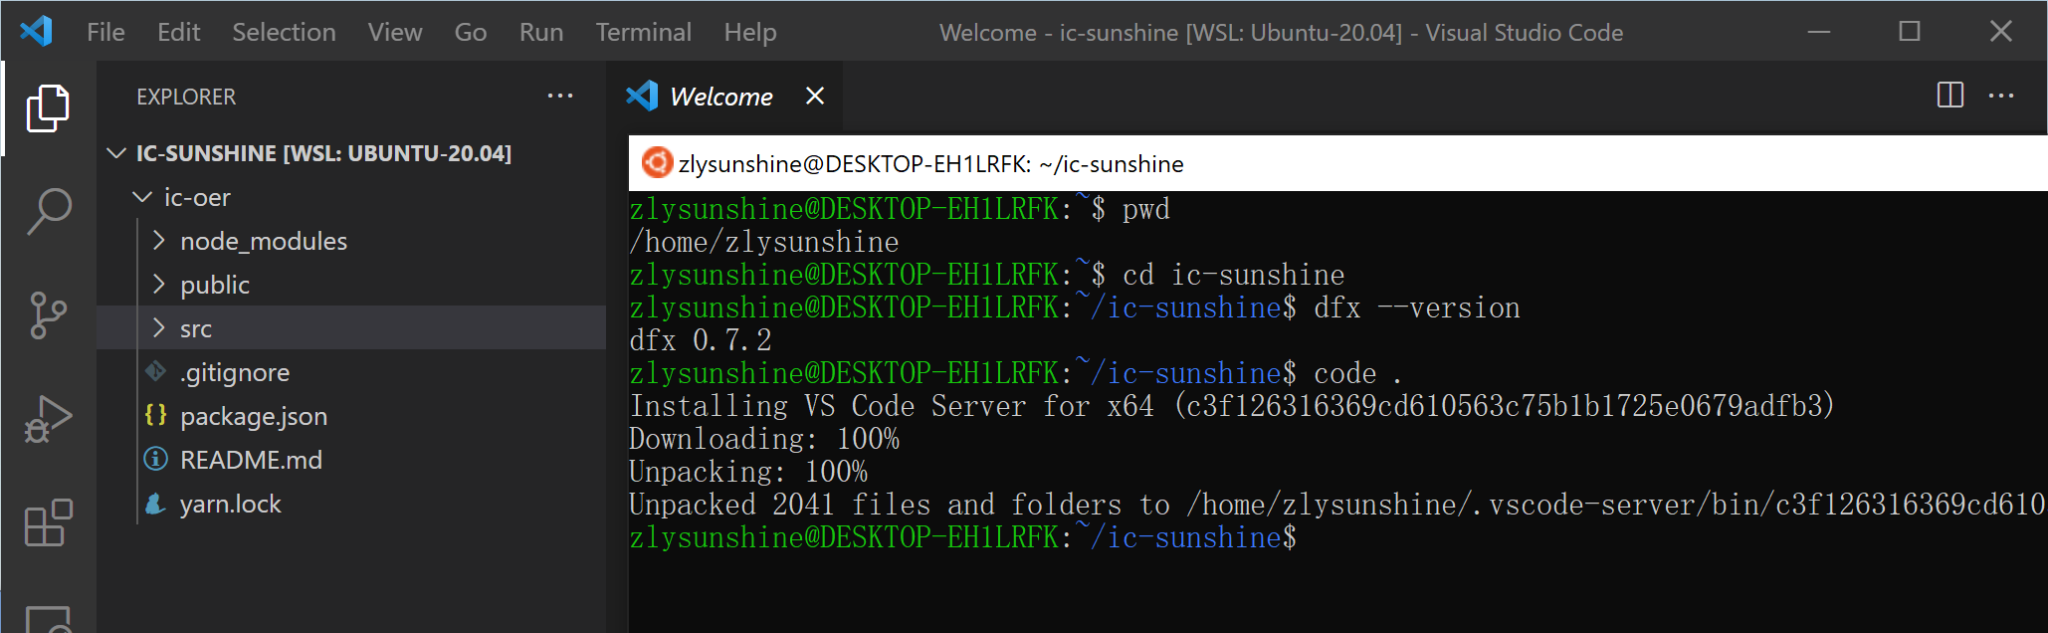
Figure 1.3.5: Open the project folder on VS code.
To customize the app, download the code editor VS code and follow these steps to open the React App folder in VS code. Figure 1.3.5 shows the project folder opened on VS code by running the following code in the working folder ic-sunshine:
code.Three subfolders can be found in the React App: node modules, public, and src. In src, edit App.js to customize the user interface using JavaScript. Figure 1.3.6 shows that the custom text “Let’s innovate on the Internet Computer” was included
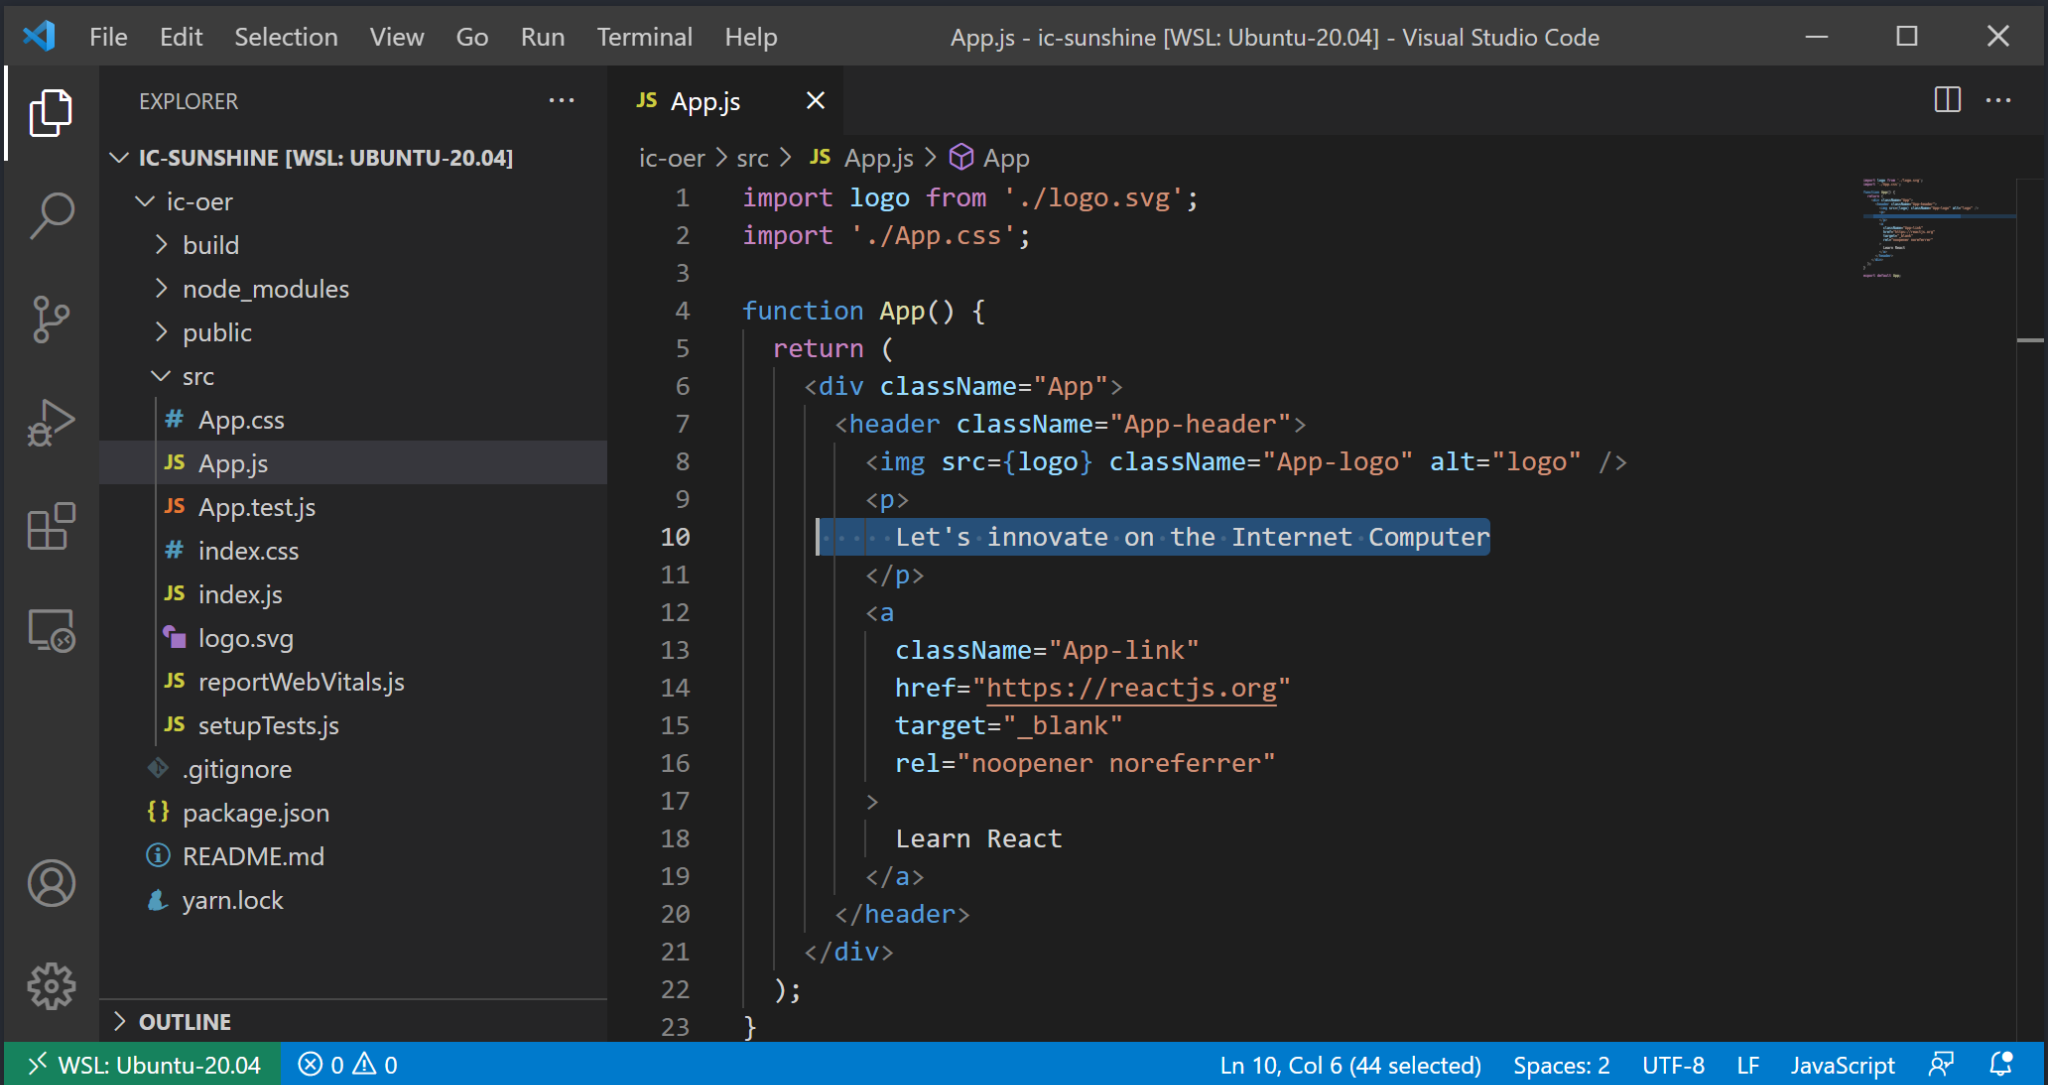
Figure 1.3.6: Customize user interface in App.js.
The following command can be run to view any updates:
yarn startNow, the app can viewed in the browser, as shown in Figure 1.3.7.
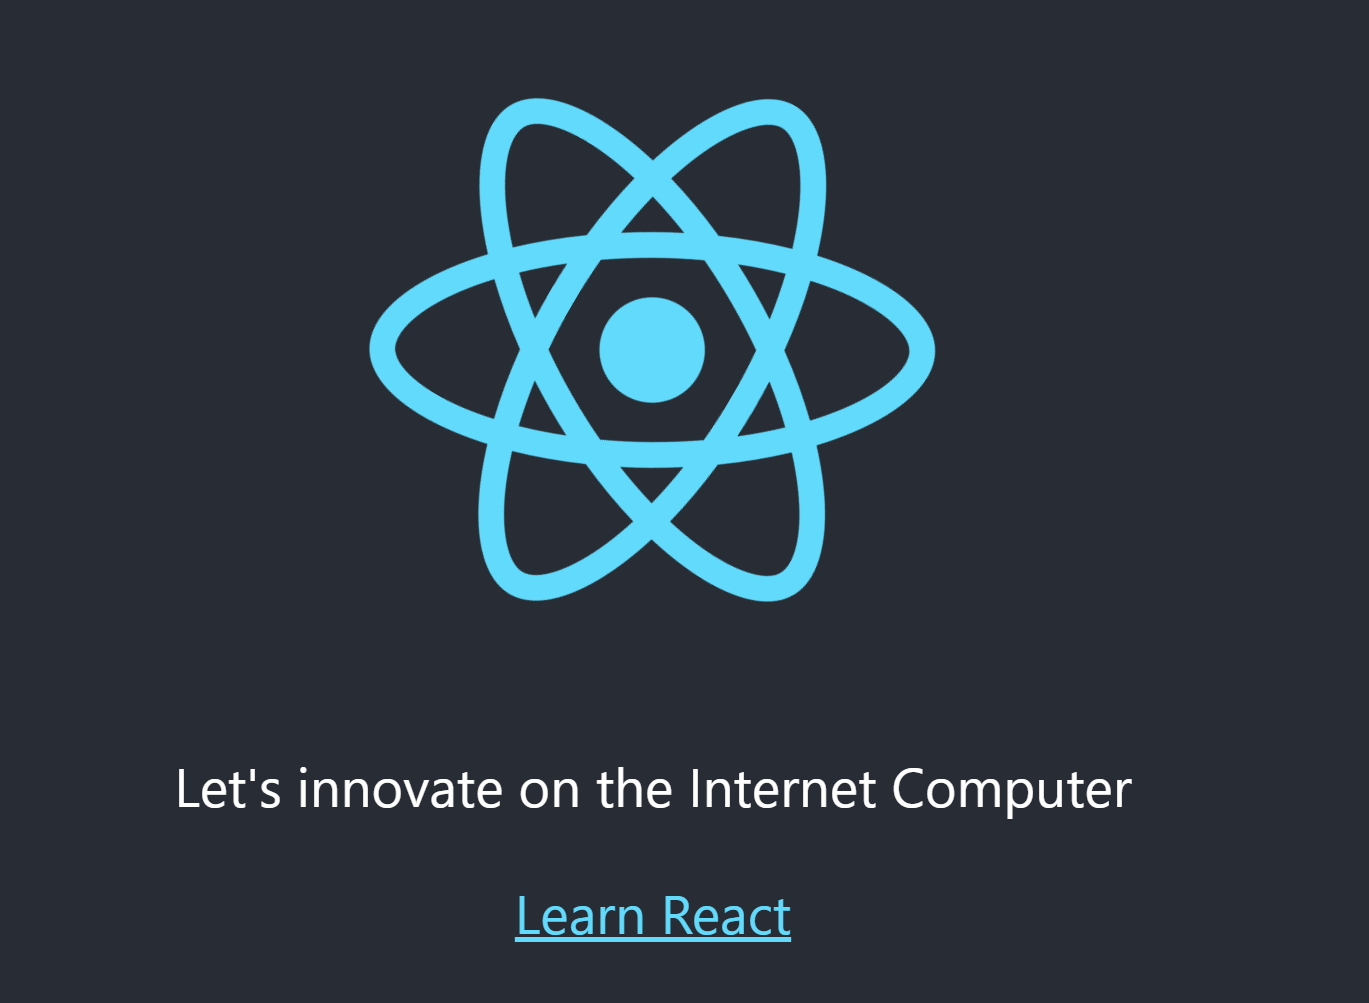
Figure 1.3.7: Customized ReactApp
2 Deploy the App to Fleek
2.1 Pull the ReactApp folder to GitHub
Now install GitHub extensions on VS code and log in to the GitHub account on VS code. Then, create a GitHub repository and push the ReadApp folder to the master branch. Figure 1.3.8 shows that we successfully pushed to the GitHub repository of duke-sunshine.
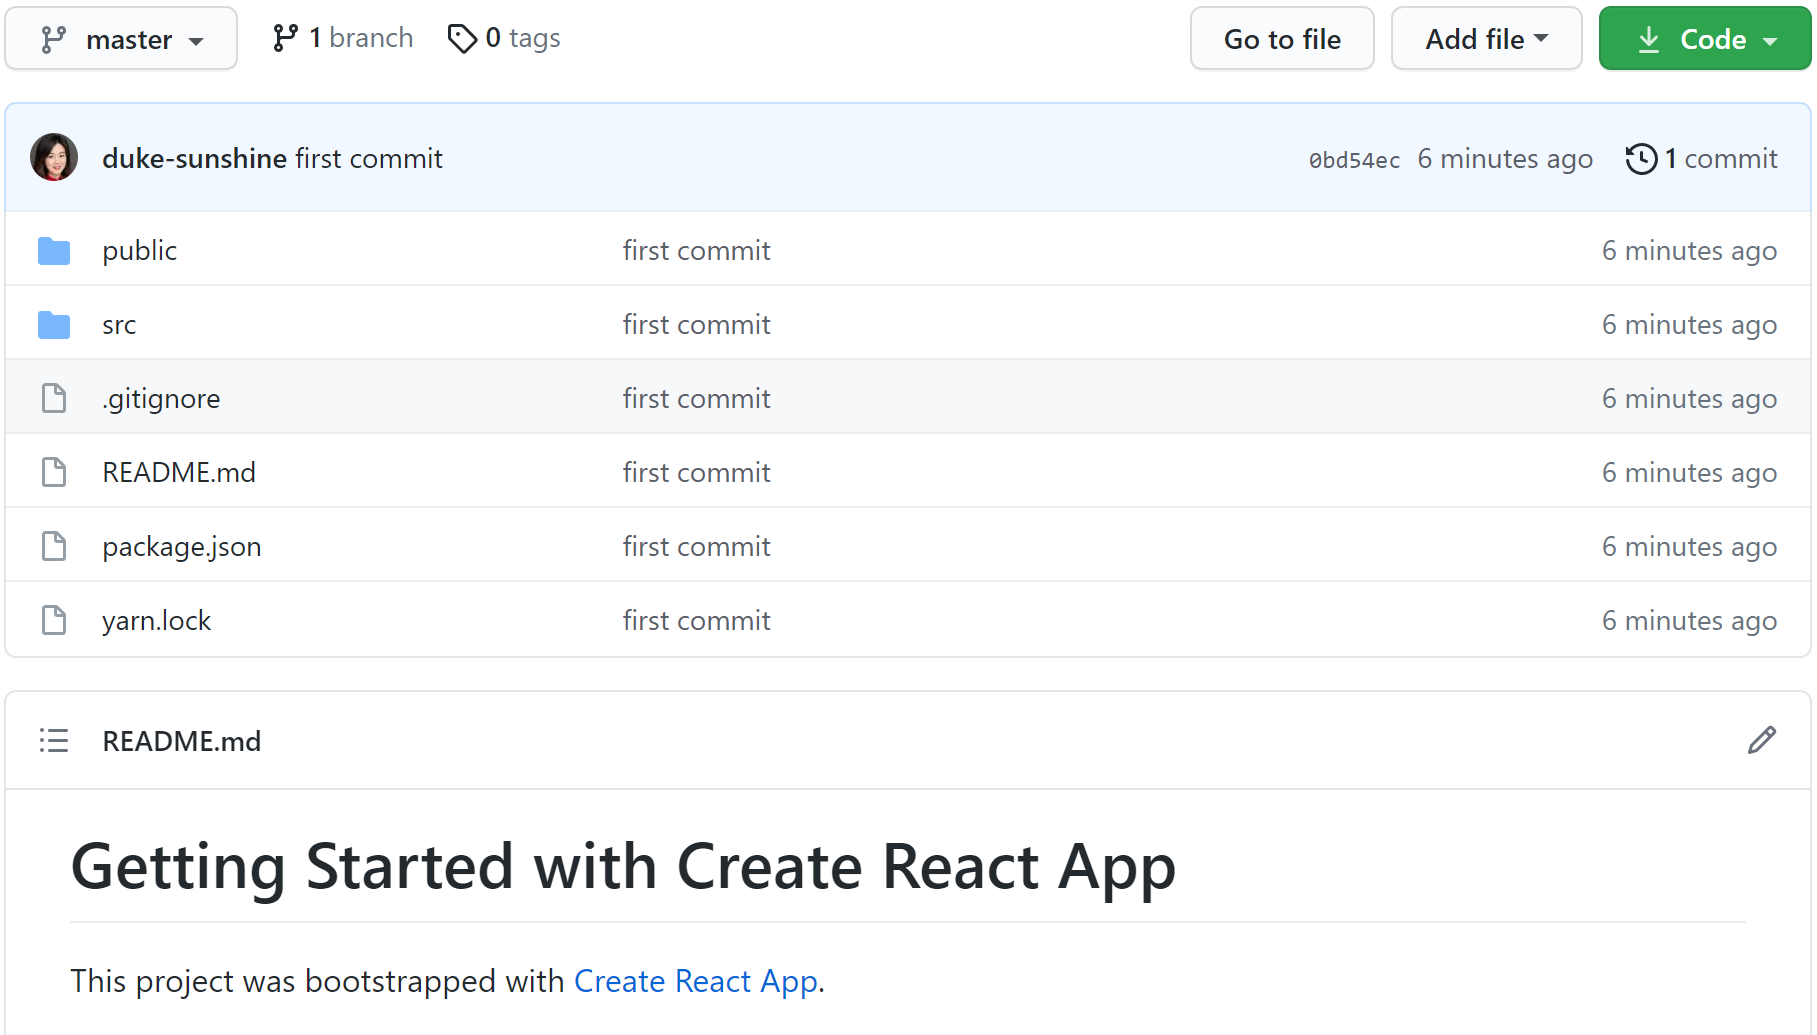
Figure 1.3.8: Pull to GitHub
2.2 Create a new site on Fleek
Now, the following steps to create a new site can be performed on Fleek. In the second step, pick the repository that saves the ReactApp. In the third step, IC is chosen instead of IPFS as the hosting services, as shown in Figure 1.3.9.
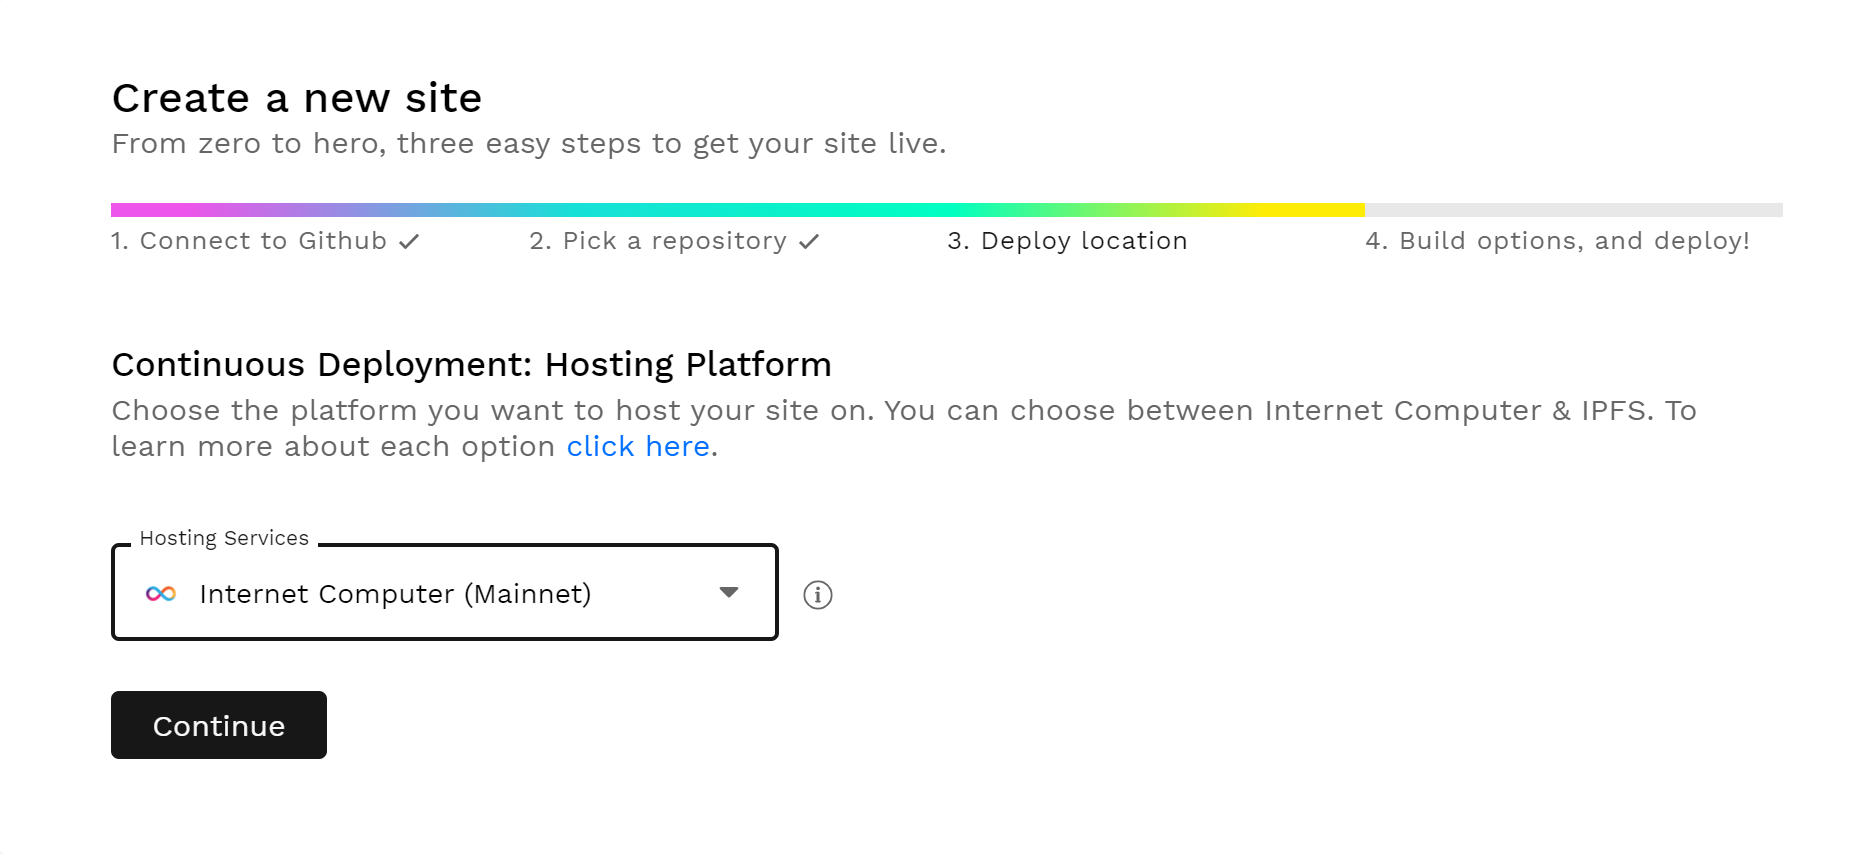
Figure 1.3.9: Create a new site on Fleek via IC
After confirming, a deployment in progress page will be shown, as presented in Figure 1.3.10.
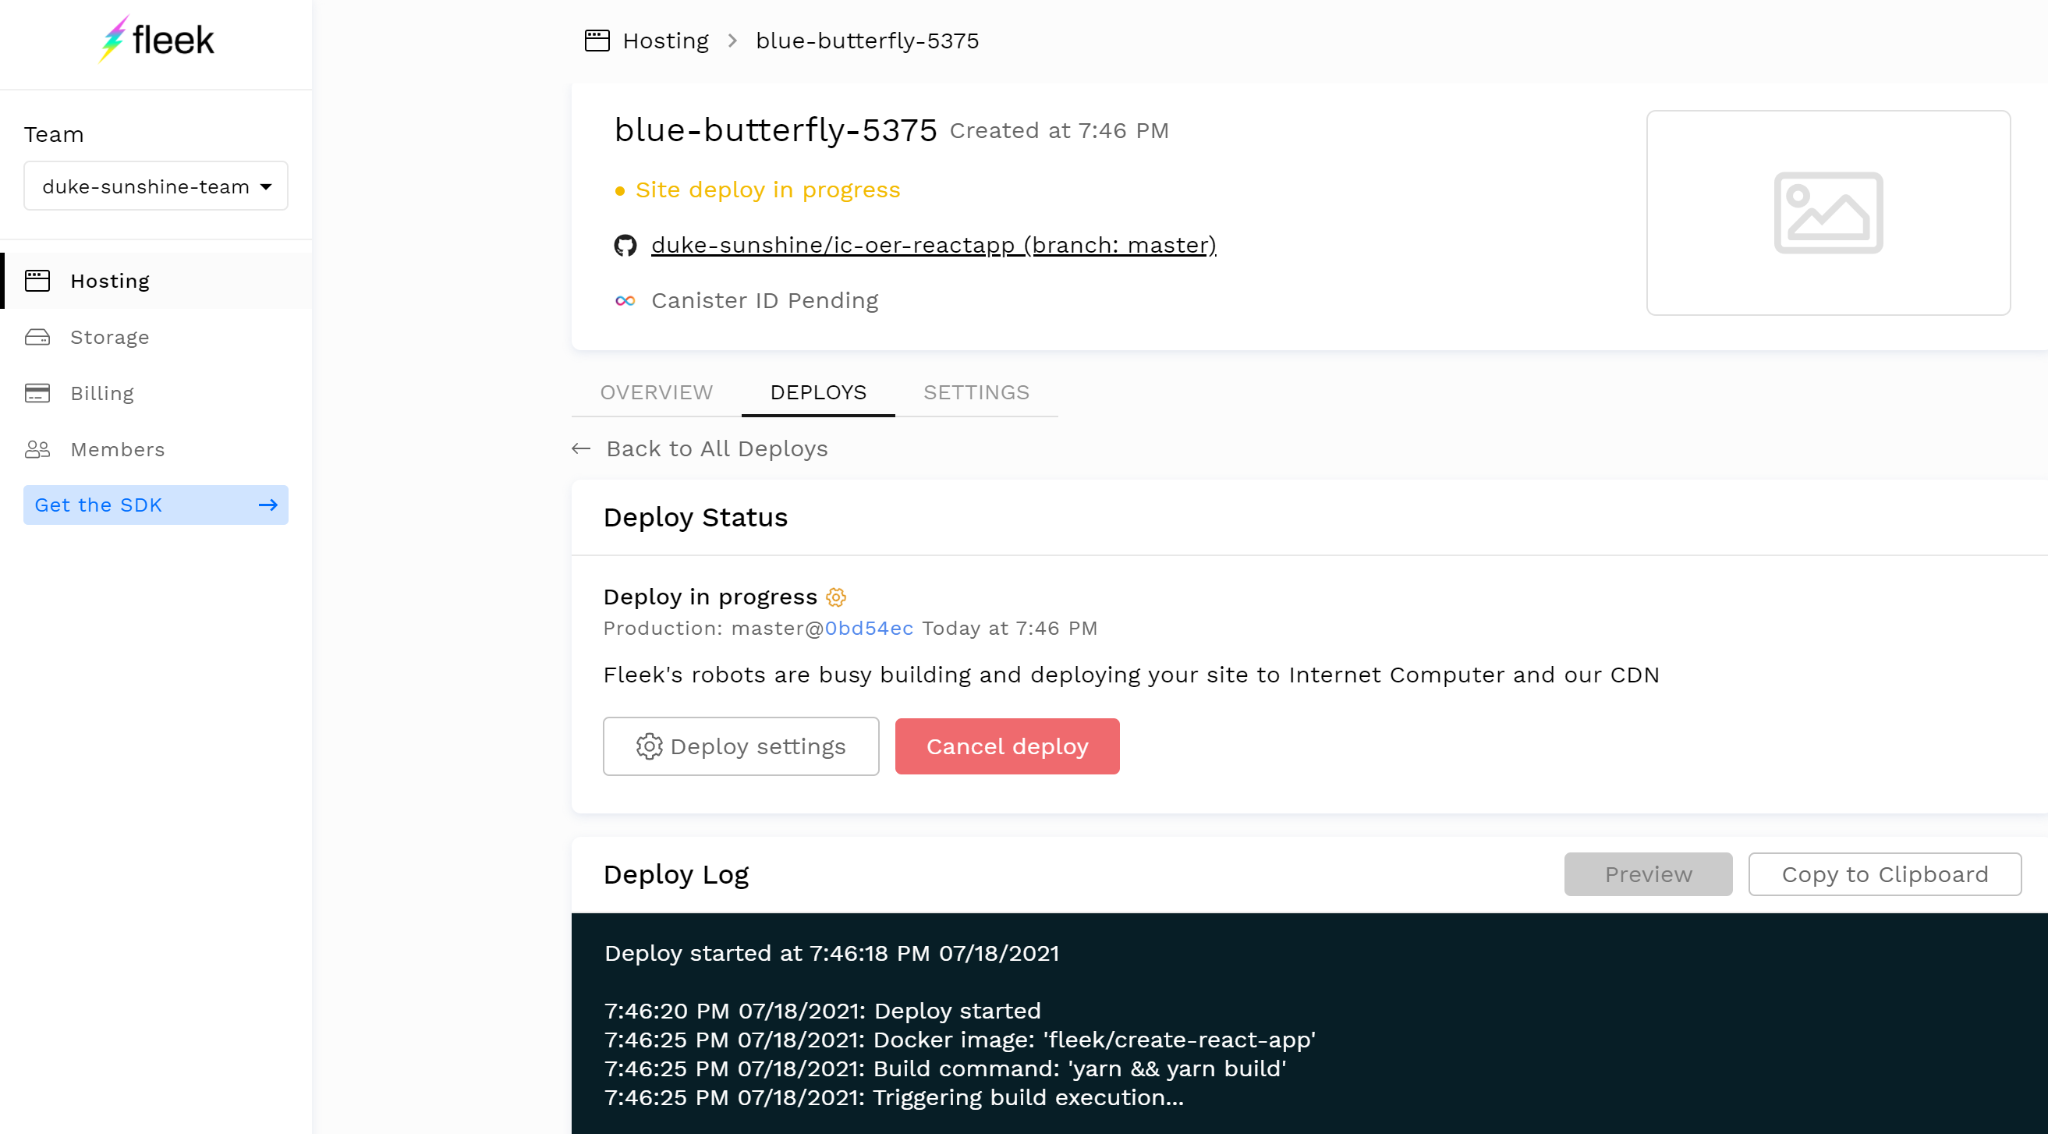
Figure 1.3.10: Deployment to the IC in progress
After a few minutes, this page is updated with the status of the published deployment and the canister address on IC-Mainnet. For example, as shown in Figure 1.3.11, the illustrative ReactApp can be visited at the address below: https://fabl4-kaaaa-aaaad-qakpq-cai.ic.fleek.co./ Congratulations on completing the milestones in Chapter 1. Let’s innovate on the IC!
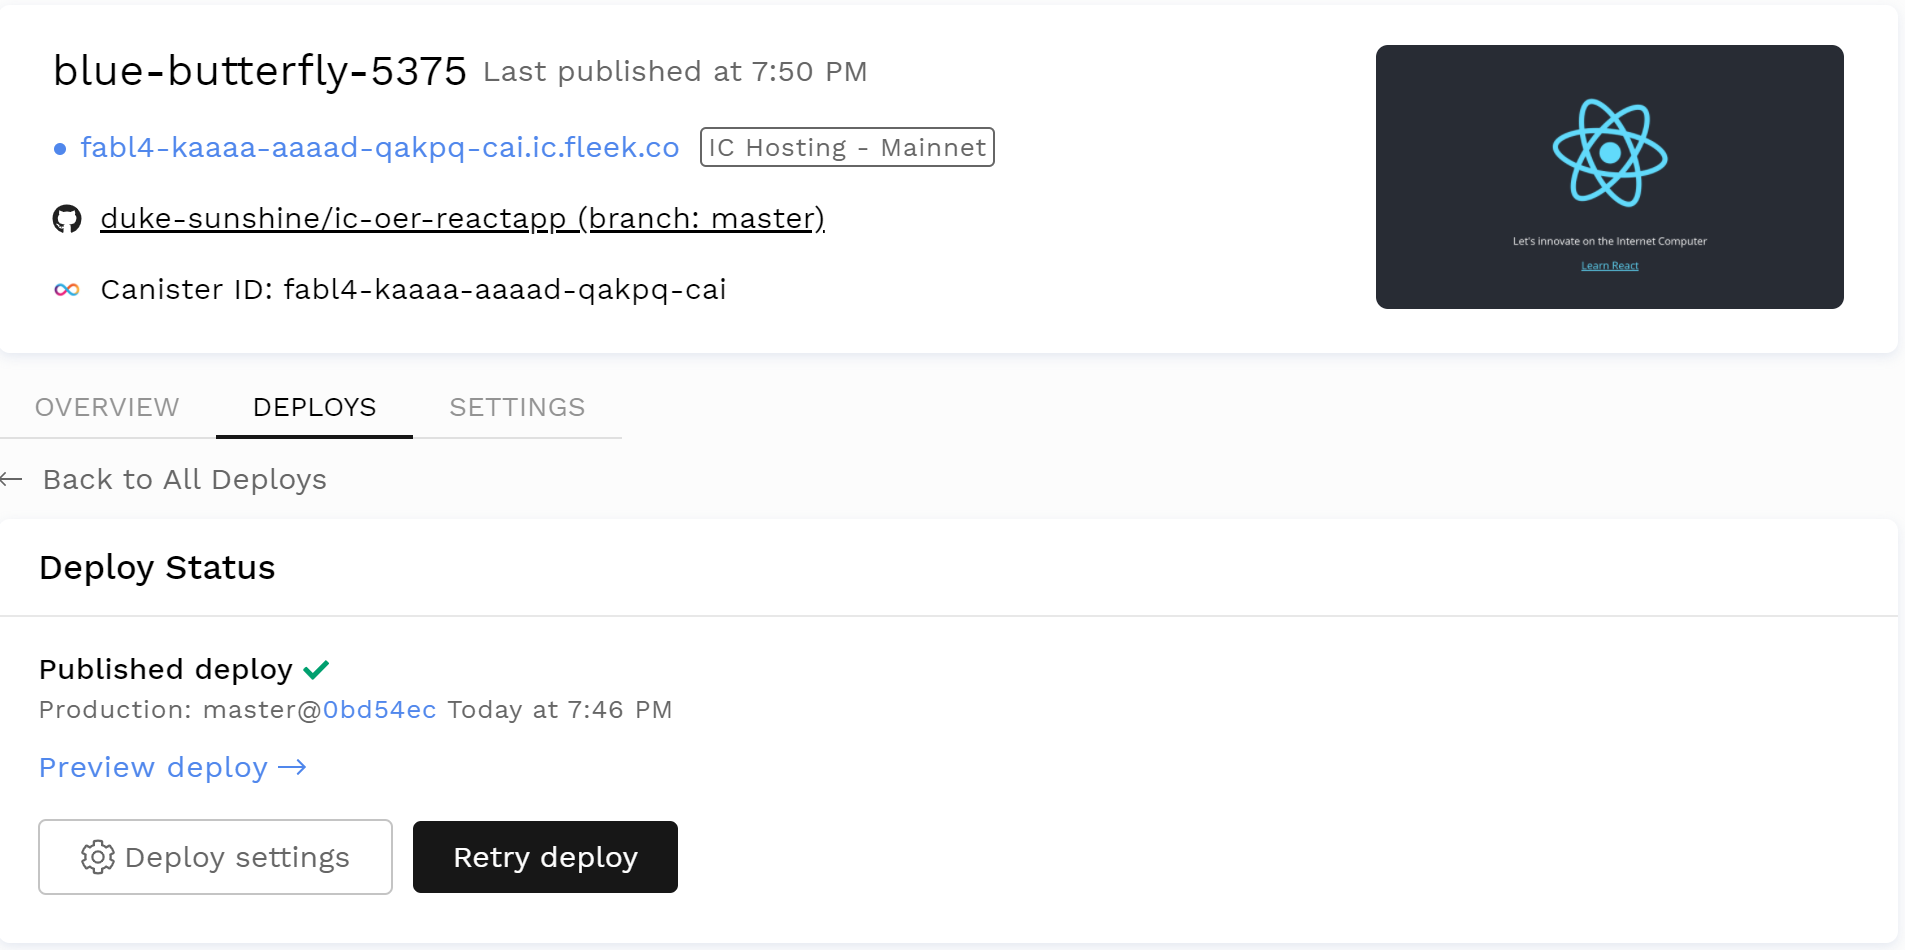
Figure 1.3.11: Successful Deployment
- Bugs and feature requests can be filed by emailing support@dfinity.org. ↵
- Early versions might lead to missing library issues. For example, see the forum post here. ↵
- PATH is an environment variable specifying a set of directories where executable programs are located. In general, each executing process or user session has its own PATH setting. ↵
