PROCEDURAL STEPS
Cervical Preparation
- Review health history, EGD, US, labs, & consents (for procedure, sedation, contraception)
- Introduce yourself (and trainee or trainer – see Ch. 11: Consent for Trainee Participation in Abortion Care), establish rapport, elicit and answer questions: “What questions do you have for me?”
- Provide reassurance and details as patient desires
- Assess vitals, perform time-out, and administer IV sedation if using.
- Don gloves (and other personal protective equipment as necessary)
- Prepare equipment tray and all items for procedure; adjust the table and light
- Provide verbal guidance to position the person
- Perform a bimanual exam (BME) as needed for chosen cervical prep
- Initiate cervical preparation by either of the following:
-
- Place misoprostol vaginally (and/or invite patient to self-administer) or buccally. OR
- Place osmotic dilators (or foley bulb) using ring forceps:
- Place speculum, evaluating cervix and vagina, collecting samples as needed (e.g. STI testing)
- Apply antiseptic to the cervix, if using
- Administer paracervical anesthesia: Make a wheal at 12 or 6 o’clock (depending on uterine position), place tenaculum, close slowly and quietly, and administer the paracervical block. Track pain level throughout the procedure, adding supplemental pain management as needed.
- Place 1-2 synthetic osmotic dilators (Dilapan-S®) +/- additional laminaria
- If placement is difficult, consider dilating the cervix to 10 to 13mm before placing multiple osmotic dilators (or foley bulb)
- Remove tenaculum and may place 1-2 antiseptic soaked gauze sponges or tampon into the vagina abutting dilator ends to absorb secretions and maintain dilators in the position
- Ensure accurate count of dilators and gauze is recorded
- Remove speculum (holding gauze sponges / tampon in place with a ring forceps)
- Place the person’s feet on the table, and re-cover their legs.
Procedural Positioning and Dilation
- After appropriate cervical prep, greet the patient again, answer any new questions.
- Assess vitals, perform time-out, and administer IV sedation.
- Position the person appropriately (hips slightly beyond table end) to allow safe visualization of the cervix and ability to maneuver instruments. If dilators were placed for cervical prep, manually remove gauze sponges / tampons (if present) and osmotic dilators, counting both and comparing with the noted number to ensure all items are removed. This also may be achieved after speculum placement with ring forceps if no manual exam is performed.
- Perform a BME, as needed or if required per health center policy.
- Note: some providers determine uterine position by US or tactile feedback with dilators instead of BME. Additional benefits of BME for people with >14 week gestation include evaluation of cervical dilation, cervical consistency, and uterine mobility (See Chapter 3).
- Initiate US guidance (NAF 2024), ensuring ergonomic positioning. An US machine with a dual monitor arm is ideal.
- Place speculum and evaluate. Typically a small Moores Graves enables more traction and cervical manipulation; Klopfers allow for wider diameter and wider opening of instrument.
- Apply antiseptic solution to cervix (if using).
- After making a wheal with local anesthetic at twelve o’clock (for most cervixes) or six o’clock (for retroverted uteruses), place tenaculum (consider an atraumatic or Ring for higher gestations), closing the instrument slowly and quietly.
- Administer paracervical block. Consider adding vasopressin (or Lidocaine with epinephrine, a cost-effective alternative) >14 weeks EGD to reduce bleeding (Keder 2003, Whitehouse 2018), with precautions to minimize intravascular administration.
- Check dilation of the cervix with either large dilators or introduction of desired forceps. If needed, gently dilate the cervix sequentially to appropriate size (see Appendix B chart) advancing dilators beyond internal os, but not to uterine fundus. Greater dilation allows easier instrumentation with forceps and decreases risk of uterine and/or cervical injury.
- Note: Consider placing a basin below the speculum/buttocks in case of accidental or artificial rupture of membranes during dilation. Many clinicians either a) place a smaller cannula through internal os, or b) insert forceps just through cervix and opening, allowing fluid to drain into a basin or fluid-collecting drape below.
- If planning uterine evacuation with aspiration only, connect a large cannula (14 – 16mm) and dilate up to equivalent size = weeks +/- 1mm).
- Note: cannula sizes >15mm necessitate use of ¾” tubing. 14mm cannulas can be purchased to fit either ⅜” or ¾” tubing without an adapter.
- Evacuate uterine contents under US guidance using a) aspiration alone (many find this adequate through 16 wks or b) D&E primarily using forceps.
a) Aspiration Technique (forceps only as needed):
-
- Under US guidance, introduce appropriate sized cannula (12 to 14mm for 14 weeks, 14 to15 mm for 15 weeks, and 16mm for 16 weeks) beyond internal os, but not to uterine fundus.
- Connect cannula to tubing before introducing cannula through the cervix and into the uterus.
- With steady patience, suction to remove all fetal tissue, including removal of the calvarium after decompression, by rotating the cannula and withdrawing to the internal os, readvancing and repeating until there are signs that the uterus is empty.
- If the calvarium is not moving into the cannula, slowly pull it into the lower uterine segment (LUS) using suction while attempting to decompress by continually rotating the cannula.
- If tissue is not moving into cannula, gently place the cannula end (with tissue) against the inside of the LUS or internal os (avoiding 3 and 9 o’clock areas) and “push” tissue into cannula by compressing it against uterine wall using an outward (away from fundus) motion.
- Alternatively, pull the tissue into LUS and through cervix while the tissue remains at the cannula tip. Some clinicians turn off the suction before removing the clogged cannula to avoid audible suction noises or accidental suction against the cervix, but this may release the clogged tissue as it travels through the cervix. Consider pressing the cannula’s distal tip against a sterile piece of gauze to de-clog the cannula while maintaining sterile no-touch technique.
- If still unable to remove calvarium or all tissue through cannula, proceed to forceps extraction (see below).
- With US, ensure an empty uterus, good uterine tone, and minimal bleeding prior to removal of instruments (or placement of IUD).
- Check POC for adequacy (4 extremities, spine, calvarium, placenta).
- Reassure that the procedure is complete and went smoothly, that cramps are a sign of a healthy uterus returning to its non-pregnant size, and that emotions arising with abortion are normal, and that you are there with them.
- See Ch 6: Troubleshooting if unable to confirm completion.
- Initiate the recovery process as described in Ch 6: Abortion Aftercare.
b) D&E (Primary forceps technique)
-
- Drain amniotic fluid, if still present, as described above.
- Orient US to determine location of fetal tissue, most frequently in a longitudinal view including cervix and entirety of uterus for the rest of the procedure.
- Straighten the endocervical canal, applying and maintaining traction to the tenaculum throughout the procedure with your non-dominant hand, and insert the closed forceps into the LUS using your dominant hand. Remain mindful of the uterine arteries at 9 and 3 o’clock.
- To begin removing tissue, as soon as forceps jaws extend beyond the internal os, open as widely as possible to surround and grasp tissue without pushing it deeper into the fundus. A systematic approach may include beginning with removal of extremities, followed by spine and torso, followed by calvarium. It may be useful to utilize forceps to reorient the fetal tissue so that it is aligned with either lower extremities first or calvarium first, if currently in a transverse position. Grasp the fetal tissue, and apply steady traction towards and through the cervix, while repeatedly supinating/pronating the forceps hand.
- At 14 to 16 weeks, fetal parts are less-calcified, making tactile feedback with forceps difficult to assess. Forceps with smaller/finer teeth are appropriate (Ring, Hern, Van Lyth, Small Finks).
- At 16 to18 weeks, fetal parts are more calcified and easier to sense in the forceps’ jaws. Larger teeth allow easier grasping (Medium Finks, Sophers, Bierers).
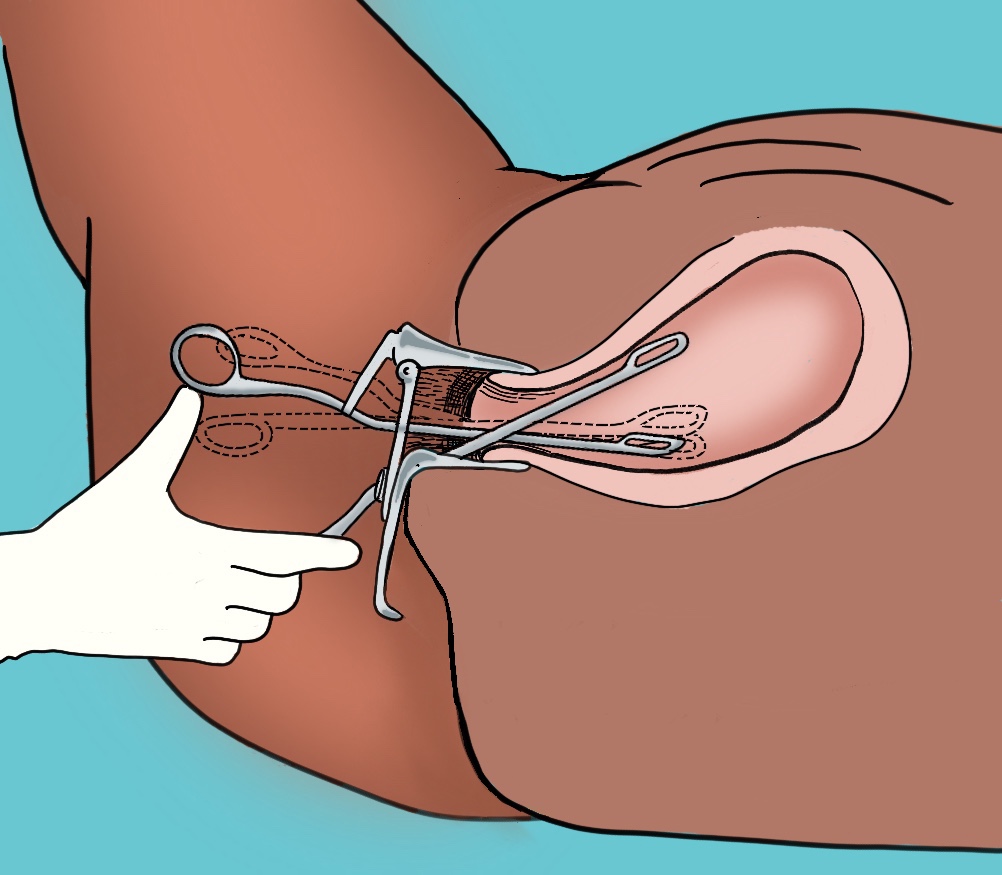 |
| Figure 6. When inserting forceps through the cervix into the uterus, insert with shanks closed, oriented vertically with top at 12 o’clock and bottom at 6 o’clock. Both shanks should be visualized on US in this orientation. |
- Forceps handling to maximize range of motion and stability, and minimize trauma:
- Some providers remove thumb from forceps loop, instead using thumb to push against medial (palmar) aspect of loop (see image)
- Minimize passes through cervix
- Keep hinge at or below the level of the cervix
- Use forceps in LUS, and remain vigilant about distal tip orientation
- Start by grasping the lowest presenting part with forceps
- If deeper insertion is needed to explore the fundus, use traction & follow the uterine axis, maintaining visualization of both jaws of the forceps with US at all times.
- Be cautious grasping tissue near the cervix, to avoid inadvertent cervical tissue trauma with toothed forceps. Instead, push tissue back into the LUS and observe forceps grasp by US.
- Continue tissue traction with rotation to LUS and through cervix until tissue is free.
- Drop grasped fetal tissue into the basin while maintaining sterile no touch technique.
- Removal of an extremity could bring the torso into the LUS. If tissue is still connected, advance the forceps up the torso and grasp for removal.
- If the fetal lie is cephalic with the calvarium blocking access to the rest of the fetal tissue, some providers decompress and remove the calvarium first, others pass closed forceps anterior or posterior past the calvarium to grasp a lower extremity. Traction and removal of lower extremity should rotate the fetal lie.
- Close forceps, reenter cervical canal into the LUS; repeat grasping tissue until all fetal tissue is removed.
- To remove the calvarium, place forceps through the cervix, open in the LUS, and attempt to encircle the calvarium by placing serrated jaws on opposite sides; then close around the calvarium to grasp and decompress it.
- If it “floats” high in the uterus, grasp any part (with forceps or with 12 – 14 mm cannula) and apply slow traction to move the calvarium into the LUS before (re)attempting decompression. Grasping it may require opening forceps wider than expected.
- If needed, provide fundal pressure while no instruments are in the uterus to bring the uterine content into the LUS.
- Thick, white fluid (neural tissue) can sometimes be seen leaking from external os after collapsing the calvarium.
- To remove the placenta, grab the distal edge using US guidance and slowly tease the placenta off – like slowly peeling a sticker. Remove with light traction +/- fundal massage while observing US to ensure no uterine wall movement suggesting myometrium entrapment in the forceps. The placenta is best removed intact, and will feel thicker, softer, and bulkier than fetal tissue. Alternatively, remove the placenta with suction alone.
- A final suction curettage using a smaller cannula can be used to empty the uterus of residual blood and tissue.
- Check POC for adequacy (4 limbs, spine, calvarium, placenta) using visual inspection during evacuation, intraoperative US guidance, and/or inspection in the lab.
- Inform the person of a complete procedure & initiate the recovery process as described in Chapter 6: Abortion Aftercare.
Additional Pearls
- When coaching staff on US guidance, be direct and deliberate with feedback to ensure they always follow the instrument inside the uterus to enable continuous visualization of both jaws of the forceps.
- Review Ch 6: Troubleshooting if you are concerned that something is not going well.
- Micro-movements are usually sufficient to approach the tissue in a different way.
- Try suctioning with a 12 – 14 mm cannula to change the position of the remaining fetal parts.
- Sometimes rotating the forceps 180 degrees to face the curvature towards 3 o’clock or 9 o’clock while continually maintaining the forceps in a vertical orientation or changing to a different type of forceps can be sufficient to achieve grasp.
- Consider dilating more to facilitate easier passage of tissue through the cervix.
- Placental expulsion is somewhat hastened with routine administration of oxytocin 10 units IM after fetal delivery at >18 weeks (to 10%) (Dickinson 2009).
- To reduce breast/chest symptoms and lactation after 15 weeks, consider routine anticipatory guidance. supportive measures, such as ice packs, and offering Cabergoline 1 mg PO immediately after abortion (Henkel 2023, SFP 2023)
Medication Abortion >14 weeks
Medication abortion is safe and effective between 14 and 18 weeks of pregnancy and beyond (SFP 2023), and routinely used at later gestations around the world (WHO 2022). The major differences from medication abortion < 14 weeks are routine repeated doses of misoprostol after mifepristone until expulsion of both the fetus and placenta, a lower dose of misoprostol > 14 weeks due to the increased number of uterine receptors, a need for ongoing pain management strategies, and advanced planning of safe, private, person-centered disposal of the products of conception.
Similar to medication abortions in earlier gestations, misoprostol-only regimens offer another safe regimen (Moseson 2021, Stillman 2020). Some studies show higher rates of ongoing pregnancy and incomplete abortion, and it takes more time although it is more widely available, and less expensive than regimens with mifepristone (Blum 2012, Kulier 2011, Moseson 2021, Raymond 2023). Retained placenta is the most common complication that can occur with medication abortion > 14 weeks. It is safe to wait 4+ hours for expulsion without an increased risk of complications. Complications such as uterine rupture, hemorrhage requiring a blood transfusion and/or infection are not common (SFP 2023); see Complications Table below.
| Table 3: Evidence-based Regimens for Medication Abortion > 14 weeks | |||
| Gestational Range | Mifepristone | Misoprostol | Core References |
| 14 – 24 weeks | 200 mg orally | 400 mcg buccally, vaginally or sublingually q 3 hrs till expulsion (with or without mifepristone) | SFP 2023, WHO 2022 |
Where to have the medication abortion?
The decision of where the abortion will take place should maximize patient safety, mitigate medical and legal risks, and ensure the safe disposal of the fetus and placenta. It can take place at home (or a person’s preferred setting), in the health center or hospital, or some combination as needed. For example, provide mifepristone on day 1, and 24 – 48 hours later the person can use 1 or 2 doses of misoprostol, then return to the health center or hospital in the morning to complete the process. For out of health center/hospital management, prescribe at least 12 – 16 tablets of Misoprostol 200 mcg to ensure enough medication to complete the process.
Steps to Medication Abortion (MAB) between 14 and 18 Weeks
- MAB > 14 weeks tends to primarily be a facility-based process, although the role of self-managed abortion (SMA) may depend as much on the legal context as on medical risks (SFP 2023). In facility-based care, people do not need to be directly observed for the entire process. Facility-based care may also provide access to related resources, such as spiritual care, bereavement services, and fetal remains disposition. However, facility-based care can be costly, less private, and may not be necessary for all people (SFP 2023). For guidance, see Ch 2: SMA.
- Review the health history, labs (Rh and hemoglobin), consents, and pregnancy dating. Dating can be done using the last menstrual period, physical exam (BME or abdominal palpation), or US, if available. Ensure appropriate counseling and shared decision making with special consideration to where the abortion will take place, timing and route of medications, plan for disposal of the products of conception, and how medical staff can be reached.
- Administer Rh IG, if indicated.
- Dispense/prescribe/discuss supportive/adjuvant medications:
- Pain: NSAIDs are the mainstay of treatment, but some people may do well with acetaminophen, tramadol or opiates. Multimodal pain management options can be offered (see Ch. 5: Pain Management).
- Nausea: ondansetron 4 to 8 mg PO q 8h or prochlorperazine 5 to10 mg q 6-8h PRN.
- Diarrhea: loperamide 4 mg PO x1, 2 mg PO q hour after loose stool, max 16 mg in 24h
- The person will take mifepristone 200 mg PO (when available), optimally waiting 24 to 48 hours before taking misoprostol 400 mcg every 3 hours. If the abortion process needs to be expedited, co-administration of mifepristone and misoprostol is still superior to misoprostol alone (Abbas 2016). In settings without mifepristone, misoprostol 400 mcg should be taken every 3 hours (see SFP 2023 for more detail).
- Misoprostol can be used vaginally (recommended for lowest side effect profile and fastest time to expulsion), buccally, or sublingually, per individual preference. There is no limit to the number of doses of misoprostol that can be used.
- Fetal and placental disposal is a sensitive issue that should be managed with person-centered options and the utmost care and will also be impacted by local laws and cultural practices. Discovery of fetal remains or placenta has led to criminalization. States may vary on requirements for disposition of fetal remains and whether an individual may request cremation or funeral services, however no state has a law explicitly criminalizing private disposal of fetal remains.
- For specific legal questions about their situation people should contact the Repro Legal Helpline to speak with a lawyer, available 24/7
- For medical questions during a medication abortion at home people can people contact the M+A Hotline to speak with a volunteer medical provider
- Average time to completion is:
- 10 hours for mife/miso regimens, with 90% of people completing the process after 24 hours of misoprostol, and 95% after 48 hours (Abbas 2016, Dabash 2015).
- 12 hours for Miso-only regimens between 14 to18 weeks gestation, with completion rates >90% at 48 hours (Dabash 2015).
1 California has a law making it a misdemeanor to dispose of fetal remains in a place open to public view. California Penal Code 643