11
Technical reports (including handbooks and guides) have various designs depending on the industry, profession, or organization. This chapter shows you one traditional design. If you are taking a technical writing course, ask your instructor for any design specifications she has for your documents. The same is true if you are writing a technical report in a science, business, or government context. Organizations very often have their own “stylesheets” on which all organizational document designs are based, so make sure the design presented in this chapter is acceptable.
Technical reports have specifications as do any other kind of project. Specifications for reports involve layout, organization and content, format of headings and lists, the design of the graphics, and so on. The advantage of a required structure and format for reports is that you or anyone else can expect them to be designed in a familiar way—you know what to look for and where to look for it. Reports are usually read in a hurry—people are in a hurry to get to the information they need, the key facts, the conclusions, and other essentials. A standard report format is like a familiar neighborhood.
When you analyze the design of a technical report, notice how repetitive some sections are. This duplication has to do with how people read reports. They don’t read reports straight through: they may start with the executive summary, skip around, and probably not read every page. Your challenge is to design reports so that these readers encounter your key facts and conclusions, no matter how much of the report they read or in what order they read it.
Be sure and see the example reports.
The standard components of the typical technical report are discussed in this chapter. The following sections guide you through each of these components, pointing out the key features. As you read and use these guidelines, remember that these are guidelines, not commandments. Different companies, professions, and organizations have their own varied guidelines for reports—you’ll need to adapt your practice to those as well the ones presented here.
Cover letter
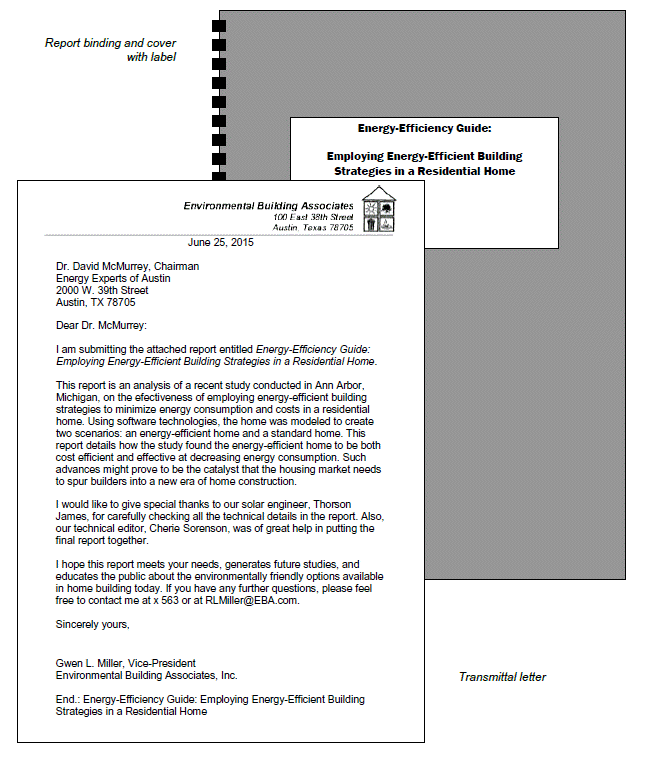
The cover letter is either attached to the outside of the report with a paper clip or is bound within the report. It is a communication from you—the report writer—to the recipient, the person who requested the report and who may even be paying you for your expert consultation. Essentially, it says “Here is the report that we agreed I’d complete by such-and-such a date. Briefly, it contains this and that, but does not cover this or that. Let me know if it meets your needs.” The cover letter explains the context—the events that brought the report about. It contains information about the report that does not belong in the report.
In the example of the cover letter that follows, notice the standard business-letter format. If you write an internal report, use the memorandum format instead. In either case, the contents and organization are the same:
First paragraph. Cites the name of the report, putting it in italics. It also mentions the date of the agreement to write the report.
Middle paragraph. Focuses on the purpose of the report and gives a brief overview of the report’s contents.
Final paragraph. Encourages the reader to get in touch if there are questions, comments, or concerns. It closes with a gesture of good will, expressing hope that the reader finds the report satisfactory.
As with any other element in a report, you may have to modify the contents of this letter (or memo) for specific situations. For example, you might want to add another paragraph, listing questions you’d like readers to consider as they review the report.
Cover page
Be sure to create a cover page for your report. It’s a step that some report writers forget. Without a label, a report is anonymous; it gets ignored.
The best way to create a cover page is to use your word-processing software to design one on a standard page with a graphic box around the label information. Not much goes on the label: the report title, your name, your organization’s name, a report tracking number, and a date. There are no standard requirements for the label, although your company or organization should have its own requirements. (An example of a report label is shown below.)

Transmittal letter and report cover (with cover label).
Abstract and executive summary
Most technical reports contain at least one abstract—sometimes two, in which case the abstracts play different roles. Abstracts summarize the contents of a report, but the different types do so in different ways:
- Descriptive abstract. This type provides an overview of the purpose and contents of the report. In some report designs, the descriptive abstract is placed at the bottom of the title page, as shown in the following:

Descriptive abstract. Traditionally, it is placed on the title page (not the cover page).
- Executive summary. Another common type is the executive summary, which also summarizes the key facts and conclusions contained in the report. Think of this as if you used a yellow highlighter to mark the key sentences in the report and then siphoned them all out onto a separate page and edited them for readability. Typically, executive summaries are one-tenth to one-twentieth the length of reports ten to fifty pages long. For longer reports, ones over fifty pages, the executive summary should not go over two pages. The point of the executive summary is to provide a summary of the report—something that can be read quickly.
If the executive summary, introduction, and transmittal letter strike you as repetitive, remember that readers don’t necessarily start at the beginning of a report and read page by page to the end. They skip around: they may scan the table of contents; they usually skim the executive summary for key facts and conclusions. They may read carefully only a section or two from the body of the report, and then skip the rest. For these reasons, reports are designed with some duplication so that readers will be sure to see the important information no matter where they dip into the report.
Table of contents
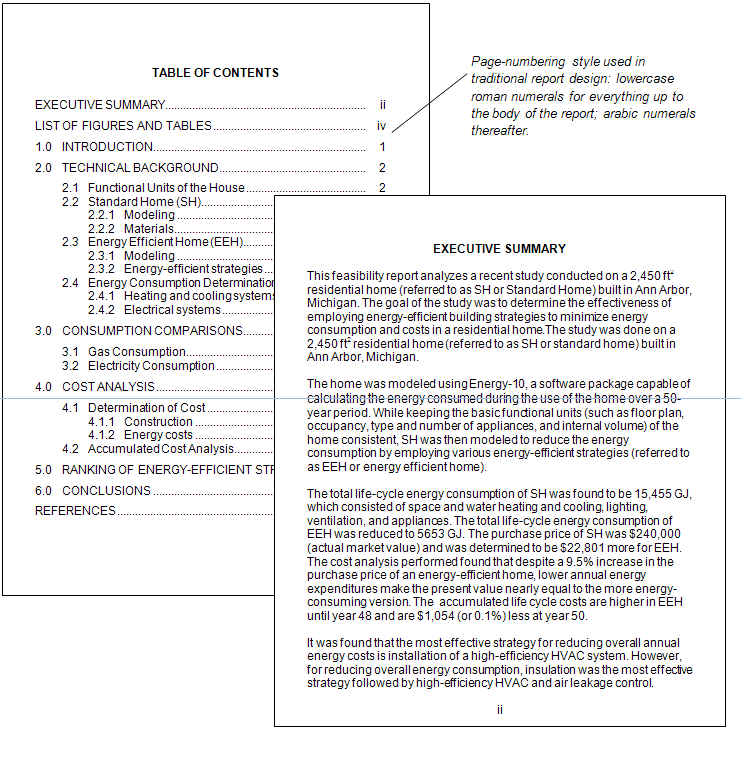
You are familiar with tables of contents (TOC) but may never have stopped to look at their design. The TOC shows readers what topics are covered in the report, how those topics are discussed (the subtopics), and on which page numbers those sections and subsections start.
In creating a TOC, you have a number of design decisions:
- Levels of headings to include. In longer reports, consider not including only the top two levels of headings. This keeps the TOC from becoming long and unwieldy. The TOC should provide an at-a-glance way of finding information in the report quickly.
- Indentation, spacing, and capitalization. Notice in the illustration below that items in each of the three levels of headings are aligned with each other. Although you can’t see it in the illustration, page numbers are right-aligned with each other. Notice also the capitalization: Main chapters or sections are all caps; first-level headings use initial caps on each main word; lower-level sections use initial caps on the first word only.
- Vertical spacing. Notice that the first-level sections have extra space above and below, which increases readability.
Using the automatic TOC creator in your word processor can help you produce a clean, professional document. If you prefer to make your own, learn to use dot leader tabs in order to line up the page numbers correctly.
One final note: Make sure the words in the TOC are the same as they are in the text. As you write and revise, you might change some of the headings—don’t forget to change the TOC accordingly. See the example of a table of contents:

Table of contents (which comes first) then the executive summary. In a technical writing course, ask your instructor if the decimal-numbering style for the table of contents and headings is required.
List of figures and tables
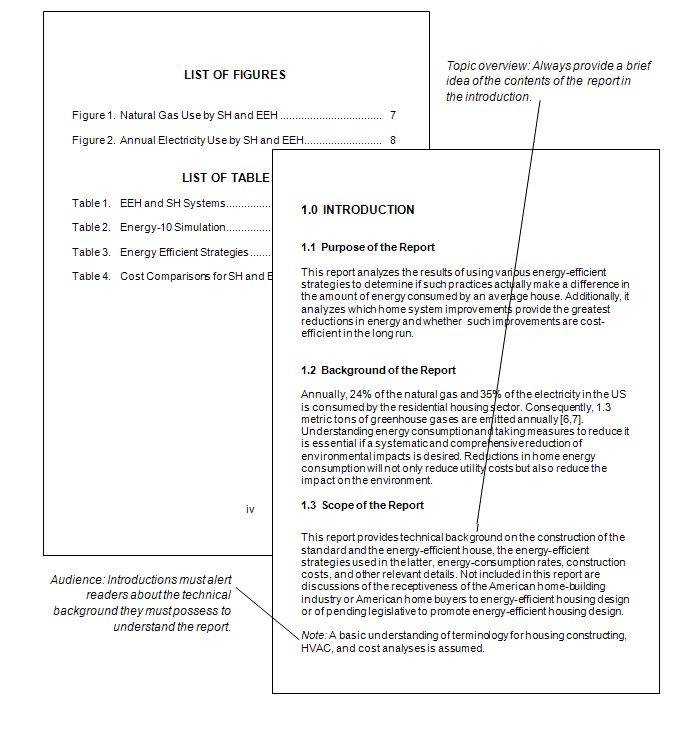
If your document has more than two figures or tables create a separate list of figures. The list of figures has many of the same design considerations as the table of contents. Readers use the list of figures to quickly find the illustrations, diagrams, tables, and charts in your report.
Complications arise when you have both tables and figures. Strictly speaking, figures are illustrations, drawings, photographs, graphs, and charts. Tables are rows and columns of words and numbers; they are not considered figures.
For longer reports that contain dozens of figures and tables each, create separate lists of figures and tables. Put them together on the same page if they fit, as shown in the illustration below. You can combine the two lists under the heading, “List of Figures and Tables,” and identify the items as figure or table as is done in the illustration below.
Introduction
An essential element of any report is its introduction—make sure you are clear on its real purpose and contents. In a technical report, the introduction prepares the reader to read the main body of the report.
See this example of an introduction:

List of figures and tables followed by the introduction. If there are no tables, make it “List of Figures.” In a technical writing course, ask your instructor if the decimal-numbering style for headings is required.
Body of the report
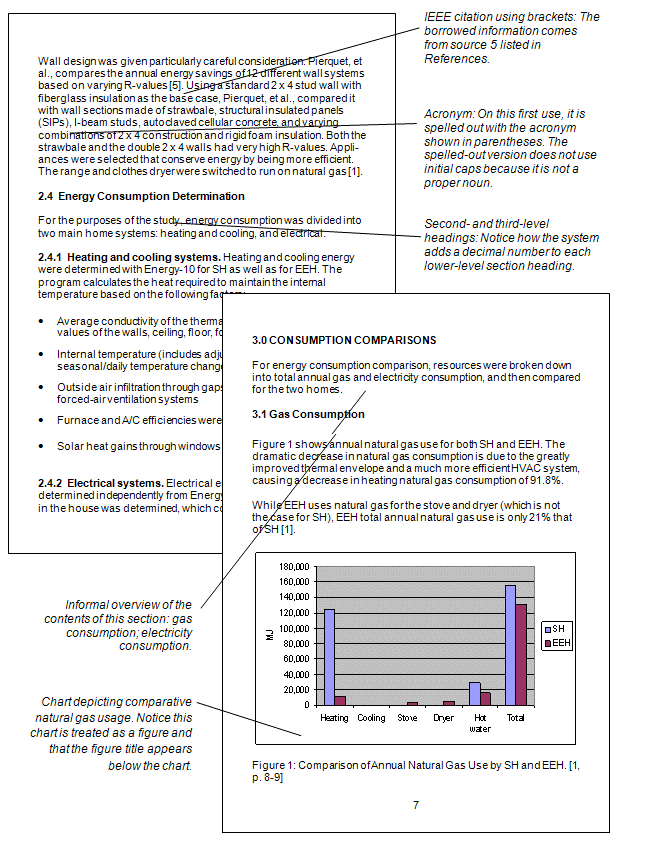
The body of the report is of course the main text of the report, the sections between the introduction and conclusion. Illustrated below are sample pages.
Headings
In all but the shortest reports (two pages or less), use headings to mark off the different topics and subtopics covered. Headings are the titles and subtitles you see within the actual text of much professional scientific, technical, and business writing. Headings are like the parts of an outline that have been pasted into the actual pages of the document.
Headings are an important feature of professional technical writing: they alert readers to upcoming topics and subtopics, help readers find their way around in long reports and skip what they are not interested in, and break up long stretches of straight text.
Headings are also useful for writers. They keep you organized and focused on the topic. When you begin using headings, your impulse may be to slap in the headings after you’ve written the rough draft. Instead, visualize the headings before you start the rough draft, and plug them in as you write.
Your task in this chapter is to learn how to use headings and to learn the style and format of a specific design of headings. Here are a number of helpful tips:
- Make the phrasing of headings self-explanatory: instead of “Background” or “Technical Information,” make it more specific, such as “Physics of Fiber Optics.”
- Make headings indicate the range of topic coverage in the section. For example, if the section covers the design and operation of a pressurized water reactor, the heading “Pressurized Water Reactor Design” would be incomplete and misleading.
- Avoid “stacked” headings—any two consecutive headings without intervening text.
- Avoid pronoun reference to headings. For example, if you have a heading “Torque,” don’t begin the sentence following it with something like this: “This is a physics principle…..”
- When possible, omit articles from the beginning of headings. For example, “The Pressurized Water Reactor” can easily be changed to “Pressurized Water Reactor” or, better yet, “Pressurized Water Reactors.”
- Don’t use headings as lead-ins to lists or as figure titles.
- Avoid “widowed” headings: that’s where a heading occurs at the bottom of a page and the text it introduces starts at the top of the next page. Keep at least two lines of body text with the heading, or force it to start the new page.
If you manually format each individual heading using the guidelines presented in the preceding list, you’ll find you’re doing quite a lot of repetitive work. The styles provided by Microsoft Word, OpenOffice Writer, and other software save you this work. You simply select Heading 1, Heading 2, Heading 3, and so on. You’ll notice the format and style are different from what is presented here. However, you can design your own styles for headings.

Excerpt from the body of a technical report. In a technical writing course, ask your instructor if the decimal-numbering style for headings is required. Also, a different documentation system may be required—not the IEEE, which is for engineers.
Bulleted and numbered lists
In the body of a report, also use bulleted, numbered, and two-column lists where appropriate. Lists help by emphasizing key points, by making information easier to follow, and by breaking up solid walls of text. Always introduce the list so that your audience understand the purpose and context of the list. Whenever practical, provide a follow-up comment, too. Here are some additional tips:
- Use lists to highlight or emphasize text or to enumerate sequential items.
- Use a lead-in to introduce the list items and to indicate the meaning or purpose of the list (and punctuate it with a colon).
- Use consistent spacing, indentation, punctuation, and caps style for all lists in a document.
- Make list items parallel in phrasing.
- Make sure that each item in the list reads grammatically with the lead-in.
- Avoid using headings as lead-ins for lists.
- Avoid overusing lists; using too many lists destroys their effectiveness.
- Use similar types of lists consistently in similar text in the same document.
Following up a list with text helps your reader understand context for the information distilled into list form. The tips above provide a practical guide to formatting lists.
Graphics and figure titles
In technical report, you are likely to need drawings, diagrams, tables, and charts. These not only convey certain kinds of information more efficiently but also give your report an added look of professionalism and authority. If you’ve never put these kinds of graphics into a report, there are some relatively easy ways to do so—you don’t need to be a professional graphic artist. For strategies for adding graphics and tables to reports, see the chapter on Creating and Using Visuals. See the chapter on visuals for more help with the principles for creating visuals.
Conclusions
For most reports, you will need to include a final section. When you plan the final section of your report, think about the functions it can perform in relation to the rest of the report. A conclusion does not necessarily just summarize a report. Instead, use the conclusion to explain the most significant findings you made in relation to your report topic.
Appendixes
Appendixes are those extra sections following the conclusion. What do you put in appendixes? Anything that does not comfortably fit in the main part of the report but cannot be left out of the report altogether. The appendix is commonly used for large tables of data, big chunks of sample code, fold-out maps, background that is too basic or too advanced for the body of the report, or large illustrations that just do not fit in the body of the report. Anything that you feel is too large for the main part of the report or that you think would be distracting and interrupt the flow of the report is a good candidate for an appendix. Notice that each one is given a letter (A, B, C, and so on).
Information sources
Documenting your information sources is all about establishing, maintaining, and protecting your credibility in the profession. You must cite (“document”) borrowed information regardless of the shape or form in which you present it. Whether you directly quote it, paraphrase it, or summarize it—it’s still borrowed information. Whether it comes from a book, article, a diagram, a table, a web page, a product brochure, an expert whom you interview in person—it’s still borrowed information.
Documentation systems vary according to professionals and fields. For a technical writing class in college, you may be using either MLA or APA style. Engineers use the IEEE system, examples of which are shown throughout this chapter. Another commonly used documentation system is provided by the American Psychological Association (APA).
Page numbering
Page-numbering style used in traditional report design differs from contemporary report design primarily in the former’s use of lowercase roman numerals in front matter (everything before the introduction).
- All pages in the report (within but excluding the front and back covers) are numbered; but on some pages, the numbers are not displayed.
- In the contemporary design, all pages throughout the document use arabic numerals; in the traditional design, all pages before the introduction (first page of the body of the report) use lowercase roman numerals.
- On special pages, such as the title page and page one of the introduction, page numbers are not displayed.
- Page numbers can be placed in one of several areas on the page. Usually, the best and easiest choice is to place page numbers at the bottom center of the page (remember to hide them on special pages).
- If you place page numbers at the top of the page, you must hide them on chapter or section openers where a heading or title is at the top of the page.
Chapter Attribution Information
This chapter was derived from the following sources.
- Online Technical Writing by David McMurrey – CC: BY 4.0
