Appendix C: Audiovisual Collection Inventory and Instructions
Introduction & Resources
This page offers guidelines and explanations on how to use the Audiovisual Collection Inventory Template provided by the Community Archiving Workshop and Recollection Wisconsin. You may download a copy of the inventory spreadsheet here. This is your copy, and you may modify the fields as you see fit for your own collections. In addition, Audiovisual Formats: A guide to identification will aid you in visually identifying the many different audiovisual formats you might encounter.
Using this inventory template, you will document metadata that can mostly be gathered from looking at the objects themselves. Keep in mind that you may not be able to fill out every detail for every object – feel free to use “Unknown” as a value.
Assess condition and use caution before playing items in your collection to gather more details. Loanable kits for inspecting and playing audio and video formats are available from Community Archiving Workshop.
An item-level inventory can help you make plans and priorities for digitization of your collections to locate, preserve, and increase access to the content. This inventory can be used to estimate the cost of digitization, rehousing, and storage, and can be vital to tracking the progress of work whether you are reformatting your material in-house or with an outside vendor. Identifying and locating your most valuable collections will help you consolidate by location so it’s easier to find and evacuate them in the event of an emergency.
If you would like overall guidance on how to get started using this document to inventory the collections at your organization, please contact communityarchivingworkshop@gmail.com to set up a short consultation.
Getting Started on Your Inventory Project
Preparing your sheet and items
The first step is to decide what you will be inventorying and to get your inventory sheet or form ready. We suggest saving the provided template as your master document, and creating a copy and renaming it to match your specific library, museum, or archive and collection. If multiple people will be working on the inventory, you can create a copy of the Google form to Google drive and share the link with everyone who needs it to enter data. Remember to save your version of the sheet/form with your name in the title of the file, and send a link to the holding organization so they will have a copy of your inventory.
If your items do not already have unique IDs and you plan to add identifiers during this process, you should gather some paper labels or a marking pen to write the identifiers on your object before beginning the inventory. Finally, a ruler can be useful when identifying formats.
Understanding how the inventory sheet works
In the inventory template, we have entered data for a sample item, a VHS tape, in the second row. It may be useful to look over this sample data before you start your own inventory. Remember that each row in the sheet represents a single physical item, and it will be common to not be able to fill out every field for every item – in these cases leave the field blank. The inventory is the first step in a longer process and your goal for now is to get a baseline amount of information to start making preservation plans and priorities.
Understanding how to identify different audiovisual formats
The provided guide to understanding audiovisual formats contains a wealth of information and images which will assist you as you are inventorying. If you come across an item whose format you do not recognize, check it against the images included in the guide.
Inventory Sheet Data Entry Guide
| Field | Description |
|---|---|
| Holding Organization | Name of the organization whose collection is being inventoried |
| Storage Location | Enter the permanent storage location of the item (Building/Room/Shelf). Noting the permanent location, whether a shelf number or the name of a room, can help you link the item on this inventory back to the item itself. If unknown, leave blank. |
| Unique ID # | Unique identifier assigned to and written on the item that will help match the item back to this inventory sheet. This could be a barcode, or could be a temporary number or letter-number combination. Use the unique identifier system that the organization already uses. This is also an opportunity to develop a new numbering system if you need to. For example: year/period/four digit number (2018.0456). If you assign unique IDs, be sure to label clearly. |
| Other IDs | Items may have old IDs from previous collection inventories. Be sure to note those, even if you have assigned a Unique ID. If unknown, leave blank. |
| Box # | Use if applicable. This is a number that would have been assigned to the box that holds the item prior to the inventory being taken. If unknown, leave blank. |
| Collection Name | Identify which collection this item belongs to, if any. If unknown, leave blank. |
| Title on Item | Capture clearly indicated title on label or item, or if specified by collection stewards. |
| Creator(s) | Person(s) or organization(s) responsible for creating the item. Format consistently and separate multiple entries with a semicolon: Last name, First name, role; Last name, First name, role. Example main credits: Producer, Director, Interviewer; Writer. If unknown, leave blank. |
| Contributor(s) | General catchall for other credits. Format consistently and separate multiple entries with a semicolon: Last name, First name, role; Last name, First name, role. Example additional roles: Camera; Cast; Editor; Interviewee; Music; Musician; Sound; Speaker. If unknown, leave blank. |
| Date on Item | Transcribe any information on the label or item that identifies the date of the recording. Format consistently: YYYY-MM-DD or YYYY-MM or YYYY. If unknown, leave blank. |
| Content Description | If information regarding content is available, list it here. Capture information regarding content. Include all relevant info as it is recorded on item label(s) - visible at first glance. If unknown, leave blank. |
| Rights | Known copyright date(s), copyright holder(s), access restrictions and other relevant information. Record any information regarding copyright noted on the item. If unknown, leave blank. |
| Annotations | All relevant info as it is recorded on housing and item label(s). Record all text verbatim. Indicate where annotations are found (container or recording itself; face or spine). Include alternate titles, list of titles for compilations, or additional credits. Use semicolons between lines of content. If there are checked boxes for technical specs, record all boxes checked. If some annotations are illegible, indicate in brackets. If no annotations are listed on the container or case, leave blank. |
| Condition Notes | Enter any information you can determine about the condition from looking at the object. For example: dusty, case cracked, case missing, evidence of mold, loose wind, slide cracked, sticky, smelly, footage is fuzzy, audio is unclear, etc. Use consistent vocabulary. |
| Media Type | General nature of the content. Use controlled vocabulary. |
| Format | Additional detail about the medium if known. See the format identification guide if you need help. If unknown, leave blank. |
| Extent | Number of parts - tapes, reels or pages per item. |
| Approximate Duration (AV only) or Approximate Dimensions (Print only) | For audiovisual recordings, approximate total run time. If unknown, capture maximum tape length (written on the box or tape). Be consistent with format, e.g. hh:mm:ss. For print materials, record dimensions, if possible. Measurements of width and height in inches, e.g. 8 1/2 x 11 in. Use whole numbers or fractions (no decimal values). If unknown, leave blank. |
| Color/B&W | For moving image media. Is it in color or black and white? Listed on label or identified during inspection. Use controlled vocabulary. If unknown, leave blank. |
| Audio Information | For moving image media. Look for information on label or identify during inspection. Use controlled vocabulary. If unknown, leave blank. |
| Carrier | Identify the carrier of the item (film on REEL, film on CORE, video or audio CASSETTE). Use controlled vocabulary. |
| Housing | Identify the housing that the item is stored in, if any (film CAN, video CASE, Audio CASE, etc.). Use controlled vocabulary. |
| Film Element Type | Is the film a positive print, reversal, or a negative? Use controlled vocabulary. If unknown, leave blank. |
| Film: Estimated Footage Length (ft.) | Approximate film length with a film ruler, look for notch marks on the film reel, or check labels for information. If unknown, leave blank. |
| Film Edge Code | Series of shapes that are visible on Kodak stock only, which designate the year the film was produced (but not necessarily exposed and processed). Consult the NFPF Film Preservation Guide: https://www.filmpreservation.org/userfiles/image/PDFs/fpg_10.pdf If unknown, leave blank. |
| Reel Diameter (inches) | Measure the physical diameter of all reels (film and audio) in inches. This information can help you approximate duration. |
| Base Material Type | Identified during inventory or listed on label. Is the film or videotape polyester, acetate, or a combination? Use controlled vocabulary. If unknown, leave blank. |
| Access Restrictions | Are there any known restrictions on who can view this item based on the content for legal or ethical reasons? If unknown, leave blank. |
| Notes | This is a field to include any additional information you think could be useful that did not fit into any of the other fields. If nothing to add, leave blank. |
| Preservation Priority | Consider the physical condition of the item and value of its content. For example, is the item damaged or an obsolete format? Is it unique or rare? Is it historically significant? Is it important to your organization or community? |
| Date Inventoried | Enter the date the item was inventoried. Format as: YYYY-MM-DD, e.g. 2018-10-09. |
| Inventoried By | Enter the name of the person completed the record. |
Using an Item Level Collection Inventory for Collection Management and Preservation Planning
Why Create an Item Level Inventory?
An item level inventory is a powerful tool that allows the user to generate information necessary for preservation planning, digitization, and fundraising. Item level inventories are especially important for audiovisual materials, in part because one tape or film reel can hold so much technical and content metadata.
Ways an inventory can be used include:
- Locating and tracking physical collection items
- Estimating the running time of collections, which can be used to estimate the time (and cost) it will take to digitize them
- Tracking what audiovisual assets have been digitized
- Knowing how many audiovisual assets you have of each format
- Prioritizing collection items for preservation (using the AVPRAPPS System)
- Describing the content of the collection
- Providing research access to the collection
- Identifying access restrictions for certain items
- Capturing institutional memory (content, places, names, context, etc.)
This document walks the beginner user through some ways in which a CAW inventory— or any inventory created using an online spreadsheet— can be used to support collection preservation and access.
Why Use a Spreadsheet?
Some organizations track assets in their collections using cataloging software such as Past Perfect or The Museum System (TMS). Some organizations use a spreadsheet or software such as Air Table. For organizations just getting started on their collection inventory, Community Archiving Workshop (CAW) recommends using a simple spreadsheet. A spreadsheet is “an electronic document in which data is arranged in the rows and columns of a grid and can be manipulated and used in calculations.” Google Sheets and Microsoft Excel are examples of spreadsheets. CAW recommends using a spreadsheet for the following reasons:
- They are free of charge to use, or relatively low cost
- The layout allows for fast data entry
- The layout and use can be learned in about an hour
- Data can be parsed out into discrete cells, which means that if the organization adopts another cataloging system in the future, data can be migrated directly into the corresponding fields
- Spreadsheets allow the user to create drop down menus, which allows for faster data entry and allows for the creation of controlled vocabularies (for example, “VHS” instead of “vhs”.
- Spreadsheets allow filtering and sorting (see below), so that you can create larger data about your collection. (for example, you can filter by “VHS” and see exactly how many VHS tapes you have)
- There is no need to purchase expensive cataloging systems or choose a complex cataloging methodology before creating an inventory of your collection
Once you have a spreadsheet, and an item level inventory, you have a wealth of information necessary to plan digitization projects and to write grants.
Sharing Online Spreadsheets (Google Sheets)
Currently, CAW uses Google Sheets to create inventories. Google Sheets is “a web-based application that enables users to create, update and modify spreadsheets and share the data online in real time.[1]” A Google Sheets inventory is not a document that needs to be downloaded in order to use. It lives in cloud based storage. Many people can log into a Google sheet at one time, no matter where they are, and enter data. The advantage to this is that the document is a living document that is always up to date, and that many people can work on it at once in your organization. The downside is that you may overwrite someone else’s information if you are working at the same time (though Google Sheets has a function that allows you to go back to earlier versions). CAW recommends saving Google sheets outside of the Google drive periodically. More on this below.
To use Google Sheets to inventory a collection, you need a link to access the spreadsheet, or you need to be invited as a user with editor capabilities. To create a link to the document, click on file > share> share with others. You will see options for emailing a link or creating a link. You will also have the option to allow people to access the document as a view only, a commenter only, or an editor.
Entering Data into the Spreadsheet
Google Drive is an online storage system that automatically stores any documents that you create using Google’s suite of tools. An inventory in Google Sheets will live in a Google Drive. When working with others to create an inventory:
DO
- Work in one spreadsheet
- Put all data into one spreadsheet tab, rather than in multiple tabs (this way, you can sort all of your data at one time. See the section on sorting below)
DON’T
- Create multiple copies of the Google sheet
- Download the spreadsheet and work on it offline (this creates multiple versions and may result in loss of work)
Backing Up an Online Inventory Spreadsheet
Google or any online work or data processing platform will autosave your spreadsheet on their servers. However, it’s recommended to periodically back up your work in other ways, rather than relying only on the software company alone. To back up your work, download a copy of the inventory at regular intervals (once a week, once a month), and store it on another cloud service, server, and hard drive. Any of these will do, but all three is best. You may also wish to print out a copy on paper. Remember this is for back up, do not work off the downloaded files.
Using the Data in Your Inventory
An inventory made in a spreadsheet is much more powerful than a list of items written on paper or in word processing documents. This is because data in a spreadsheet, if entered correctly, can be sorted and filtered, and numbers can be automatically added or averaged. For example, if you want to know how many VHS tapes you have, you can filter for VHS tapes and add up the results in a few seconds. Or, if you wish to estimate the running time of a collection so that you can estimate the time it might take to digitize the collection, a spreadsheet can do this for you quickly. In addition, if you or your organization ever decide that you would like to adopt a new database or content management system, you can migrate data directly from one field in the spreadsheet inventory into the corresponding field in your new database.
This section goes over how to perform the most common of these functions. CAW suggests creating a copy of your inventory that you only use for practicing these skills, so that you can practice using these functions without worrying about losing your data or changing the spreadsheet. Once you have a few of these functions down, you can easily search for items in the collection, quickly count how many of each format you have, and even estimate the running time of your collection– all essential in creating successful grant applications, a digital storage plan, or a digitization plan.
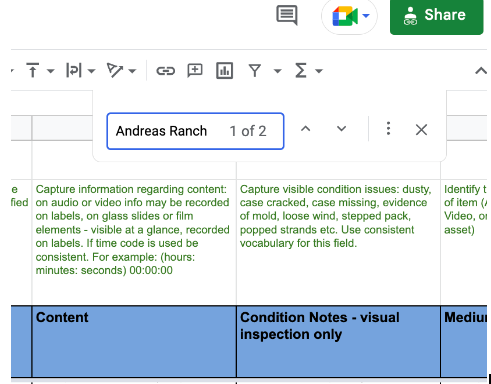
Searching for an item using the “find” function
This is super handy if you want to find a specific item. Think of it like using a mini search engine that only works on your document.
- Click command>F
- A box pops up in the upper right hand corner of your spreadsheet
- Type in any words or numbers associated with the item
- The spreadsheet will jump to the item or items
- Use the up and down arrows next to the search box to toggle between multiple items that meet the search criteria.
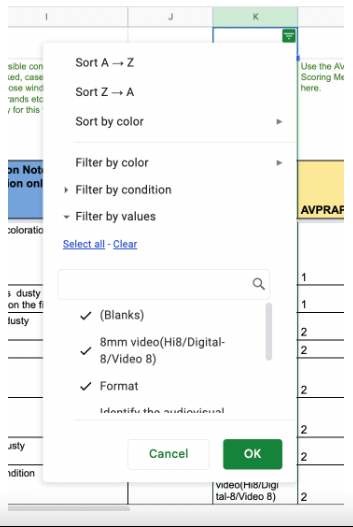
Filtering items
Using the filter function, you can find out how many VHS tapes you have, how many assets have mold, or how many assets have been digitized. There are endless data sets that you can create using the filter function
- Click on a column and highlight it
- Click on the filter icon (it looks like a funnel)
- Click on the filter icon that you now see at the top of the column (it looks like a tornado, see below)
- Choose “clear”
- You will see a list of every option available in that column. Check the box next to the item/s that you want to see displayed (for example VHS only). Hit “OK”.
- Sheets will show you only the VHS tapes in your collection.
- To remove the filter, click on the filter (funnel) icon again.
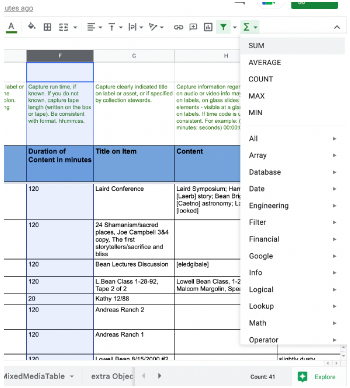
The “sum” function is a button on the spreadsheet that will add up the numbers in any cells that you highlight. This is a very important tool for counting collection items and running times.
- Highlight the column that you wish to add
- Click on the “sum” symbol in the upper right hand corner of the spreadsheet (the Greek letter, sigma)
- The sum will appear in the box below the last highlighted cell
- Alternatively, you can highlight the numbers you wish to add, and look in the lower right hand corner of the spreadsheet (see in the screenshot below). You will see the word “count” followed by a number. Your sum will also be there.
Metadata is a Latin term meaning "information about information." In the digital realm, metadata is data that describes key information about digital objections (image files, text files, digital audio/video) and, when appropriate, the original objects they represent. Types of metadata include administrative, descriptive, structural, and technical.
