3 Focus Area 3: Digitize
Digitization is the process of making a digital copy of a physical object — for instance, scanning a document, using a digital camera to photograph an artifact, or converting an audiocassette into a WAV file. Another common term for this process is reformatting.
Your goal here is to create a digital file that accurately represents the original item, using recognized standards that will keep the file usable for years to come. Keep in mind that this digital file will need ongoing care and storage, just as proper care and storage is still needed for the original physical object.
Because A/V preservation is an evolving process, the general recommendation is to keep physical materials as new technology or processes may emerge that would allow collections to benefit from another pass at digitization, if it is still possible. (See the Store and Maintain section of the Toolkit for more on caring for your digital files).
DIGITIZE: BRONZE LEVEL
| Key Activities |
|---|
| - Identify the resolution, color, bit depth, file format, and other standards you will use to digitize materials. |
| - Choose equipment for reformatting, identify partnerships, or select an appropriate vendor. |
| For A/V materials: |
| Identify the sample rate, bit rate, codec, wrapper, and other standards you will adopt for digitized materials. |
Digitization Standards
When digitizing, aim for a “capture once, use many times” approach. Get the best quality you can the first time around; don’t anticipate going back to re-digitize down the road. A high-quality primary file can be copied, edited, or resized as needed for all kinds of future uses.
So what quality do you need? There is no one-size fits all specification — the standards you’ll use will depend on the size and type of the original materials. The table below outlines the generally recommended minimum standards to use for resolution, color, bit depth, and file format when digitizing common formats, including documents, images, audio, and video[1].
Last play?
If you’re considering digitizing an audiovisual recording, keep this in mind: the digitization stage may be the last opportunity to play it back, either because the equipment used to play the recording may be obsolete (or nearly so), or because the medium itself may be fragile, decaying, or at risk of damage during digitization. You should consult with an A/V professional before viewing or listening to media that you suspect may be at high risk. The goal is to get the best signal from the item, and to use a file format that captures the highest quality possible. However, an organization must also consider using a file format that they can play back in the future and consider a file size that is possible for them to store with their existing or future storage capabilities. Once a preservation file is created, the organization can produce derivative files that are better suited for streaming or downloading from the preservation file.
Preferred file formats and digitization standards
The table below describes recommended resolution, bit depth, and file formats for several commonly-used materials. We have adjusted the recommendations to be achievable by an under-resourced cultural heritage organization and still meet the requirements of high-quality digital files. The minimum options will give you usable files, but the ideal options will create files that can be stored for the long term and edited or adjusted at a later date. Several more resources are available for further reading in the Resources and Tools list at the end of this section.
| Content Type | Resolution (PPI) | Color | Bit Depth | File Format/Extension | Details |
|---|---|---|---|---|---|
| Books or other texts with no images | Min: 300 Ideal: 600 |
B & W or Grayscale | 1 (bitonal) or 8 | Min: PDF/A Ideal: TIFF |
Optional Character Resolution (OCR) applications work best on documents scanned at 400 DPI or higher. Access files: PDF/A. |
| Books or other texts with images | Min: 300 Ideal: 400 |
Min: Grayscale Ideal: Color |
Min: 8 Ideal: 24 |
TIFF | Optional Character Resolution (OCR) applications work best on documents scanned at 400 DPI or higher. Access files: PDF/A. |
| Manuscripts, letters, diaries | Min: 300 Ideal: 600 |
Color | Min: 8 Ideal: 24 |
TIFF | Aim for 3000-4000 pixels on the longest edge of the digital file. |
| Slides, film and negatives smaller than 4"x5" | Min: 1200 Ideal: 3000 |
Min: Grayscale Ideal: Color |
Min: 16 Ideal: 24 |
TIFF | Aim for 3000-4000 pixels on the longest edge of the digital file. |
| Photos and prints smaller than 8”x10” | Min: 400 Ideal: 600 |
Min: Grayscale Ideal: Color |
Min: 16 Ideal: 24 |
TIFF | Aim for 3000-4000 pixels on the longest edge of the digital file. |
| Photos, posters, and maps larger than 8”x10” | Min: 300 Ideal: 600 |
Min: Grayscale Ideal: Color |
Min: 8 Ideal: 24 |
TIFF | Aim for 3000-4000 pixels on the longest edge of the digital file. |
| Audio | 96 kHz | Sample rate: (recommended) 24-bit, 96kHz, (minimum) 24-bit, 48kHz | Broadcast wave (BWF), .wav or .aif | Access files: 320 Kbps sampling rate. File format: mp3 Codec: LPCM |
|
| Video (transferred from analog source) | 720x486 4k |
8-10 uncompressed Sample rate: (recommended) 24-bit, 48kHz, (minimum) 16-bit, 48kHz |
.mov or .avi (Quicktime) MKV (Matroska) |
Access files: 1.5 Mbps sampling rate. File format: mp4 h.264 Codec: Uncompressed 4:4:4:4 (motion picture film) Uncompressed 4:2:2 (video) Prores 4444 Codec (audio): PCM |
|
| Digital video | Native | Native, or 8-bit Sample rate: 16-bit, 48kHz |
Native, .mov or .avi | Access files: 1.5 Mbps sampling rate. File format: mp4 h.264 Codec (Image): DV-NTSC (DV-25) Codec (audio): PCM |
|
| Motion picture film 35 mm film 8 or 16 mm film audio |
4k (4096 pixels) 2k (2048 pixels) |
10 bit RGB
24-bit, 48kHz |
.DPX and .BWAV |
Codec: uncompressed
Codec: 24-bit, 48kHz |
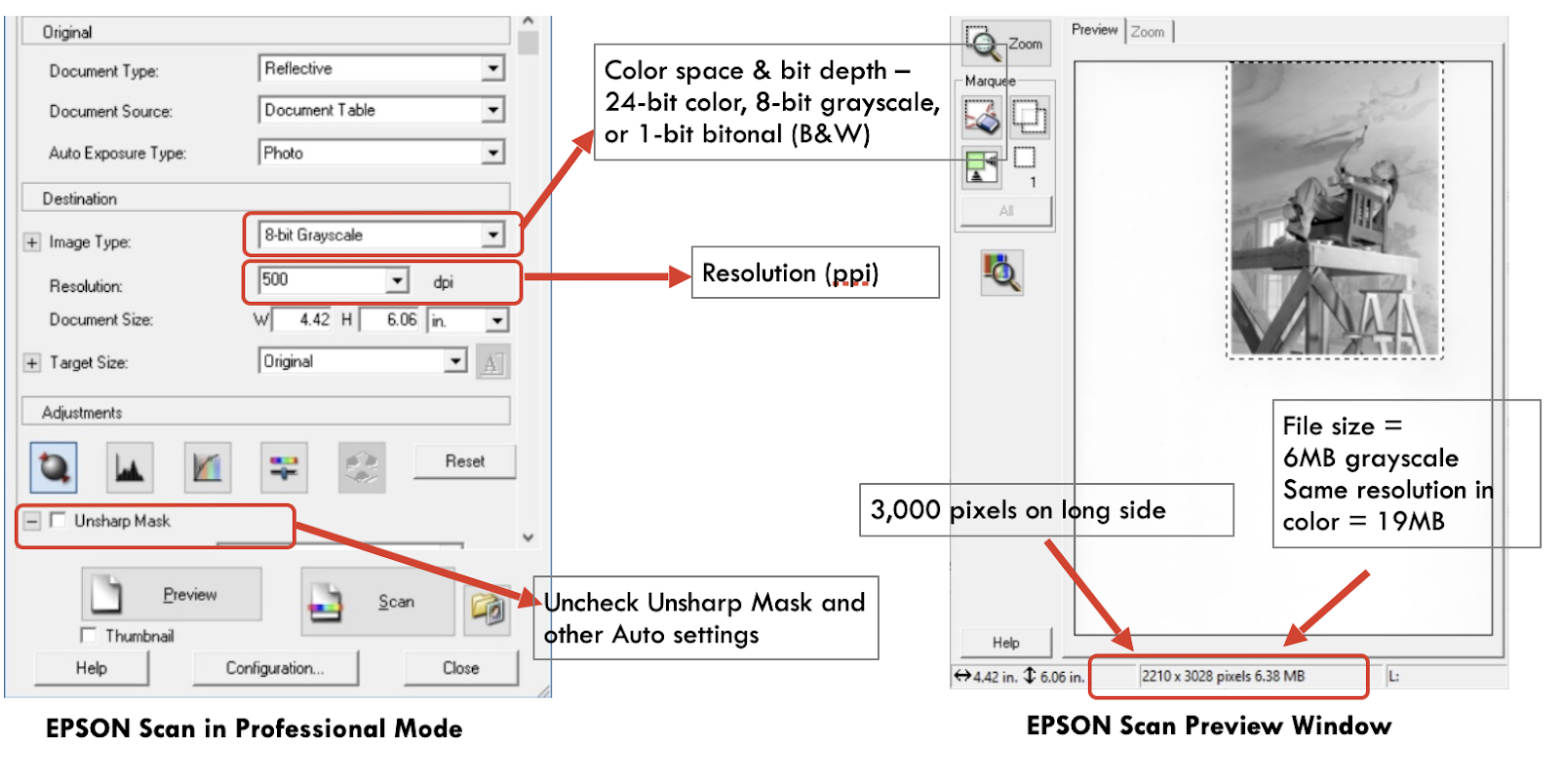
Below is an example of how these settings might look in your scanner software, here shown in the Epson scanner settings.
The large, high resolution files that result from your scans and transfers are known as primary files, archival files, or preservation files. You can then save smaller versions of these primary files for editing and access purposes.
| Primary File (also known as an archival file or preservation file) | Access File (also known as a derivative) | |
|---|---|---|
| Use For | Long-term storage, projection | Sharing on social media |
| Selling reproductions | Emailing to researchers | |
| Printing, i.e. publications, calendars, posters, exhibit panels |
Posting on your website | |
| Unedited for archival storage, color correction or restoration if required. | ||
| File Type | Images and text: TIFF Motion picture film: .DPX and .BWAV |
Images and text: JPEG or PDF |
| File Size | Images and text: BIG! (one scanned postcard: ~20MB) 35mm film: ~4.3 TB/hr 16mm, 8mm, Super 8 film: ~765 GB/hr Audio: ~1 GB/hr |
Images and text: Small (probably less than 1MB) |
| Editing | Unedited or minimal editing i.e. cropping or straightening A/V preservation files maintain discreet audio tracks (as many as 12!) and things like closed captioning |
May be edited i.e. significant cropping, contrast adjustment, etc. |
Choosing Equipment
Many small cultural heritage organizations choose to use a flatbed scanner (a scanner with a flat glass plate and a lid) as the most economical and easy-to-use method to digitize photographs, postcards, documents, and books.
Some things to keep in mind when choosing a scanner:
- Most entry-level flatbed scanners accommodate items up to 8” x 10.” If you have oversized items, you may need to invest in a larger scanner, explore a copy stand and camera setup, or work with a partner or vendor to scan larger items.
- If you have a large number of film negatives or 35mm slides to digitize, consider a flatbed scanner with film or slide trays, or a dedicated slide scanner.
- Not all consumer grade scanners can capture TIFF files – be sure yours does.
- Avoid using scanning “wands,” “scanner” apps on your smartphone, or similar devices. They’re great for researchers who want to get a quick reference image, but they won’t give you high-quality results.
- Do not use a sheet-fed scanner for any archival materials, as it can easily damage the originals.
Accessing Equipment for A/V Digitization
While many cultural heritage organizations have access to scanners for documents and photographs, it is less common for a small library, archive, or historical society to own the necessary equipment for digitizing film, video, audio, and other A/V materials. In many cases, you might not even know what equipment you need before you complete an inventory of your collection.
The Memory Lab Network is a project of the DC Public Library that provides resources for individuals and organizations wanting to digitize audiovisual formats around the United States. In particular, you might want to check out the detailed list of equipment used in the DCPL’s Memory Lab, and the map of existing digitization labs in the United States.
If you’re interested in purchasing digitization equipment for audiovisual collections, see Appendix D: Guide to Equipment Needed for Audiovisual Digitization.
Should I re-scan?
We’ve heard from local history organizations who have inherited legacy projects in which images (sometimes many, many images!) have been scanned at lower quality than the organization would prefer – scans that were only saved as jpegs or at 150 dpi, for instance. The decision to rescan materials can be a difficult one. We recommend that your organization make that decision based on the goals of your digitization program. Are your images sufficient for access – can those jpegs be shared sufficiently, and is that “good enough” for what you want to accomplish? If you would like to sell reproductions of images and can’t do so with the files you have, then it may be worth taking the time to rescan to obtain a higher resolution image.
Working with a Vendor
Some materials such as large maps, books with fragile bindings, and analog audio or video present a reformatting challenge. If you don’t have the equipment, expertise or time to create high-quality digital copies yourself, consider outsourcing the digitization to a vendor.
Digitizing in-house means using your own equipment, staff, and expertise – and it usually means gaining a new skill set. Digitizing out of house means that you enlist a vendor’s existing equipment, labor and expertise. An organization may also use a combination approach, digitizing a sample of materials in-house and using a vendor for more decayed or rare materials. In this webinar, Community Archiving Workshop members go over the benefits and drawbacks of each approach. See also Appendix F: Working With An A/V Digitization Vendor.
Working with Born-Digital Content
Born-digital materials have never had a physical, analog form; they were created or “born” on a computer or mobile device. Collections of born-digital materials may come to you on an external hard drive, CD or DVD, or USB thumb drive. They might be delivered to you through a file sharing platform like Google Drive, or they may be copied or downloaded from the Internet. Your organization might create born-digital content such as video or audio oral history interviews, digital photos of local places or events, or newsletters and other publications. For guidance in this area, a good place to start is the book The No-Nonsense Guide to Born-Digital Content by Heather Ryan and Walker Sampson (2018).
| Bronze Level: Resources and Tools |
|---|
| Grizzard, Eva, and Terrance D'Ambrosio. "Digitizing for Preservation and Access: Best Practices for Every Budget." Sustainable Heritage Network, 2016. |
| Minimum Digital Capture Recommendations. Association for Library Collections and Technical Services / American Library Association, 2013. |
| “Digitization: Technical Concepts.” State Archives of North Carolina, 2021. |
| Archiving Born-Digital Materials: Born-Digital Preservation Methods, Emporia University. |
| Hix, Kelli, and Marie Lascu. “CAW SW Webinar 4: Digitization Planning.” Community Archiving Workshop, 2021. |
| Guidelines: Motion Picture Film Scanning Projects. Federal Agencies Digital Guidelines Initiative, 2014. |
| Digital Preservation Handbook: File Formats and Standards. Digital Preservation Coalition, 2023. |
| Recommended Formats Statement. Library of Congress, 2023-2024. |
| Recommended File Formats for Digital Preservation. Duke University Libraries. |
| A short guide to choosing a digital format for video archiving masters. SCART, 2014. |
DIGITIZE: SILVER LEVEL
| Key Activities |
|---|
| - Prepare physical materials for reformatting. |
| - Complete a pilot project. Digitize a handful of items to check your settings and make sure the standards you identified will give you the results you want. |
| - Document your workflow. Create a step-by-step outline of your digitization procedures. |
Prepare Physical Materials for Reformatting
Review the materials to be digitized as a group and prepare them – perhaps in batches, depending on the size of the collection – to be scanned.
- Remove staples, paper clips, binder clips, or rubber bands (Watch out for sharp ends!)
- Remove items from binders or sleeves
- Review items for torn areas; place severely torn items in a plastic sleeve for scanning. Do not use tape or glue to repair items without consulting a professional conservator[2].
- Remove loose items like sticky notes
- Set aside any duplicate items
- If appropriate, organize the items in the order in which they will be scanned
- Keep separate any materials with mold or mildew; treat them to kill the mold or mildew before scanning[3].
- If materials, especially photographs or slides, seem dusty, carefully use an air can or microfiber cleaning cloth to remove the dust[4].
- Examine the glass scanner surface for fingerprints or dust, and wipe or dust off with a microfiber cloth as appropriate.
Tips for safe handling of original materials during digitization projects:
- No food or drinks near collection items
- No pens near collection items – pencil only
- Wash hands regularly; gloves are only recommended when handling photographic materials.
- Always have plenty of room in your workspace to accommodate the material you are working with
- Never use collection items as a work surface
- Do not stack different items together such as books and photos
- Return items to their storage area at the end of the day.
Tips for Scanning Photos and Documents
- Keep scanner glass clean and free of dust
- Use scanning software in “professional” mode
- Turn off all auto settings
- Scan one item at a time
- Use image editing software to crop after scanning, rather than letting the scanner auto-crop
- If there is writing or other information on the reverse side of a photograph, scan that too
Develop your Digitization Procedures
Before you dive into any project, take a test drive. Select a few representative items to scan and try multiple settings so you can be sure to get the results you want. For example, if you’re digitizing a yearbook collection, scan a couple of volumes from different decades to reflect different layouts, color vs. black and white photos, etc. If you’re working with a vendor, they should be able to reformat a handful of sample items so you can see their work before you move forward.
Based on what you learn in this pilot project, create a digitization workflow to document your process. A workflow is simply a sequence of connected, repeatable steps that lay out an activity from start to finish. As you digitize, update your written workflow with troubleshooting tips and changes to the workflow. Equipment availability changes, vendors change, and skills change, so having a living, adaptive workflow that is documented is key.
Key elements of a digitization workflow might include:
- Create primary file (also known as a “preservation file,” “archival scan/file,” or “raw file”)
- Name the file according to your file naming convention (See Describe section of this toolkit for more information)
- Conduct quality control review
- Create access copy (sometimes called a derivative file or user copy), if needed
- Move primary file to stable storage (See Store and Maintain section of this toolkit for more information)
Questions to ask as you create a digitization workflow:
- Who is responsible for what aspect of digitization?
- What equipment is used?
- For A/V materials: What cabling, connections, and signal path will be used?
- What software is used?
- Where are files stored?
- What are common challenges and how do you solve them?
- What is the quality control procedure?
- Who communicates with the vendor?
- What kind of files do you plan to make? What are the specs?
- If making access files, do you plan to edit, clean up, create OCR, etc.?
| Digitization Workflow Examples |
|---|
| Scanning and Cataloging Workflow, Chippewa Valley Museum |
| Epson Perfection V600 Photo Color Scanner Workflow, South Central Library System |
| VHS Digitization Workflow, Sustainable Heritage Network |
Photographing Museum Objects
Our recommendations in this area are still under development, but here are a few resources to get you started:
- Photography Standards and Instructions, Maine Memory Network, Maine Historical Society
- Basic Object Photography, William J. Hill Texas Artisans and Artists Archive
| Silver Level: Resources and Tools |
|---|
| Barera, Michael. "Creation and Improvement of a Digitization Workflow." Milwaukee County Historical Society, April 2023. |
| Barera, Michael. "MCHS Digitization Workflow." Milwaukee County Historical Society, April 2023. |
| “Tutorial: Scanning Historic Photos.” Video. Recollection Wisconsin, 2012. |
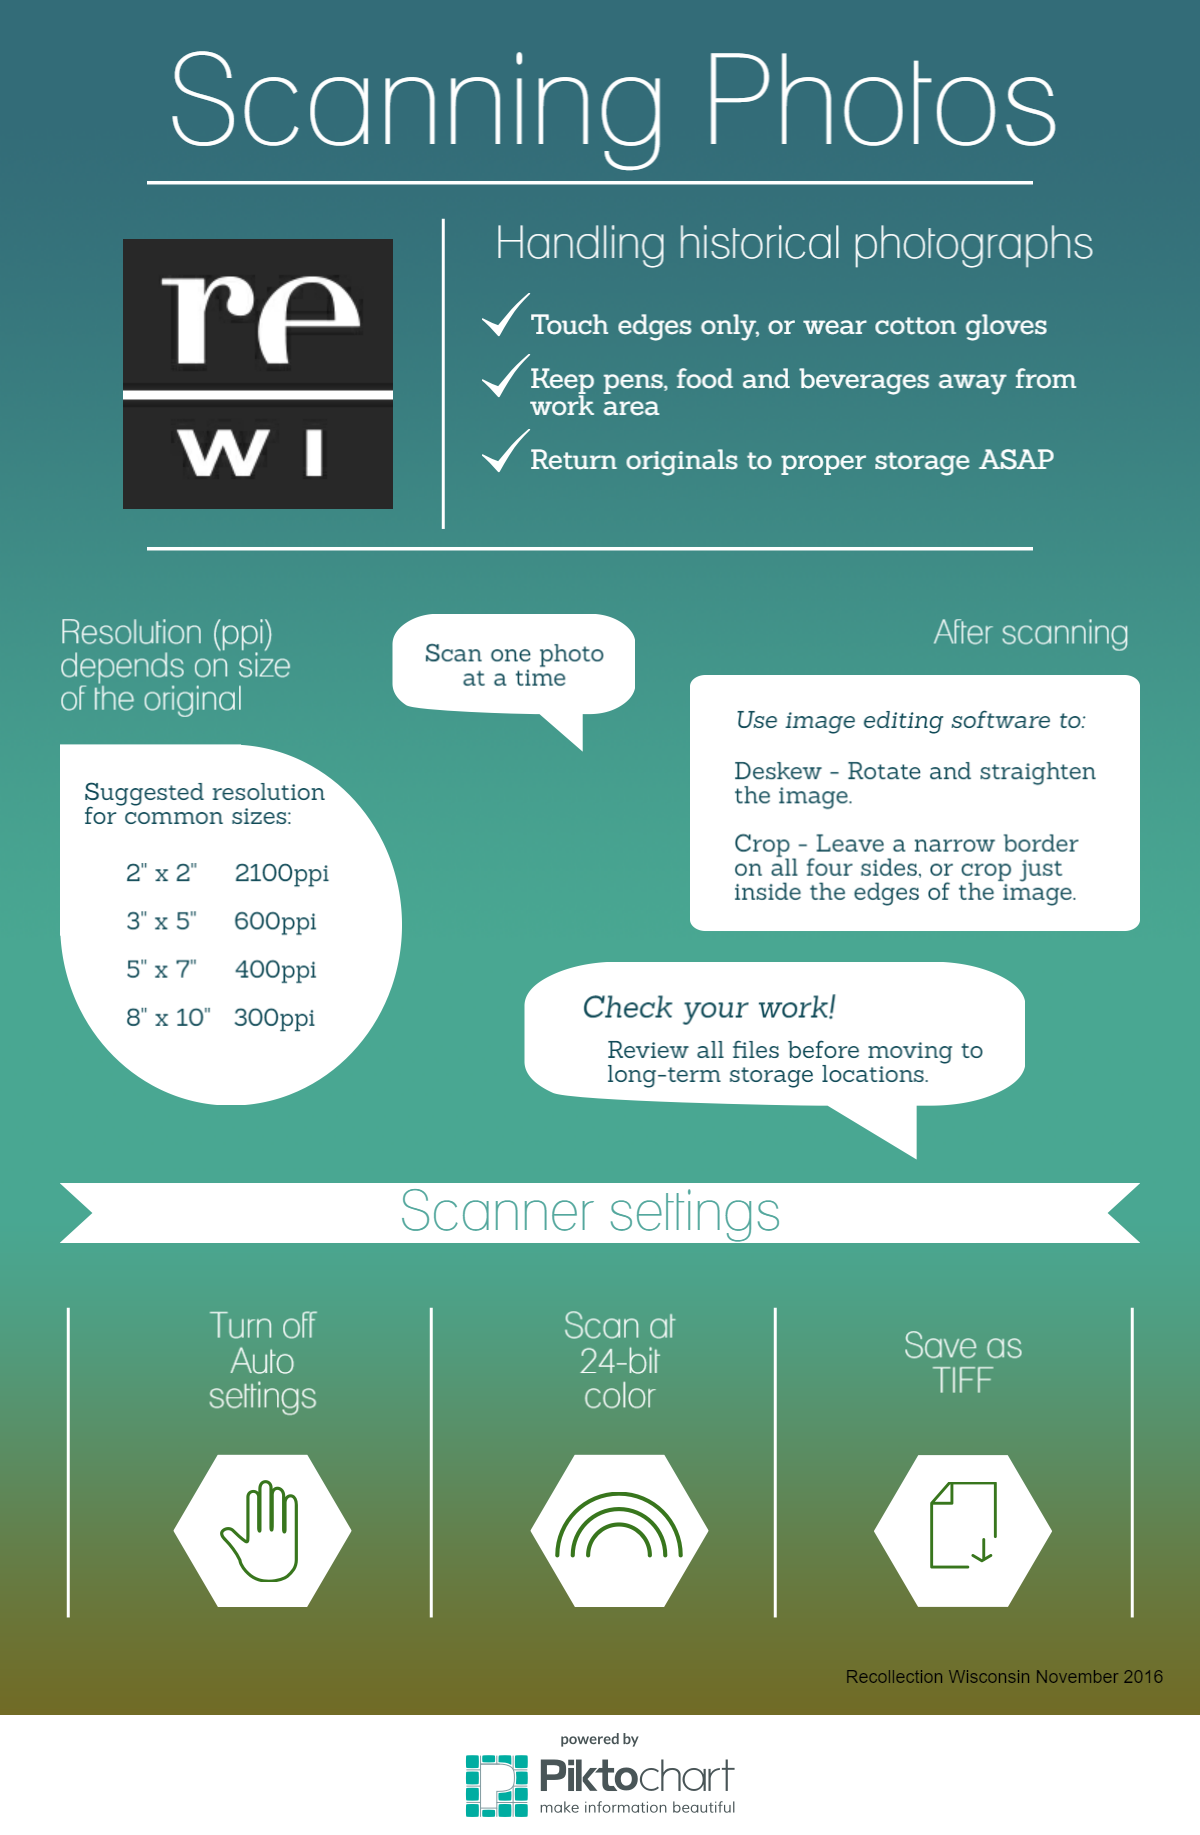
| “Scanning Photos.” Recollection Wisconsin, 2016. |
| “Digital Reformatting and File Management.” Video. Public Library Partnerships Project, DPLA, 2015. |
| Digitizing Entire Collections, Chapter 4. Archives of American Art, Smithsonian Institution. |
| Woody, Rachel Christine. “Create a Museum Digital Project Workflow That Works.” Lucidea, 2021. |
| Hutton, Emily. “How to Convert Film Negatives to Digital Pictures.” Image Restoration Center, 2022. |
DIGITIZE: GOLD LEVEL
| Key Activities |
|---|
| - Develop a list of what to check during a quality control review. |
| - Determine who is responsible for quality control. |
| - Use a log to track digitization work and quality control reviews. |
Quality Control
As you digitize, be sure to review the digital files on a regular basis. The goal of regular quality control is to ensure that you are creating faithful digital copies of the original materials and that the digital files are being created according to the standards you determined at the start of your project. This step is especially important when working with volunteers or vendors.
Basic quality control for digitized images and documents includes confirming that:
- The file can be opened
- The file name is correct
- The image is not rotated or backwards
- The image is not skewed, off-center, or unevenly cropped
- There are no unwanted materials (dust, hair) or digital artifacts in the image
Basic quality control for digitized audio and video includes the above, plus:
- The file size is as expected
- Checking 5-second segments at the beginning, middle, and end of the recording
- The sound syncs up with the video.
The first round of quality control should be done by the digitizer after they complete a batch. The second round of quality control should be performed at least weekly by a separate individual. Consider adding columns to your collection log (described in the Store and Maintain section of this toolkit) to track who is doing the digitization, when scanning was completed, and when quality control was performed (See Appendix B – Collection-Level Log).
For more on quality control, see the Sustainable Heritage Network’s “Guide to Quality Control and Quality Checklists.” This helpful guide gives a fuller picture of quality control needs and procedures, and we suggest you customize the relevant sections for your project.
Scanner Calibration and Color Targets
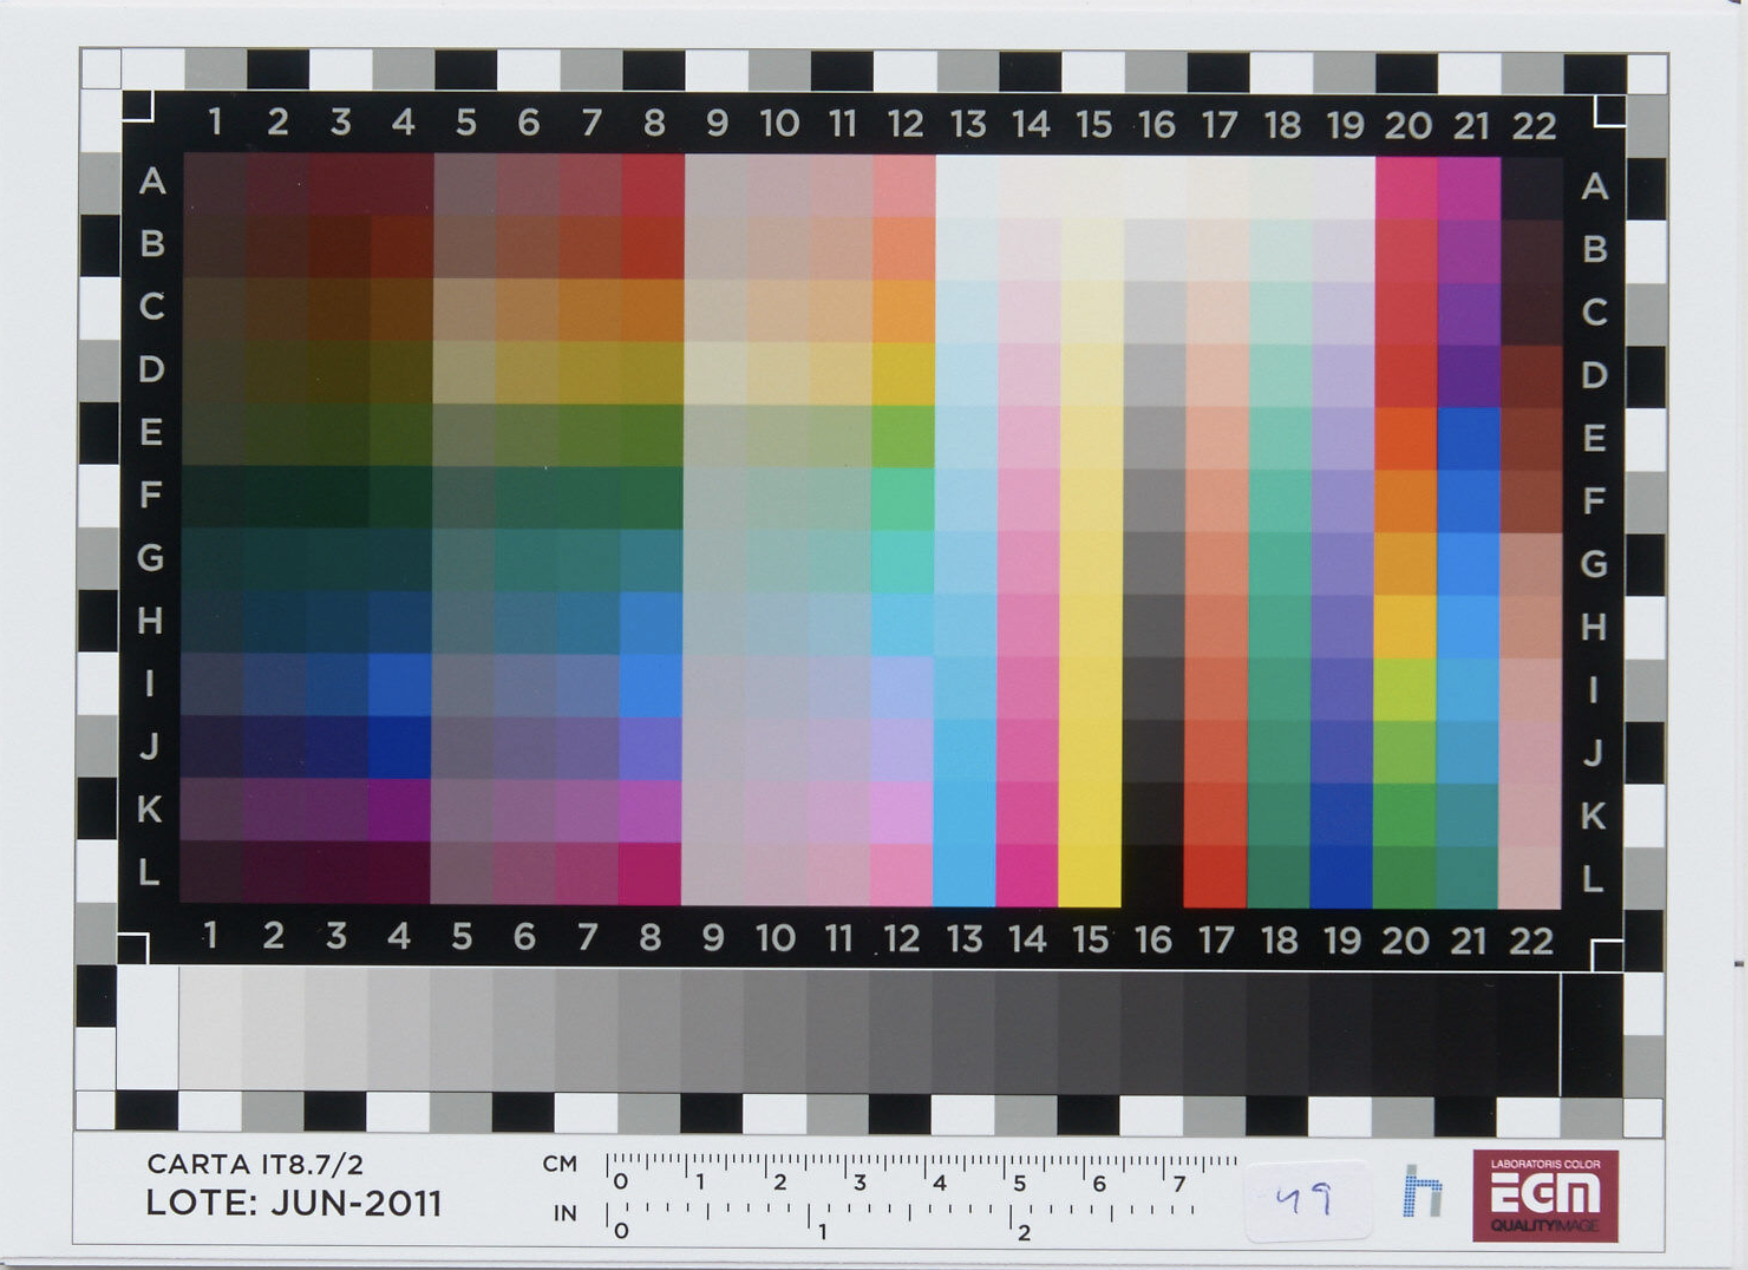
Calibration refers to aligning a scanner’s color profile with its attached computer’s color profile using a color target. A color target is a small card with a range of colors printed on it that the scanner can scan during the calibration process. Calibrating your scanner using a color target helps you achieve accurate color results in your image scans; this process sets the colors on the target as precise references for colors in your scanned image.
| Gold Level: Resources and Tools |
|---|
| Norton-Wisla, Lotus. "Guide to Quality Control and Quality Checklists." Sustainable Heritage Network, 2020. |
| Wagner, Patrick. Scanner Calibration with IT-8 Targets. Scandig. |
| “Digitization Quality Control Workflow.” UCLA Library Special Collections. |
- Table adapted from “Digitization Standards and Guidelines,” University of California Santa Cruz Library. https://guides.library.ucsc.edu/DS/Resources/DigitizationStandards ↵
- Rebecca Elder. "Preservation 101: Caring for Paper Based Materials," Sustainable Heritage Network. https://sustainableheritagenetwork.org/digital-heritage/preservation-101-caring-paper-based-materials ↵
- “Preparing for and Cleaning Mold on Paper Records,” Alabama Department of Archives and History. https://fortherecordalabama.blog/2021/09/17/preparing-for-and-cleaning-mold-on-paper-records/ ↵
- Roemer, Christian. “Cleaning Tips Before Digitizing Slides And Photos,” Aperture. https://kodakdigitizing.com/blogs/news/cleaning-tips-before-digitizing-slides-and-photos ↵
Digitization is the process of creating digital copies or "surrogates" by scanning or otherwise converting analog materials. Digitization is the conversion of analog information into digital information.
Conversion usually refers to some form of analog-to-digital conversion, such as digitizing VHS tapes or film reels, including scanning paper documents to create digital images or rekeying paper text into a computer. Conversion is more than copying files. It involves a change in media internal structure, such as from diskette to tape, from one version of an application to a later version, or from one application to another.
Dots per inch, or DPI, refers to the number of printed dots contained within one inch of an image printed by a printer. It is a measure of the resolution of a printed document or digital scan -- a higher DPI is a sharper image; a lower DPI is a fuzzier image.
Bit depth is determined by the number of bits used to define each pixel. The greater the bit depth, the greater the number of tones (grayscale or color) that can be represented. Digital images may be produced in black and white (bitonal), grayscale, or color.
Digitally, a file format is a standard way that information is encoded for storage in a computer file. A file format is often indicated by a file name extension, for example .tif, .pdf, or .jpg.
A preservation copy refers to digital content targeted for preservation that is considered the archival version of the intellectual content of a digital resource. Preservation copies generally do not undergo significant processing or editing. Preservation copies are often used to make other copies, including reproduction and distribution copies. See Archival Copy, Access Copy, Master Copy.
An image scanner is a device used to scan images, printed text and objects into a digital format.
Born-digital content has never had an analog form. Born-digital materials differ from analog documents, movies and photographs that were digitized; that is, scanned or converted to a digital format.
A workflow consists of the tasks, procedural steps, organizations or people, information and tools needed for each step in a process.
An archival copy in digital collections refers to digital content, targeted for preservation, that is considered the archival version of the intellectual content of a digital resource. Archival copies/preservation copies generally do not undergo significant processing or editing, and are often used to make other copies including reproduction and access copies.
A file naming convention is a set of rules used to create consistent names across a set of files.
Quality control (QC) or quality assurance (QA) is a process used to verify the quality, accuracy, and consistency of digital projects. A regular systematic QC process allows you to check for files that do not meet the standards of your project plan, and identify any problems.
(Or access file) A copy made from a digital object that is intended for use, such as online display or transmission over email
Digital storage refers to a digital method of keeping data, electronic documents, images, etc. in a digital storage location, usually a hard drive or in cloud-based storage. Archival digital storage is not the same as a backup ー archival storage keeps content accessible for future users and computers, while backups keep your computer files working safely and securely.
Calibration refers to aligning a scanner's color profile with its attached computer's color profile; a process that uses a color target. Calibration ensures true capture of the original colors in a digital format.
A color target is a type of measuring table that calculates the exact color recognition capability of a scanner and identifies the singularities of that scanner. The color target is a small card with a range of colors printed on it that the scanner can scan during the calibration process.
