Enable Deep Linking for an Existing LTI Registration
Deep linking allows instructors to bring Pressbooks content into the LMS in a simple, streamlined way. For instructions on using deep linking, see the chapter Use Deep Linking to Bring Pressbooks Content into a Course.
Please note that if you register your Pressbooks Network as an LTI Tool using the dynamic registration or JSON URL methods in the previous chapter, then deep linking is automatically enabled by default and you can disregard this chapter.
However, if you have an existing, manually configured LTI registration for your Pressbooks network from an earlier date, you will need to edit the LTI registration in your LMS in order to enable deep linking for instructors working with Pressbooks content in your LMS instance.
This chapter will cover how to enable deep linking for an existing LTI registration in each supported LMS: Canvas, Blackboard, Moodle, and D2L Brightspace.
Canvas
- As an LMS administrator, navigate to Admin > Developer Keys and locate the Developer Key associated with your Pressbooks network.
- Click the pencil icon in the ‘Actions‘ column to edit the key.
- Scroll down to Placements and ensure you have Link Selection added.
- Scroll down to Link Selection.
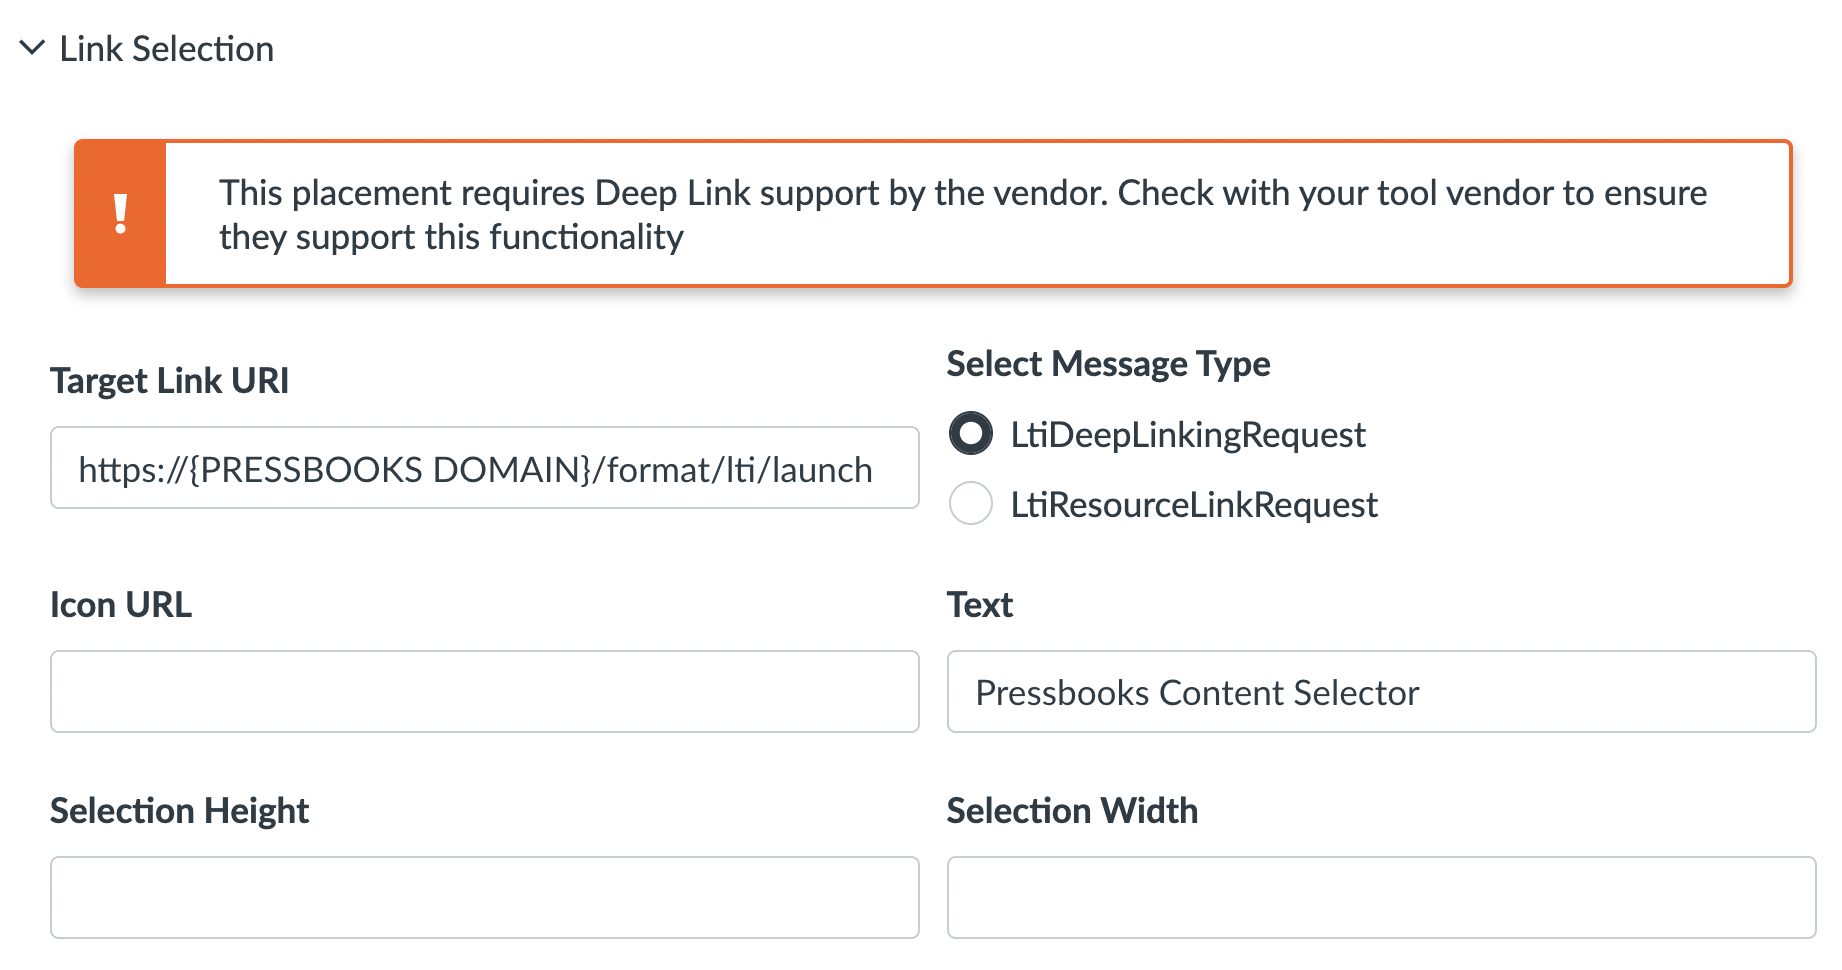
- In the Target Link URI field, input
https://{PRESSBOOKS DOMAIN}/format/lti/launch.Replace {PRESSBOOKS DOMAIN} with the URL of your Pressbooks network. - For Select Message Type, select LtiDeepLinkingRequest.
- In the Text field we recommend using the name ‘Pressbooks Content Selector’
- In the Icon URL field, you can input the value
https://{PRESSBOOKS DOMAIN}/app/themes/pressbooks-book/dist/images/favicon-32x32.pngif you would like to use the Pressbooks icon. - All other fields under Link Selection may be left blank.
- Press Save to save changes.
Moodle
- As an LMS administrator, navigate to Site Administration > Plugins > External Tool > Manage Tools.
- Locate the listed tool connected to your Pressbooks network and click the wheel icon to edit it.
- Under Tool Settings check the box for Supports Deep Linking (Content-Item Message).
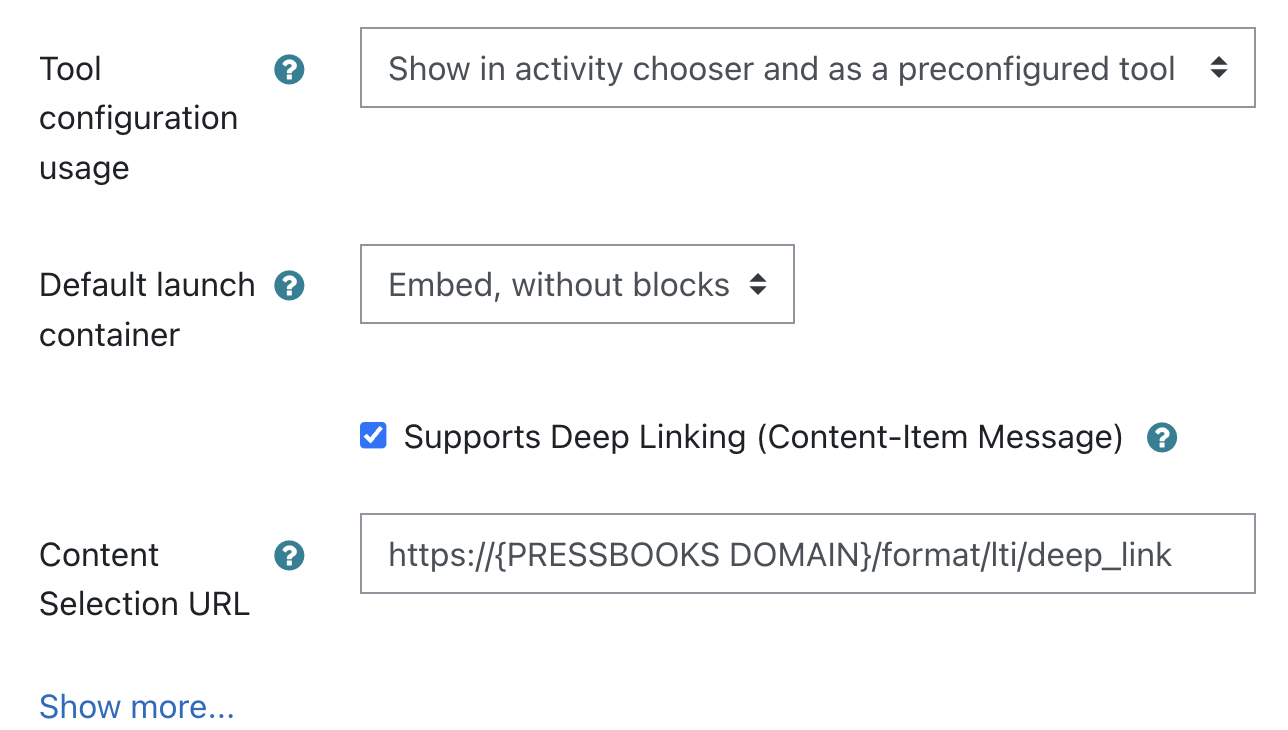
- For the Content Selection URL input the following value:
https://{PRESSBOOKS DOMAIN}/format/lti/deep_link. Replace {PRESSBOOKS DOMAIN} with the URL of your Pressbooks network. - For the Tool configuration usage setting above, we recommend selecting ‘Show in activity chooser and as a preconfigured tool’
- For the Default launch container setting we recommend ‘Embed, without blocks’
- In the Icon URL field (revealed by clicking ‘Show more…’), you can input the value
https://{PRESSBOOKS DOMAIN}/app/themes/pressbooks-book/dist/images/favicon-32x32.pngif you would like to use the Pressbooks icon. - Click Save changes.
Blackboard
- As an LMS administrator, navigate to System Admin > Integrations > LTI Tool Providers.
- Hover your cursor over the name of the existing tool connected to your Pressbooks network and click the down-arrow icon that appears. In the pop-up menu, click Manage Placements.
- If a placement does not already exist, click Create Placement.
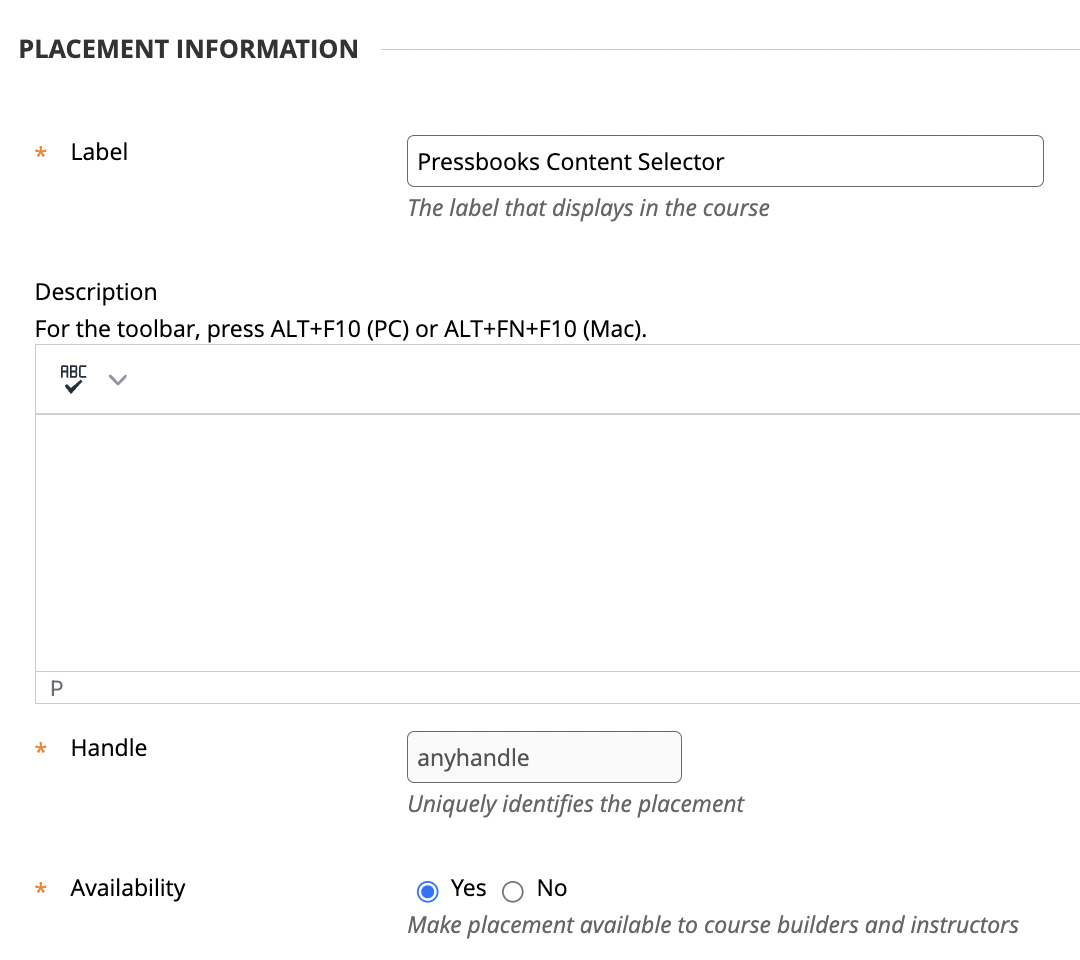
- Give the placement a Label; we recommend using ‘Pressbooks Content Selector’
- Input any desired value for the unique Handle.
- Leave all default values in place / blank.
- Upload the image from
https://{PRESSBOOKS DOMAIN}/app/themes/pressbooks-book/dist/images/favicon-32x32.pngas the Icon if desired. - In the Target Link URI field under Tool Provider Information, input:
https://{PRESSBOOKS DOMAIN}/format/lti/deep_link. Replace {PRESSBOOKS DOMAIN} with the URL of your Pressbooks network. - Press Submit.
D2L Brightspace
- As an LMS administrator, navigate to Manage Extensibility > LTI Advantage and locate the listed tool connected to your Pressbooks network. Click the linked tool name in order to edit it.
- Ensure that the checkbox for Deep Linking is checked under Extensions.
- Scroll to the bottom of the page and click View Deployments.
- Locate the enabled Deployment you are using and click its name.
- Ensure that the checkbox for Deep Linking is also checked under Extensions here.
- Scroll to the bottom of the page and click View Links.
- On the Links page, click New Link.
- Enter the following values, filling in your Pressbooks domain in
https://{PRESSBOOKS DOMAIN}/format/lti/deep_link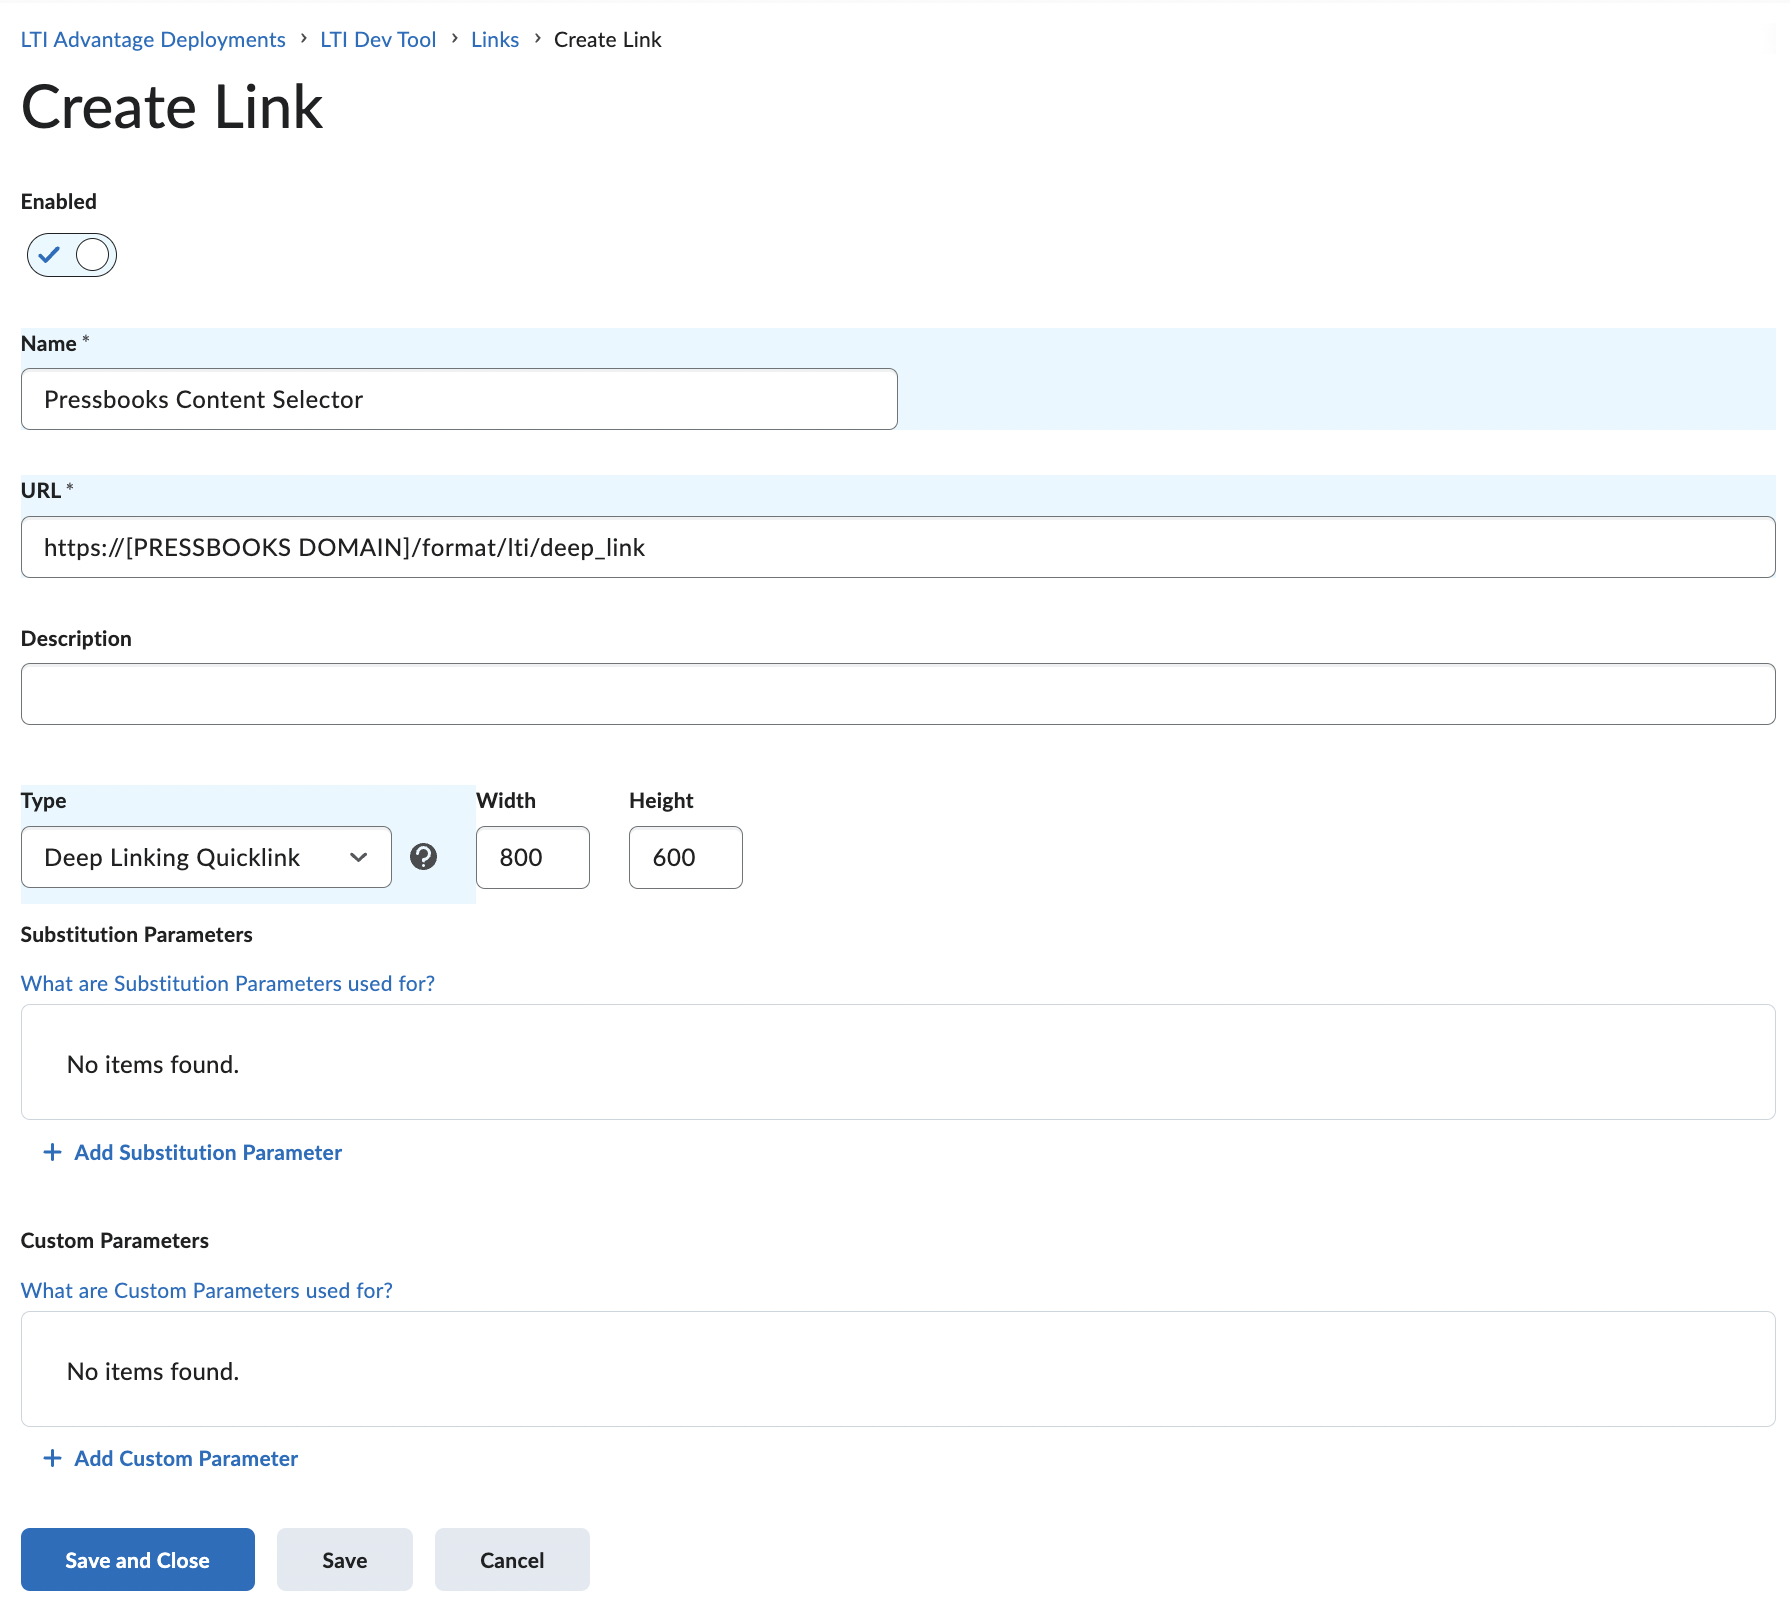
- Click Save and Close.
