5
Ye Li
This chapter will help you:
- Understand the benefit of managing and sharing your research data
- Recognize the components of data management and sharing plan
- Organize and document your data
- Identify your needs in data storage, backup, and security
- Share and archive your data
Introduction
Research Data Management (RDM) includes the process to keep your research data well organized, documented, and backed up. What’s more, good RDM practices will ensure you can share your data with peer researchers and your future self in Findable, Accessible, Interoperable, and Reusable (FAIR) means.
Why data management and sharing matter
Developing a good practice in managing and sharing research data may take additional time and effort, especially when you attempt to establish a shared practice among your collaborators or in a research group. However, the time and effort for building RDM practices will allow you to:
- Increase efficiency and save time long term
- Support the reproducibility and replicability of your research
- Comply with open data requirements from funders and publishers
- Promote discovery and enhance the impact of your research
- Provide more equitable access to your research worldwide
Components of your data management and sharing plan
At the beginning of a research project, developing a data management and sharing plan will ensure you have resources and procedures in place to organize, document, store, backup and share your data. A data management and sharing plan is now often required by funding agencies to submit with grant applications. In the United States, the White House Office of Science and Technology Policy (OSTP) announced an update on August 25, 2022 to emphasize the importance of making publications and their supporting data resulting from federally funded research publicly accessible immediately. Each funding agency is updating their guidelines for researchers regarding data management and sharing plans, for example, the Final NIH Policy for Data Management and Sharing (NOT-OD-21-013).
A typical data management and sharing plan includes the following components (adapted from Elements of an NIH Data Management and Sharing Plan) :
- Data type
- Summarize the types and amount of scientific data to be generated and/or used
- Describe which data will be preserved and shared with the reasoning and consideration of ethical, legal, and technical factors
- List metadata and associated documentation (e.g. protocols, instruments, methods, etc.)
- Related tools, software and/or code
- Standards
- Describe what standards, if any, will be applied (e.g. data formats, unique identifiers, data dictionaries, definitions, etc.)
- Data preservation, access, and associated timelines
- List name(s) of the repository(ies) to archive datasets
- Describe action plans to make data findable and identifiable
- Outline the timelines to make data available and for how long
- Access, distribution, or reuse considerations
- Specify any restrictions, privacy, and confidentiality protections
- Specify any license or term for reuse
- Oversight of data management and sharing
- Indicate how compliance with the plan will be monitored and managed
In this chapter and the next chapter, we will discuss these elements in detail. Research is a dynamic process and the plan changes. The Data Management and Sharing Plan is meant to be a living document. You can update the plan as often as needed and design validation processes to ensure consistency.
Tools:
DMPTool is a freely available tool for researchers to draft their data management and sharing plan. It provides templates based on the specific requirements listed in funder policy documents. Sample plans are also provided. Researchers can sign up for an account to use it for free. If your institution is a participating member of their services, you may also find customized templates and/or additional support from your institution integrated with the tool.
How to organize your data [1]
In the digital workflow, naming and organizing your files and folders are fundamental steps to ensure you yourself and others could find and access your data, now and in the future. You do not want to end up with data files scattered on your computer desktop, a list of meaningless filenames that no one can decipher (as shown in this PHD comics “A story told in filenames”), or multiple versions of the same file that no one can identify the true final version (as shown in this PHD comics ““Final”.doc ).
To better organize your data, you should:
- Plan ahead to establish a system working for you (and your collaborators)
- Determine the proper level of details to include in your file names and folder structures
- Choose a manual or automated version control mechanism
Think about your project and go through the following steps:
Step 1: Identify what and who
- What are you organizing?
(Different types of data files, reports, presentations, notes, images, videos, processed data, literature resources etc. ) - Who are you designing the system for?
(Yourself, your collaborators, other people or organizations who may also use your data)
Step 2: Create a descriptive file naming convention for each type of data and document it
- What elements describe the file?
(Project, data type, sample, creator, instrument, experiment conditions, etc.) - What makes each file unique?
(Run of experiment, Date and time, version number etc.)
Example of descriptive file naming
Example file naming scheme:
[Instrument]_[Sample]_[CreatorInitial]_[Date]_[RepeatitionNumber].[FileExtension]
Example file name:
NMR_NADH_YL_20220605_001.DAT
NMR_NADH_YL_20220605_002.DAT
SEM_SiO2_EB_20220607_001.tiff
UVis_SiO2_BB_20220608_001.csv
Tips on file naming:
- Be consistent with the elements and their order
- Use the same date format (YYYYMMDD as most recommended)
- Document abbreviations and acronyms in a README.txt file
- Use leading zeros for sequential numbers (e.g. for 100 samples, use 001, 002 … 099, 100)
- Do not user spaces
- Do not use special characters. Only use numbers, letters, underscores.
- Do not rely on letter case alone to distinguish between files
- Only use period before the file extension
- Limit file name to 32 characters or less
Read more on File Naming Best Practices by Christine Malinowski, MIT Libraries Data Management Services.Copyright © 2020-04-24 Massachusetts Institute of Technology, licensed under a Creative Commons Attribution 4.0 International License except where otherwise noted.
Step 3: Determine an organization structure for your files using folder and sub-folders
- What contextual information describes the project and its components?
(Project name, collaborators, time periods, activities, methods, file types and purpose etc.) - What meaningful categories can reflect the crucial contextual information? (Nest the selected categories into folder and sub-folders.)
- Choose your directory naming convention in consideration of your file naming convention.
Sometimes, it may be useful to duplicate some contextual information you identified in #1 in both folder names and file names, especially when a file can be taken out of the folder context.
Primary / Secondary / Tertiary
[Project] / [Sub-projects] / [Experiments] / [Samples] / [Dates]
[Project] / [Activities] / [CreatorInitials] / [Dates]
[Project] / [Locations] / [Activities] / [Dates]
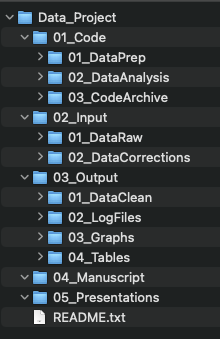
See example template on GitHub.
Tips on folder structure:
- Avoid overlapping categories
- Balance what to include in your file names and what to include in your folder structure
- Use numbers as a folder name prefix to order folders (e.g. 01_Data, 02_Manuscript, 03_Presentations etc.)
- Don’t let each folder get too large. Use meaningful sub-folders to group files.
- Don’t let the folder structure gets too deep
Last, but not least, document your file naming convention and folder structure in a README.txt file will help you and others navigate your files in the future.
Read more on README: File & Folder Schema Example by MIT Libraries Data Management Services. Copyright © 2018 Massachusetts Institute of Technology, licensed under a Creative Commons Attribution 4.0 International License except where otherwise noted.
Step 4: Choose automatic and/or manual version control
Working with digital files allows you to easily create multiple versions of a file. Some versions serve different purposes or different audiences; while others are intermediate versions during the editing process. Versioning can help you find the version needed and avoid unnecessary duplication or iteration of files.
1. Incorporate version numbers, milestone date, and/or main contributor at this stage into file names.
Example of file names with version numbers, date, or main
ProjectReport_v01.pptx
ProjectReport_20220608.pptx
ProjectReport_20220608_v01.pptx
ProjectReport_20220608_YL_Reviewed.pptx
-
- Only save a new version when you need it to serve a different purpose (e.g. differentiate the version before and after being reviewed by a collaborator)
- Document versioning convention as a part of your file naming convention.
2. Log changes in a file manually
Between different versions of files, tracking changes made in a file can help you go back to and question specific changes, as well as “undo” some changes when needed. Log major changes manually, especially for communication between contributors. To manually log major changes between two versions, create a CHANGELOG.txt file and summarize the following as needed:
-
- What has changed
- Who made the change
- When did the change happen
- Why was the change made
3. Use automatic tools to log changes
Many collaborative platforms provide automatic log of changes which allow you to:
-
- Keep track of what each contributor did and when
- Go back to and question specific changes and undo them when needed
- Notify conflict between copies from collaborators and merge changes selectively
For word processors or slide presenting, here are some examples:
-
- Microsoft Office & Office365 / Track Changes and Browse Version History
- GoogleDocs/GoogleSlides / Suggesting mode and Version History
- LibreOffice / Recording and Displaying Changes
- Overleaf (for LaTeX editing) / Review mode and History
For data files and scripts, codes used for data analysis, or script-based text editing (e.g. LaTeX or markdown), choose an advanced version control software. Git & GitHub is often used for such purposes.
-
- Learning Resources
How to document your data
Data can be difficult to interpret when taken out of context. Documenting your data can help you and others understand and use a dataset. Your documentation should include a description of the dataset, the workflow you used to create the dataset, and how you organized the data package. Use this list of questions about your dataset to help you prepare the documentation.
- What is the dataset about?
- What format are the files?
- Where to find it?
- How to access it?
- Who are the contributors?
- What can it be used for?
- What are the limitations and known issues with the dataset?
- When and how was it collected, processed and analyzed?
- What are the variable names referring to?
- What are the units of measures?
- What are the ethical and privacy restrictions (if any)?
- How is it licensed for use?
- How can people cite the dataset?
- Where is the related report or publications (if any)?
- What are the funding sources for this project (if any)?
When you have the answers to the above questions, organize them into a README file for each dataset as a plain text file. You may write the README file at the project level, for a single data file, or for a cluster of data files. If you are using code or scripts to process or analyze the data, include a description of the code in the README and include the code files in your data package. Read more on this topic in the next chapter. Also, see this template for a README file from Cornell University.
More and more research communities are developing standards for data formats and metadata for specific types of data. We will discuss how standards could help you document your data in the next chapter.
Do not wait until the very end of your project to write the README files for your data. During your research process, document your data collection and analysis process carefully so that you do not have to rely on your memory to write the README file. Some researchers may choose an Electronic Lab Notebook (ELN) or other project management software or platform (e.g. Open Science Framework) to keep their notes and data organized.
Tools:
- Select an ELN for your research from Harvard Medical School
- View a comparison grid of available ELNs.
- Open Science Framework – A cloud-based project management system that allows version control and integration with other tools and platforms.
How to store and backup your data
Digital files and their containers can be easily lost or damaged. It is crucial to store and backup your research data in secured places so that you do not lose the fruit of your diligent work.
One widely accepted principle for data backup is to have 3 copies in 3 different locations and on 3 different media types. Preferably, you need at least one of the copies to be physically located at a remote location from your working copy. For example, if you have your working copy on your own laptop, you can have a second copy of it on an external hard drive and a third copy in a cloud-based storage, such as OneDrive, GoogleDrive, DropBox, Box, or AWS Cloud Storage etc. The remote option can also be a cloud-based backup and recovery service provider, such as CrashPlan. Your institution may provide support for one of these solutions and they may also provide a local server hosted by your institution.
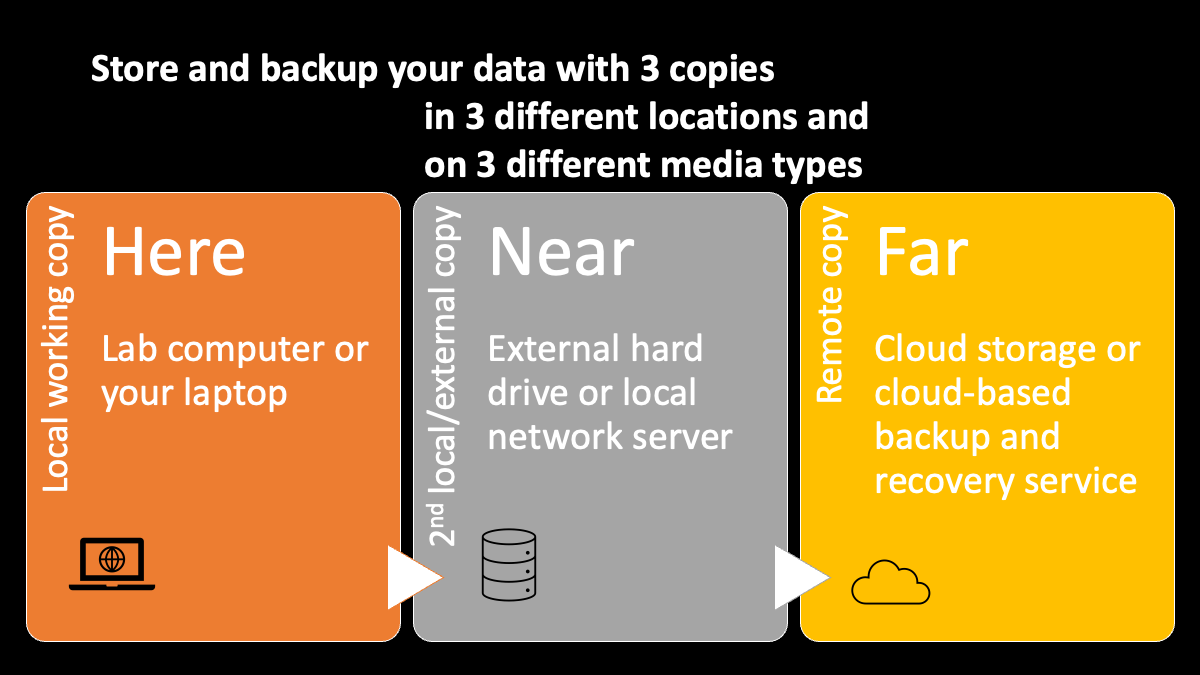
Some media for digital storage such as floppy disks and optical disks can have surprisingly short lifespans when you need to use them regularly. (See Lifespan of Storage Media from CrashPlan) To ensure longer term accessibility of your backup copies, choose those storage medium with reasonable expected lifespan. For example, choose a solid state hard drive as an external backup option instead of a USB flash drive.
When you setup your backup plan, you also need to:
- Set a schedule to synchronize your copies regularly, if they are not automatically synchronized
- Test file recovery from different copies
- Set a schedule to test file recovery regularly
Usually, cloud-based storage and services provide mechanisms for automatic synchronization. Pay attention to which files are being saved as both local copies and cloud copies at the same time in your synchronization configurations. For external hard drives or local network servers, you may need to synchronize files manually. Software, such as GoodSync or TotalCommander, could help manage the synchronization process for Windows and Linux systems. For Mac, you may also use Apple’s TimeMachine for local backup.
When you are using different backup options, especially those in the cloud, you also need to consider:
- Who can access my files?
- Is the access password protected?
- Are the files encrypted?
- Am I using a secured network to access my files?
If your research project requires additional protection of data security due to any legal, regulatory, privacy-protecting, and/or ethical reasons, you need to check if the storage and backup options meet those requirements. Your institution may provide more guidance or support, for example, MIT-Committee on the Use of Humans as Experimental Subjects.
How to share and preserve your data
Publish and deposit your data into a data repository will allow you to:
- Share your data with peers and future collaborators in a rigorous manner
- Enable access and discovery of your data
- Allow longer term preservation of your data
- Get acknowledged and cited beyond your regular publication
Traditionally, research data supporting a publication are often published as supplementary materials to the research report or manuscript. These supplementary materials are often in the format of a PDF documentation and lose the data reusability. Sharing your data via a proper data repository and including a link to the data entry in your publication have gradually become required by some funders and publishers since this approach will enhance the reproducibility and reusability of the research data. See next chapter for more discussion on this topic.
Some funding agencies provide guidelines on desirable characteristics of a data repository, e.g. U.S. Office of Science and Technology Policy – Desirable characteristics of Data Repositories for Federally Funded Research. The TRUST principle[2] is also widely accepted for evaluation of a digital repository. In this section, we will provide you with practical tips on choosing a repository for your research data.
Currently, there are three types of data repositories:
- General data repositories (e.g. Zenodo, Dataverse, and Dryad etc.)
- Discipline specific repositories (e.g. Protein Data Bank, EarthChem etc.)
- Institutional or organizational data repositories (e.g. DeepBlueData – University of Michigan etc. )
In general, if there is a data repository that your research community uses most often for your discipline, you should consider using it first. Those discipline specific repositories are likely designed for the specific data types you work with and make your dataset most discoverable by your peer researchers. If no such discipline-specific repository meets your need, you may consider a general data repository or an institutional / organizational repository.
Tools:
Browse the following list to help identify discipline specific repositories:
- Registry of Research Data Repositories
- FAIRsharing.org Databases
- Data Repository Guidance from Nature Scientific Data
When comparing data repositories, you may consider the following parameters of a repository and determine if it will work for your dataset:
- What are the limits for file sizes and dataset size?
- Does the repository support versioning of your dataset?
- Will the repository assign a persistent and unique identifier for your dataset?
(e.g. an DOI, digital object identifier) - Will the repository track a persistent and unique identifier for contributors?
(e.g. ORCID iD for contributors) - Does the repository provide useful integrations with other tools or platforms
(e.g. Zenodo provides integration with GitHub that would allow easy transfer and versioning of your project including data and code between the two platforms.) - Does the repository allow multiple administrators?
- Does the repository allow embargo (i.e. a delayed public release date)?
- What licensing options could you choose for your dataset?
(e.g. CC0 or CC BY) - Does the repository provide private URLs for the peer review process before publishing?
- Does the repository provide computational access?
(e.g. API services) - Does the repository provide usage analytics to track how your dataset got used?
- How much does it cost (if any) for you to deposit the data ?
Selecting a repository can be a complicated process. Give yourself sufficient time to consult with your local librarians or the repository staff members before you have to make a decision.
Once you select a data repository, you may prepare your dataset for depositing. Make sure you organize your dataset and include proper documentation for your dataset according to what we discussed in this chapter and next chapter.
Selected Learning Modules for Data Management and Sharing
- Research Data Management Class – University of Washington
- MANTRA Research Data Management Training
- Data Management Training Clearing House
- Research Data Management and Sharing | Coursera
- Research Data Management Librarian Academy [RDMLA]
Reflection
Now you have learned some basics about data management and sharing, consider the following when you start working on a research project:
- Are there any data sharing and/or data management plan requirements from your research funders or the potential publishers for your future research reports?
- What data management and sharing support is available in your institution?
- Have you determined what types of research data to collect for your research project?
- Have you planned out:
- how to organize your data and records?
- how to document your data?
- where to store and backup your data?
- which repositories to share your data with?
- which license to share your data under?
- Have you started writing a data management plan with the factors considered above?
- This section is adapted from Data Management: File Organization by Data Management Services. Copyright © 2022-04-12 Massachusetts Institute of Technology, licensed under a Creative Commons Attribution 4.0 International License except where otherwise noted. Access at http://bit.ly/fileOrgSlides ↵
- Lin, D., Crabtree, J., Dillo, I. et al. The TRUST Principles for digital repositories. Sci Data 7, 144 (2020). https://doi-org.libproxy.mit.edu/10.1038/s41597-020-0486-7 ↵
