Lesson ideas: Upper secondary school
8 Commas in argumentative writing
Marie Nottmeier; Alina Sophie Peters; and Lara Warnecke
1 Introduction and rationale
Following a corpus-based lesson structure, the proposed lesson enables students to deduce frequent comma placement in a specified context (here: academic writing). Thereby, students and teachers both interact with the English language via the dedicated corpus and corpus tool (here: BNC1994 on Sketch Engine), drawing their own insights and gaining sustainable strategic competences (Niedersächsisches Kultusministerium 2015: 8), which we believe enhances motivation and successful learning in the long run. The overarching aim is to develop independent, autonomous learning strategies and agency. This is supported with various scaffolding options.
Outline and Objectives
Target learners: Secondary school (10th grade or higher); B1/B2 level students
Teacher preparation time (multiple options):
- Use the worksheets included in this chapter (see Appendix)
-
- Getting familiar with the proposed lesson structure: 15 min
- Collect your own data and design worksheet(s)
-
- Getting familiar with Sketch Engine: 10 min
- Creating concordance lines and worksheet(s): 30 min
- Optional: worksheet with scaffolding: approx. 15 min
Lesson time: 90 min
Global learning objective: Students can use corpus extracts to deduce rules for the placement of commas and can apply them in their own argumentative essays.
Competence-oriented learning objectives:
Students can…
- spot grammatical patterns in concordance lines taken from a corpus (e.g., commas after introductory phrases, after conjunctive adverbs, and in enumerations; cf. 3.2.1).
- infer grammatical rules for the placement of commas based on the deduced patterns.
- apply some of these patterns in their own argumentative essays.
2 Corpus, tool and methods
This chapter draws on the British National Corpus 1994 (hereafter BNC1994), which consists of approximately 100 million words of native British English. The BNC1994 is a balanced corpus, which, among other registers, features written academic language.
The planned lesson makes use of the online corpus tool Sketch Engine. Sketch Engine grants a free 30-day trial and is free of charge until March 2022 for researchers, lecturers, and students from academic institutions in the EU participating in the ELEXIS project.
The lesson at hand takes a direct corpus approach: through teacher-corpus interaction, appropriate concordance lines are selected and presented in two worksheets. The focus on simple and easy-to-use functions of the corpus tool facilitates preparation for teachers, as they do not necessarily need to have any experience in using corpora and do not have to spend a lot of time familiarising themselves with the various corpus tool functions.
In this form of data-driven learning, learners do not search in corpora themselves, but engage in paper-based corpus interaction. In contrast to an indirect use, in which the corpus only has an impact on the material, students work and interact directly with the concordance lines. This can help students to get accustomed to concordance lines and should facilitate future lessons in which students consult the corpora themselves.
3 Step-by-step guide
3.1 Teacher preparation
3.1.1 Corpus queries – data collection
This approach features teacher-corpus as well as student-corpus interaction. As the students’ interaction will be paper-based and consist of simplified corpus results, the lesson requires some teacher preparation. As part of this preparation, teachers will engage with the corpus, conduct corpus queries and collect data that will form the basis for the students’ paper-based corpus interaction and their worksheet. To compile the data, follow the steps described in this chapter.
Steps:
- Visit www.sketchengine.eu. This is our corpus tool.
- In order to use Sketch Engine, you will need to create an account. By clicking on “FREE Trial” at the top of the page (Fig. 1, a), you can sign up for a free 30-day trial, which enables you to use all the search-related functions needed for our purpose.


- Then, click on “LOG IN” (Fig. 1, b). An interface (Fig. 2) will pop up, in which you can type the username (or email) and password you created in step 2). Press “LOG IN” to log into your account.
- You should now be able to see the following dashboard (Fig. 3). Next to the interface for selecting a corpus, there is an embedded video on the right-hand side. By clicking on it, you will see a short and very informative introduction to Sketch Engine. It is not necessary to watch it when following this step-by-step guide. However, as this quick start tutorial gives you background information on the corpus tool, it might be helpful for you when modifying or creating your own lesson.

- By clicking onto the search box at the top (Fig. 3), a specific corpus can be selected. As explained above, we will use the BNC, so please type “BNC” into the search box.
- In the appearing drop-down menu, select “British National Corpus (BNC)” by clicking on it (Fig. 4).

-
- The interface should now look like the one in Fig. 5. On this interface, you get an overview of all the different functions that can be used. If you are interested in getting detailed information about the chosen corpus, such as the number of words or the kind of text genres it encompasses, you can click on “CORPUS INFO” (Fig. 5, a).
- As we want to deduce patterns for the placement of commas from entire sentences, we need to use the “Concordance” function (Fig. 5, b), so please click on it.

- The interface will change again into the dashboard shown in Fig. 6. Click on the tab labelled “ADVANCED”, which enables us to specify a register.

- The drop-down menu called “Query Type” should already be open on the next interface. Now choose the option “simple” (Fig. 7, a). This option is not case sensitive and finds the search word form of your choice.

- Then, choose a subcorpus. To do so, click on the arrow next to “none (the whole corpus)” (Fig. 7, b). In the appearing drop-down menu, pick “Written Academic” (Fig. 8). This will limit our search to the selected register.

- Type a comma (“,”) into the search field which says “abc” (Fig. 9, a).

- Now, click on “GO” (Fig. 9, b) in order to start the search. (Note: the box labelled “GO” turns red once you type something into the search field.)
- You should now see your search results (Fig. 10). To get a random sample, click on the dice (Fig. 10, a). This mixes up the order of the concordance lines and prevents us from seeing only sentences from the same source. By doing that, the authenticity of the output is increased. In the pop-up box (Fig. 11), we can select the sample size. A sample of 200 concordance lines is preselected, but for our purposes, we will change it to 100 in order to reduce the number of concordance lines to a more manageable number.


- Now, you can see a randomly sampled list of concordance lines that have a comma in it (Fig. 12). By clicking on the arrow next to “KWIC” (Fig. 12), you can change the display mode. There are two display options: the first one, “KWIC”, shows the comma in the centre and some context to the left and right; the second one, “sentence”, shows the complete sentence. We chose to select “sentence”, as this makes it easier to filter out concordance lines that are not appropriate to the language level of the students.

- By ticking the boxes next to the individual concordance lines, you can select the lines you want to use for your worksheet and filter out those that do not fit the purpose or the language level (Fig. 13, a). For example, in line 4 there are many specific technical terms which the students might not understand. As this lesson’s focus is on punctuation rather than content, it would be counterproductive to include this line, so we did not tick the box next to it. Confirm your selection by clicking on “SELECTED” beneath “show only” (Fig. 13, b).

- Now, you have a selected list of concordance lines appropriate for the context. This list will provide the basis for the worksheet. You can download it by clicking on the download symbol (Fig. 14).

- A pop-up window will open. Click on “PDF” to save the list of concordance lines as a PDF document (Fig. 15). We recommend this format, as the layout is very clear and easy to work with.

- Now you have successfully collected data that your students can use in order to deduce patterns for the placement of commas.
How to create frequency lists
Frequency lists provide an overview of the words that occur most frequently directly before and after a comma. Such lists can help to empirically validate the patterns deduced by the students. Once you have reached step 13 (see above), you may execute the following steps in order to generate your own frequency lists.
Considering step 13 above as a starting point, you may now click on the “Frequency” symbol, which is displayed in the header right above the concordance lines (Fig. 16).

In the interface below, choose the option “word” as an attribute and click on “1” on the left-hand side of “KWIC” (Fig. 17). This will generate a list of words which are often followed by a comma, sorted by frequency. Click “GO” to start your search.

You should now be able to see a frequency list similar to the one in Fig. 18. Depending on the corpus you consulted, the generated frequency list may vary. You can either screenshot and save your results or tick the boxes and download them (cf. steps 16-18).

If you click “CHANGE CRITERIA”, you will be taken back to the frequency interface.

Now, to obtain a list of words that frequently appear after a comma, select “1” on the right hand-side of “KWIC”, as displayed in Fig. 19. Then, execute your search via the “GO” button.

Once again, either screenshot and save your results or tick the boxes and download them (cf. steps 16-18).

3.1.2 Worksheet and task creation
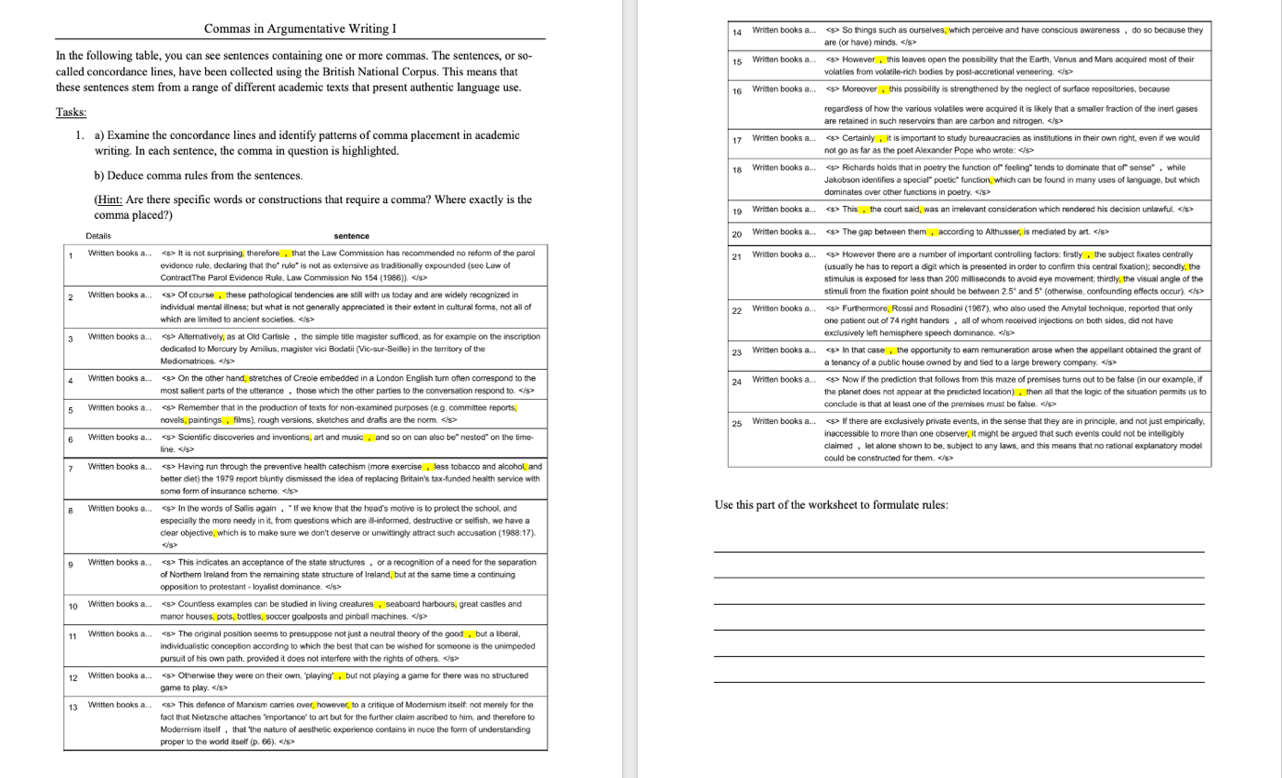
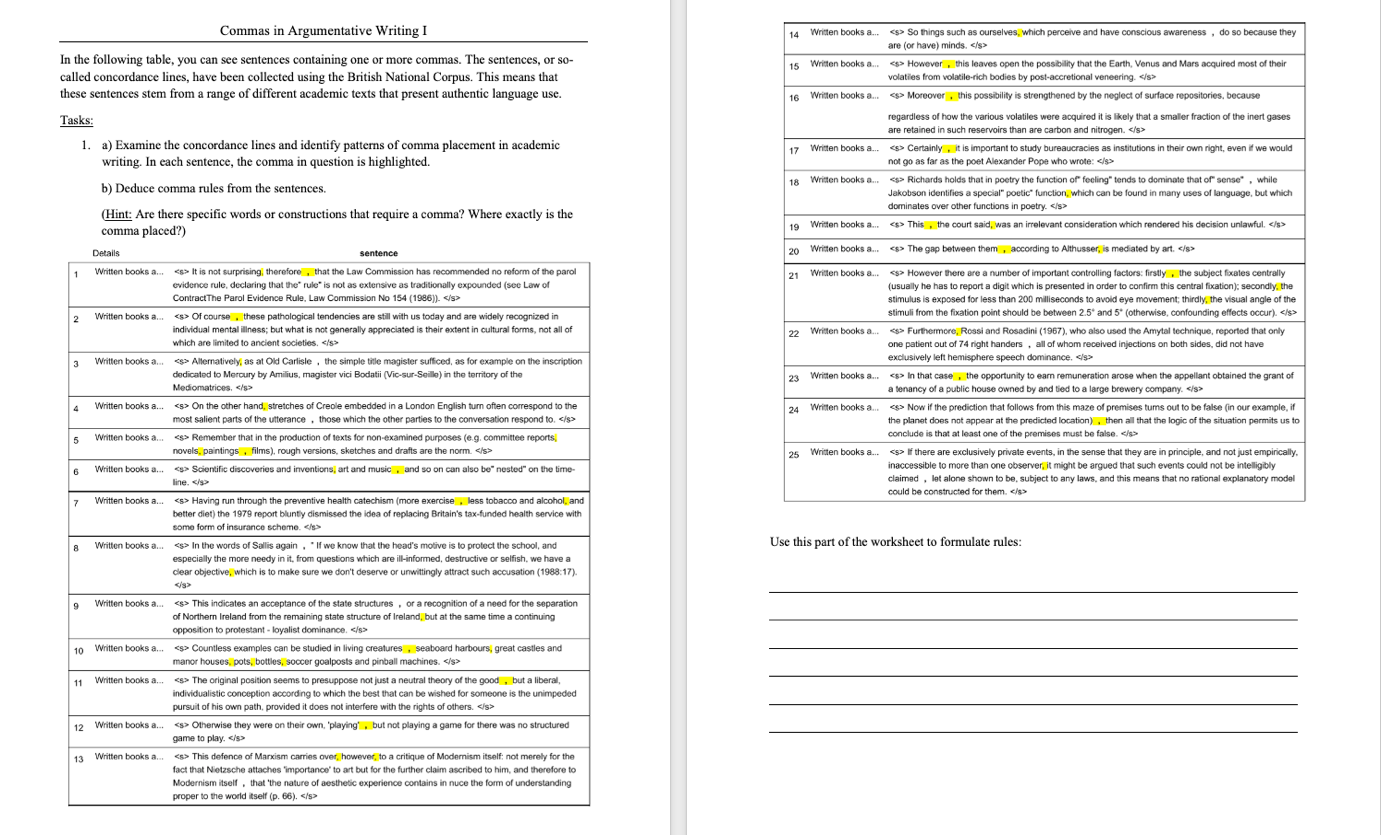
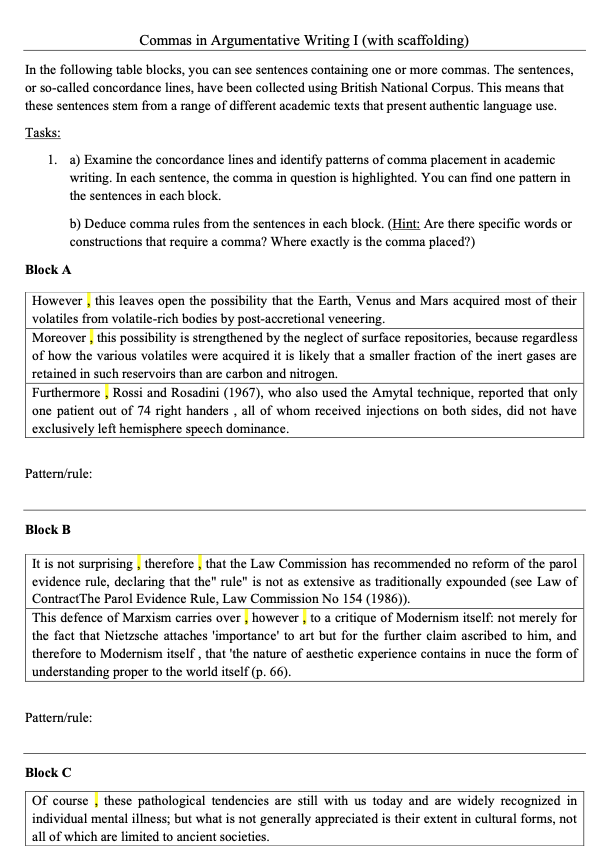
For the first task, you need to design a worksheet based on the corpus data you compiled in section 3.1.1. As the students are supposed to examine the concordance lines and deduce patterns themselves, the worksheet basically consists of the raw corpus results (though filtered by the teacher in section 3.1.1). You can highlight the comma in each sentence in order to draw the students’ attention to that specific part of the sentence. Add a task description. Your worksheet could look like the sample worksheet in Fig. 21. You could also use the sample worksheet in Fig. 21: simply click on it to download the PDF version.
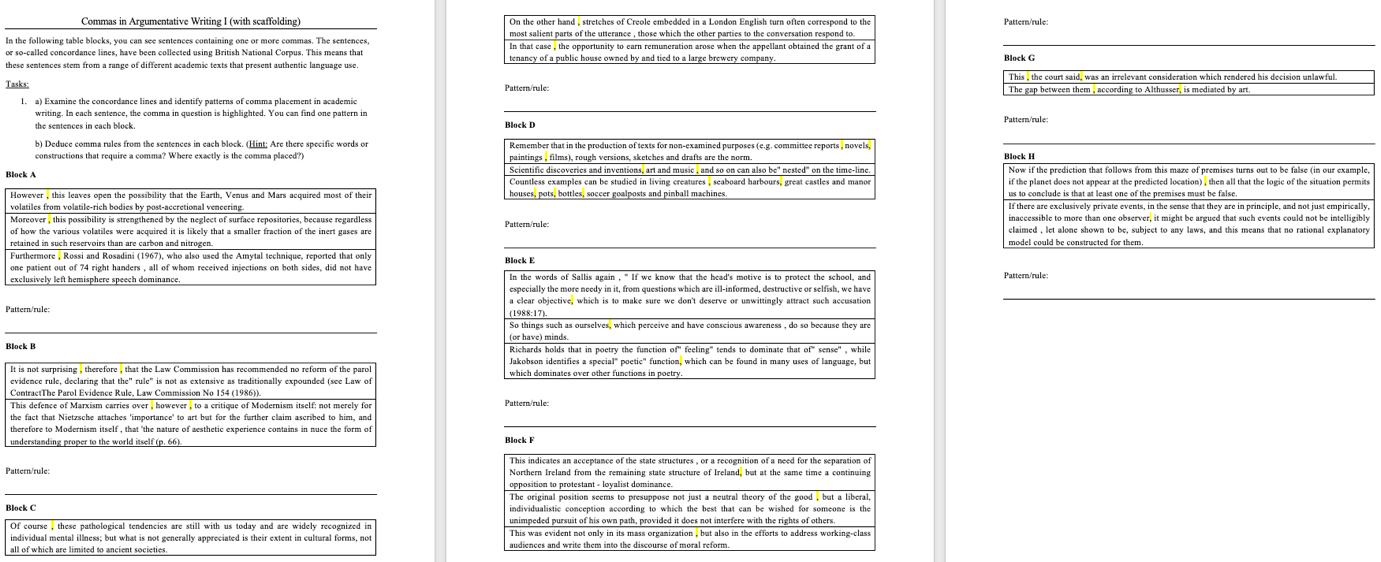
Depending on your students’ proficiency, you might want to create a second version of the worksheet that is easier and provides scaffolding. In order to adapt the worksheet to a lower proficiency level, group and arrange the concordance lines according to the pattern they show. That way, you can create blocks with two to three concordance lines and have the students deduce one pattern per block. This gives them more time to focus on the pattern itself rather than spending time searching for concordance lines that go together. In Fig. 22, you can see a sample version of such a worksheet that provides this kind of scaffolding. In addition to the prearranged blocks, this worksheet also has a reduced number of concordance lines to work through. You can find the full version of this worksheet in the appendix, too.
To create your own worksheet with scaffolding, we recommend copying the individual concordance lines into a Word document. You can do so by clicking on the document icon at the end of the concordance line to copy it (Fig. 23) and then paste it into your document (e.g., by using the keyboard shortcut ctrl + V).

3.2 Lesson plan
| Phase | Task | Interaction form | Materials/ Medium |
| Introduction: 5 min |
Talking about the significance of commas; introduction to how a corpus can help with comma placement, e.g., in academic texts |
Silent impulse (Plenum) | Picture “Punctuation”, smartboard |
| Task 1: 25 min |
Identifying patterns in comma placement in academic writing by analysing concordance lines Presentation and discussion of results Recourse/recap: explaining the need for commas and the deduced comma rules with reference to the picture from the beginning |
Bus stop (1st individual work, 2nd partner work) Plenum |
Worksheet Task 1
Smartboard Picture “Punctuation” |
| Task 2: 30 min |
Applying the deduced rules to an academic text which lacks commas (Optional end of lesson) |
Think-Pair-Share (1st individual work, 2nd partner work, 3rd Plenum) |
Worksheet Task 2, notes from task 1 |
| Task 3: 15 min |
Students correct their own argumentative essays, focusing on comma placement |
Individual work (Upcoming lesson: partner feedback) |
Notes from task 1 |
3.2.1 Tasks
Introduction/Silent impulse:


Task 1:
In the worksheet for task 1 (cf. Fig. 21/22, Appendix), students are asked to examine concordance lines and identify patterns in order to derive rules for the use of commas in English. From these concordances, the following rules for comma placement may be deduced:
When to use commas – rules:
- A comma is used after the introductory conjunctive adverbs (e.g., however, moreover, furthermore)
- When these conjunctive adverbs are used in the middle of a sentence (i.e., as parenthetical elements), two commas need to be placed: one before and one after the adverb.
- A comma is used after introductory elements or phrases (e.g., of course, in that case, on the other hand).
- Commas are used in enumerations. They separate items in a list consisting of more than two items.
- A comma is used in relative clauses before the relative pronouns which or who when the pronoun introduces a non-essential element.
- A comma is used before coordinating conjunctions joining two independent clauses (e.g., but, as, yet).
- Two commas are used to separate insertions or parenthetical remarks, which add extra information and can be removed without changing the meaning of the sentence.
- In conditional sentences starting with an if-clause, a comma is used to separate the if-clause from the main clause.
Task 2:
In worksheet 2, students apply the comma rules they formulated in task 1 to an argumentative essay by adding the missing commas in the right places. The essay has been adapted from the Michigan Corpus of Upper- Level Students Papers (MICUSP 2009).

Task 3:
Here, students are asked to check their own argumentative essays for comma placement. This helps them to internalise the patterns discovered in the previous tasks and shows them how they can make practical use of these rules to improve their own writing.
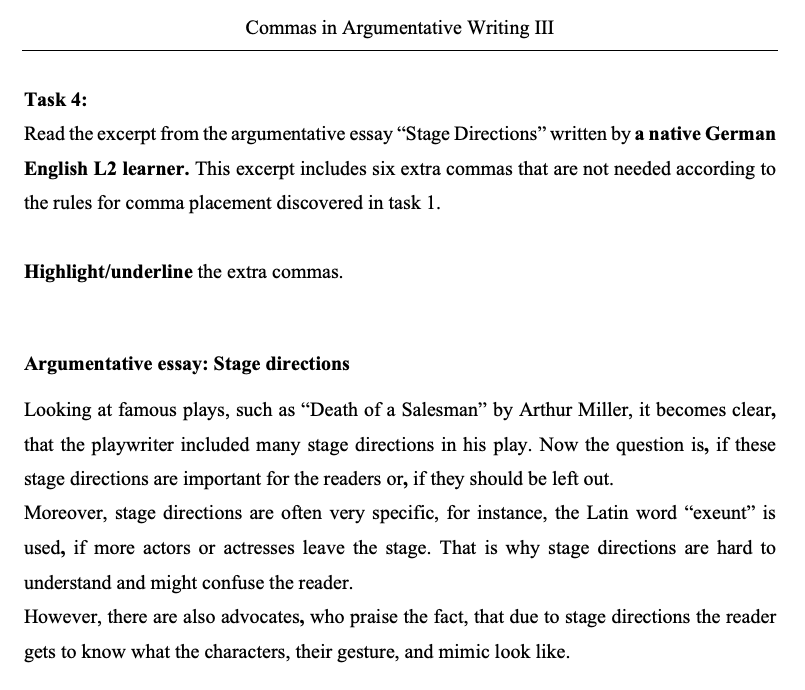
Task 4:
Note: This task is optional and not included in the lesson plan. However, it might be useful for students who tend to use more commas than necessary.

3.2.2 Methodological thoughts
In the introductory phase of the lesson, the silent impulse aims to encourage students to think of commas as a semantic, phrasal, and structural necessity, as they discover how commas can entail a change of sentential meaning (as in “I like cooking my grandma and my English teacher”).
It is the ‘form-focused approach’ which inspired the tasks (Ellis 2006: 94, Spada & Lightbown 2008: 185). Via the ‘Think-Pair-Share’ method, students continuously receive feedback, not only from the teacher but also from their classmates (Eisenmann 2019: 92-96), which represents a vital aspect of form-focused instruction (Ellis 2006: 94). Besides, they practise giving feedback to others, which – alongside the collaborative work – trains the learners’ reflective, evaluative, and communicative competences (Eisenmann 2019: 92). In addition, the ‘Bus stop’ method considers students’ individual pace of learning, matching those students with a similar pace and similar needs for the consequent partner work (Eisenmann 2019: 96-97).
In the framework of a planned focus on form (Ellis 2006: 100), students purposefully elicit frequent comma placements from the concordance lines they are presented with (Ellis 2006: 100). This bottom-up learner-corpus interaction gives rise to a natural, inductive, and experience-based second language acquisition (Spada & Lightbown 2008: 182-183, Tomlinson 2013: 14). Hence, students’ initiative and commitment is promoted in the tasks (register: written academic).
Additionally, Task 3 enables students to improve their own argumentative essay as a final product, which represents the action-oriented lesson approach. Learners are more likely to acquire sustainable knowledge based upon their own insights rather than on prefabricated input.
Lastly, by choosing an argumentative essay on “The Movement of Homosexual Marriage into the Public Sphere” (MICUSP 2009), this lesson plan deliberately positions itself against the ‘PARSNIP’ approach (frequently applied by English textbooks), which promotes the avoidance of ‘controversial’ topics, such as politics, alcohol, religion, sex and sexual orientation, narcotics, -isms (e.g., communism, racism, etc.), and pork (hence the acronym ‘PARSNIP; Harwood 2010: 11, 434). This is because English language teaching should address all topics relevant to students’ lives and society in general, enabling them to discuss these competently and express their own opinion. Hence, this lesson contributes to students becoming proficient English language speakers and autonomous language learners who are able to reflect on and talk about controversial topics.
3.2.3 Follow-up activities
As the proposed lesson plan ends with students writing their own essays, a constructive and beneficial follow-up activity would be a peer review of these essays. The students should be asked to bring their written essay to the following lesson, in which the teacher collects them and then distributes them among the students. During the peer reviewing process, the students read through the essays of their peers, checking for grammatical errors and especially paying attention to comma placement. Not only does this improve the individual essays, but it also helps students internalise and apply the rules for comma placement. Additionally, this strengthens students’ proofreading competence and, thus, their ability to check written texts, identify errors, and correct them. However, it has to be taken into account that students will probably find some errors, but not all; they may even add more errors. This means that the essays may need to be reviewed by the teacher as well.
Another useful follow-up activity that deals with the problem of overusing commas is task 4 (cf. 3.2.1). This task consists of an authentic text written by a German student learning English that has too many commas. The superfluous commas should be identified and highlighted by the students.
In addition, follow-up lessons could also address the content of the argumentative essay, i.e., homosexual marriage. This could be done by having the students collect the arguments of the essay and adding their own as well as researching the legal situation in their home country.
4 Options and further ideas
The presented lesson plan can be supplemented with activities focusing on how to use corpora. This would constitute a holistic approach, which not only uses corpora as a means to an end, but also makes corpus tools and methods a central topic. Including activities that explain and show students how the data featured on the worksheet was compiled and letting them interact with the corpus directly provides them with valuable study skills and techniques. In this way, they will be able to use corpora independently to check their own language use whenever they need to.
Furthermore, the presented lesson idea may be applied to other punctuation issues, such as the use of semicolons, for instance. Instead of looking at patterns on the word level, here, the focus would be on the sentence structure and the clause level of the concordance lines.
Moreover, this approach may be extended and used to contrast different registers. This could be done by comparing the use of commas in the “Written Academic” subcorpus (cf. 3.1.1) with comma use in a different register. Hence, differences in comma placement between academic texts and periodicals, for instance, may be analysed.
Apart from registers, this approach can also be used to contrast corpora in general. For students or teachers interested in differences in comma placement in different the varieties of English, it might be interesting to carry out a comparison of comma placement in the COCA, which represents American English, and the BNC. Another idea would be to contrast the patterns with those of a learner corpus. This can raise teachers’ awareness of frequent learner errors in this area and enable them to act accordingly.
Lastly, the approach taken in this chapter may be applied to any foreign language classroom. Provided that there is an available corpus for the language in question, this lesson is equally applicable to other languages that make use of commas, such as French or German.
5 Caveats and limitations
The lesson involves certain restrictions for both teachers and students. Teachers should be aware that, unless they are provided access via their school, Sketch Engine is limited to a 30-day trial period.
Therefore, it is necessary to plan well in advance in order to design further corpus-informed language teaching materials, e.g., by making use of the suggested ideas in this book.
A further potential problem concerns the selection of the concordance lines. Although selecting a random sample provides you with authentic language material, it is possible that some frequent uses of commas do not occur in the sample. Consequently, teachers must be particularly attentive when picking out the concordance lines. The selection should correspond to the frequency lists (Fig. 18, 20) but also suit the group of learners and their needs.
Finally, it should be mentioned that there are many other frequent uses of commas besides those discussed in this chapter.
6 Conclusion
We hope that the proposed chapter will be of help to teachers who want to design their lessons in a corpus-informed way in order to help students acquire ‘correct’ comma placement in academic texts. The lesson can be planned by teachers who have not had any experience with corpus interaction yet. Students need not have any experience either: the concordance lines will introduce students to corpora, familiarising them with corpus interaction. Following a bottom-up approach, the students derive frequent patterns of comma placement independently. This ensures that students engage intensively with the topic. Furthermore, students can apply their newly gained knowledge in tasks 2 and 3. Another advantage is the possibility of scaffolding in task 1 and the option to choose a different topic which corresponds more to the students’ interests in task 2. The proposed lesson is therefore both student-oriented and tremendously versatile.
7 Resources and references
The British National Corpus (BNC). Bodleian Libraries, University of Oxford, on behalf of the BNC Consortium. URL: http://www.natcorp.ox.ac.uk/. Available on sketchengine.eu.
Eisenmann, Maria. 2019. Teaching English: Differentiation and individualisation. Paderborn: Ferdinand Schöningh. https://elibrary.utb.de/doi/book/10.36198/9783838551098 (14 March, 2021).
Ellis, Rod. 2006. Current issues in the teaching of grammar: An SLA perspective. TESOL Quarterly 40(1), 83-107. doi:10.2307/40264512. (14 March, 2021).
Harwood, Nigel (ed.). 2010. English language teaching materials: Theory and practice. New York: Cambridge University Press.
Michigan Corpus of Upper-level Student Papers (MICUSP). 2009. Ann Arbor, MI: The Regents of the University of Michigan. https://micusp.elicorpora.info/search/view/?pid=PHI.G0.12.1.
Niedersächsisches Kultusministerium. 2015. Kerncurriculum für das Gymnasium, Schuljahrgänge 5-10: Englisch. https://cuvo.nibis.de/cuvo.php?skey_lev0_0=Fach&svalue_lev0_0=Englisch&skey_lev0_1=Dokumentenart&svalue_lev0_1=Kerncurriculum&skey_lev0_2=Schulbereich&svalue_lev0_2=Sek+I&skey_lev0_3=Schulform&svalue_lev0_3=alle&docid=1197&p=detail_view (02 June, 2021).
Spada, Nina & Patsy M. Lightbown. 2008. Form-focused instruction: Isolated or integrated? TESOL Quarterly, 42(2), 181-207. http://www.jstor.org/stable/40264447. (14 March, 2021).
Tomlinson, Brian. 2013. Second language acquisition and materials development. In Brian Tomlinson (ed.), Applied linguistics and materials development. 11–30. London: Bloomsbury Academic. http://dx.doi.org/10.5040/9781472541567.ch-002. (14 March, 2021).
8 Appendix
Example Worksheets