Use the Editor
Edit Content with the Visual and Code Editors
The Pressbooks editor provides you with two different views for your content. The default Visual Editor displays your content much like a word processor with much of the styling and formatting applied. The Code Editor on the other hand displays the full HTML structure of your content without any formatting visible. You can switch between the two views, depending on your needs.
Use the Visual Editor
When you create a new chapter, you will start out in the Visual Editor by default. It is a WYSIWYG (What You See Is What You Get) view that allows you to see most styling and formatting as they are applied.
Visual toolbar options
The visual editor toolbar displays the formatting options.
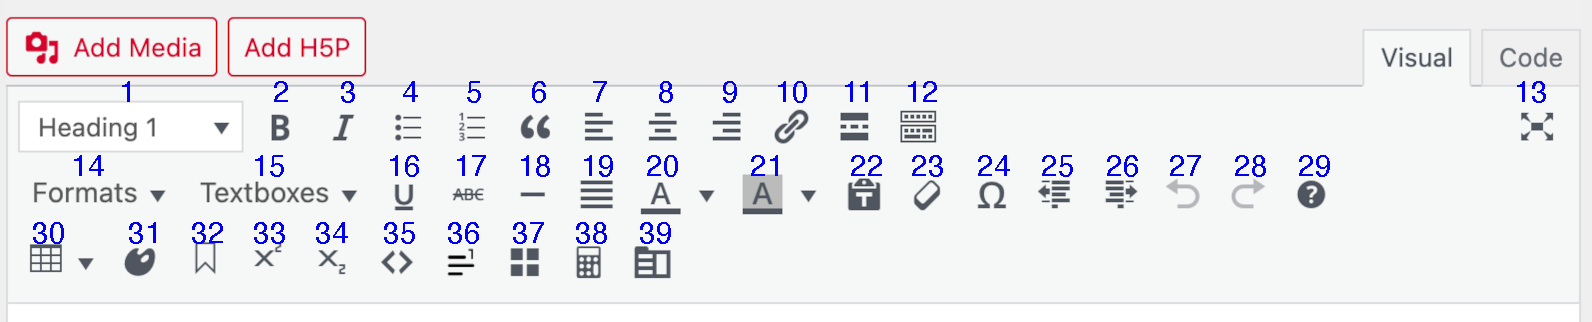
Top row from left to right:
- Paragraph styles dropdown menu: choose from normal paragraph style, six different heading styles, or preformatted text
- Bold
- Italic
- Bulleted (unordered) list
- Numbered (ordered) list
- Blockquote
- Align left
- Align centre
- Align right
- Insert/edit link
- Insert Read More tag
- Toolbar Toggle
- Distraction-free writing mode
Second row from left to right:
- Formats: dropdown menu to choose from several text indent and tracking options, as well as pullquote options and text direction
- Textboxes: dropdown menu to choose from a variety of plain textboxes or predesign educational textboxes (read more here)
- Underline
Strikethrough- Horizontal line
- Justify (Shift + Alt + J)
- Text color
- Background color
- Paste as text
- Clear formatting
- Special character
- Decrease indent
- Increase indent
- Undo
- Redo
- Keyboard Shortcuts
Bottom row from left to right:
- Table (read more here)
- Apply Class
- Anchor
- Superscript
- Subscript
Code- Insert Footnote[1]
- Convert MS Word footnotes
- Insert LaTeX
- Insert Glossary Term
You can highlight a section of existing content and then click a tool on the toolbar to add formatting to that section. Alternatively, select the tool first, and then add new formatted content.
Use the Code Editor
You can also choose to work in a code editor, or switch to it as needed (to clean up messy HTML for example). The code editor allows you to directly view and edit your book’s HTML content as HTML.
Code Editor Options
The code editor toolbar formatting options are tailored to working in HTML.

- Bold: inserts
<strong>tags (click once to open, and again to close the tag) - Italic: inserts
<em>tags (click once to open, and again to close the tag) - Insert link (a pop up will appear)
- Blockquote: inserts
<blockquote>tags (click once to open, and again to close the tag) - Deleted text (strikethrough): inserts
<del>tags (click once to open, and again to close the tag) - Inserted text: Insert a tag to display the current date and time
- Insert image (from URL)
- Bulleted list: insert
<ul>(unordered list) tags (click once to open, and again to close the tag) - Numbered list: insert
<ol>(ordered list) tags (click once to open, and again to close the tag) - List item: insert
<li>tag - Code: insert
<code>tags - Insert Read More tag:
<!--more--> - Close all open tags (automatically closes any open tags)
- Footnoe: Insert footnote shortcode
HTML Basics
Pressbooks is designed to make it easy for you to create attractive webbooks and export files without knowing much about book design or web development. Our ability to do this, however, is constrained in many ways by the quality of the underlying ‘markup’ in your book. Pressbooks uses HyperText Markup Language [HTML] to provide the content and structure of your book and Cascading Style Sheets (CSS) to apply the styles that control the appearance of your webbook and export files. You don’t need to know HTML or CSS to use Pressbooks, but understanding a little bit about how they work will help make sure your books look good when you export from Pressbooks, as most formatting problems are caused by the book’s underlying markup.
Here is a brief passage of text with some formatting:
A long, long time ago, in a galaxy far, far away, there lived a fine young man unaware of various things about his past.
This is what you might write into the Visual editor of Pressbooks. But if you look at the Code editor, you’ll see that the way that italic and bold is achieved is through “markup”, or HTML. So the markup of that text looks like:
A long, <em>long</em> time ago, in a galaxy far, far away, there lived a fine young man <strong>unaware</strong> of various things about his past.
The <em>tag</em> specifies that a text should be italicized. The <strong>tag</strong> specifies that it should be bold.
A reader reading an ebook, or a print book, or a web page won’t see those tags. They are instead used to tell the ebook software, or browser, how those words should look. In addition to the em and strong tags, there are a handful of other basic HTML tags you should know about:
| tag name | used for | tags |
| strong | used to make text bold | <strong> or <b> |
| emphasis | used to make text italic | <em> or <i> |
| blockquote | used to quote a long text, can be used for instance for a letter, a poem etc | <blockquote> |
| unordered list | used to create a list with bullets | <ul><li>item 1</li><li>item 2</li></ul> |
| ordered list | used to create a numbered list | <ol> |
| headings | used to make headings in your document | <h2>, <h3> ... </h6> |
Here is an extended version of the text from above with more HTML tags:
The Background
A long, long time ago, in a galaxy far, far away, there lived a fine young man unaware of various things about his past, including:
- the Force
- what his father was up to
- how to use a lightsaber.
All that, however, was about to change. Three things were about to happen:
- he would discover the Force
- he would learn how to use a lightsaber, and
- he would meet his father.
The Update
Long after this fellow lived, a famous movie was made about his life. The movie was shot in Tunisia.
Here is that text with markup:
<h3>The Background</h3>

A long, <em>long</em> time ago, in a galaxy far, far away, there lived a fine young man <strong>unaware</strong> of various things about his past, including:

<ul>

<li>the Force</li>

<li>what his father was up to</li>

<li>how to use a lightsaber.</li>

</ul>

All that, however, was about to change.
Three things were about to happen:
<ol>

<li>he would discover the Force</li>

<li>he would learn how to use a lightsaber, and</li>

<li>he would meet his father.</li>

</ol>
<h3>The Update</h3>

Long after this fellow lived, a famous movie was made about his life. The movie was shot in Tunisia.
Write in Markdown
⚠️ We strongly recommend saving changes to existing content before enabling the Markdown editor, as unsupported elements will be removed when converting existing HTML content to Markdown.
Users who prefer to write using Markdown can do so by activating the Parsedown Party plugin in their book. In networks where this plugin is installed and book admins are able to activate plugins, you can do so by completing two steps:
Activate the Parsedown Party Plugin
- In your book’s dashboard, click Plugins
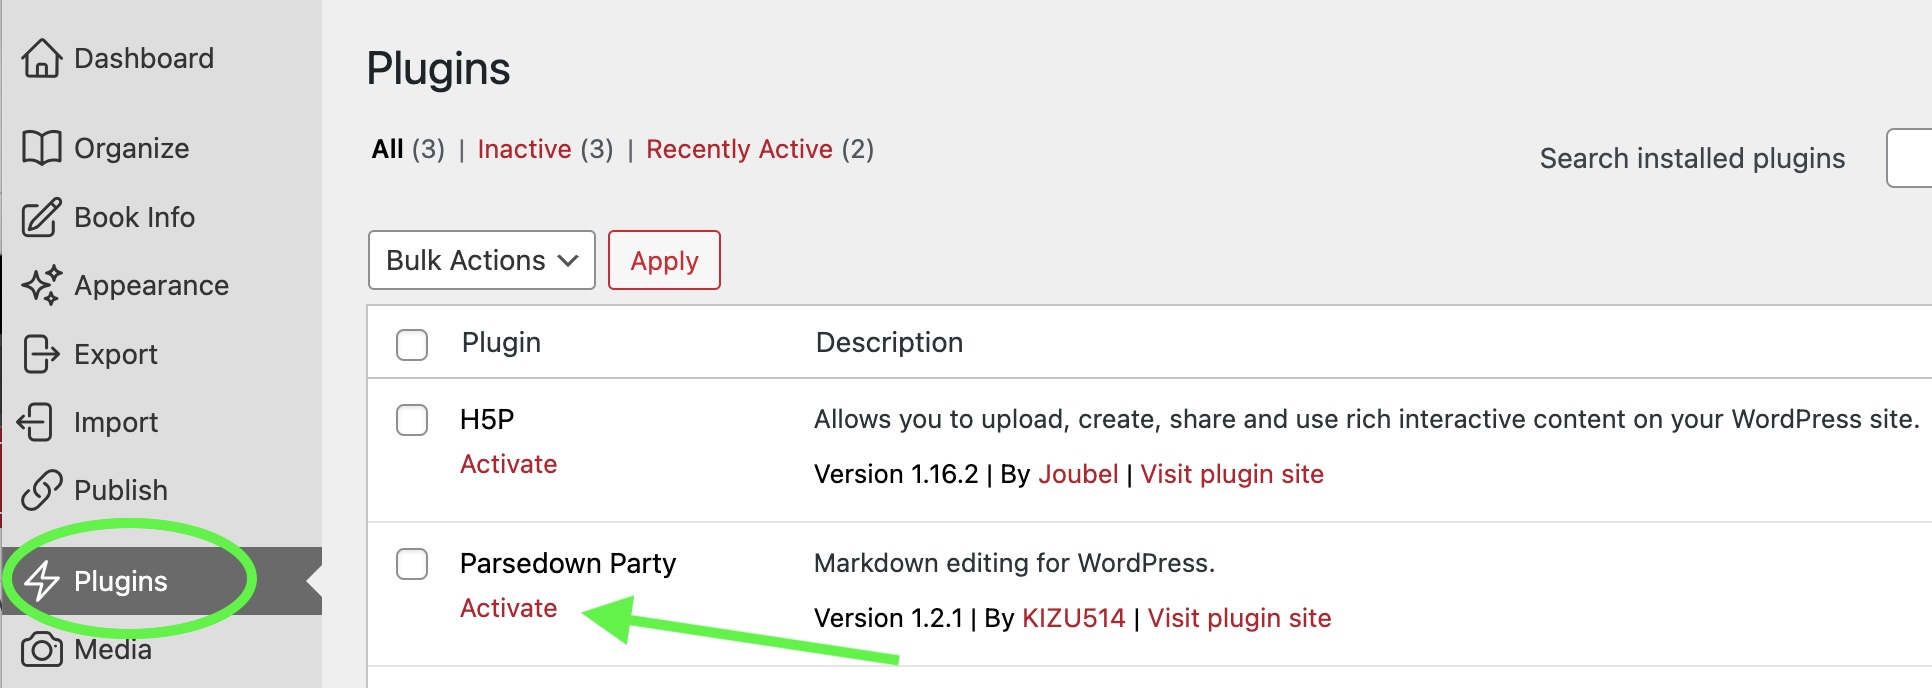
- In the Parsedown Party section, click Activate
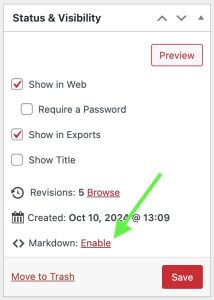
Enable Markdown in Your Book Chapter
- Open the chapter in the Visual editor
- In the Status & Visibility section, click Enable next to Markdown
The visual/code editor interface will now be replaced by a simple Markdown-based editor. You can revert the default visual/text editor interface by clicking the Disable button next to the Markdown option in the Status & Visibility menu.
- This is an example of a footnote. ↵
