Accessible Presentations
Rob Power
Death Access by PowerPoint
 “Death by PowerPoint” is a commonly used phrase that reflects both the prominence of digital slideshow presentations in teaching and learning, and the frustrations frequently experienced by their audiences. Gillis (2023) describes the concept of “death by PowerPoint” as being “caused by the poor use of presentation software… [when a] speaker fails to capture an audience’s focus and interest using their presentation.” This lack of engagement includes the accessibility of presentations to audiences with various needs. But, presentation applications like Microsoft (2024a) PowerPoint and Google (n.d.) Slides are robust tools, with the ability to help captivate and inform audiences, when used effectively.
Know Your Audience
The first step to creating an effective and accessible presentation is to know who your audience is, and how you intend to use your “slide deck.” Do you intend to:
- Present your slides in support of a live talk or demonstration?
- Use your slides to create a pre-recorded video presentation (such as an instructional video)?
- Distribute copies of your slides as a resource for your audience (students)?
The first two questions will impact some of your slide content layout decisions, which have implications for audience engagement and cognitive load. The third question requires you to answer another question before you can proceed. Do you intend for your slides to:
- Serve as a support to emphasize and summarize key points?; or
- Serve as a primary means of disseminating learning content?
If your answer is that your slides should “serve as a primary means of disseminating learning content,” then you probably have either too much content for the chosen medium, or too much text for the chosen medium.
Is a Presentation the Right Medium?
Slideshow presentations are a primarily visual medium, intended to engage the eyes while listening to a spoken message. They are intended to transmit visual and oral content. They are not an appropriate medium for transmitting large amounts of text. If you have too much text on your slides, you run the risk of:
- Boring your audience by simply reading your slides word-for-word. (In this case, what even is the point of having a speaker? Your audience can read the text themselves, or get a machine to read it for them!)
- Creating cognitive overload, as your audience struggles to simultaneously read the on-screen text and listen to your narration.
I once had a wise professor advise me that “your slides should be useless without you there to present them!” I don’t fully agree with that statement. He made it at a time when it wasn’t so common to distribute copies of slide decks to students as supporting resources, so issues of document accessibility weren’t considered a priority. But, he did have a point about how you use slides in a live presentation. I try to follow his advice when preparing slides for a live presentation by limiting my use of on-screen text to a few key points (like a bullet list), and by using a lot of figures and graphics instead of text. I find this helps me to:
- Leverage the on-screen contents to generate audience interest, and to focus their attention on the key points.
- Facilitate a more engaging live session, by avoiding the trap of simply reading the on-screen text. Instead, I use the on-screen bullets, images, and figures to prompt me about the points I intend to make. (This forces me to engage in a more natural conversation about those points, rather than sound like I’m reading a prepared script!)
If your answer is that your slides should “serve as a primary means of disseminating learning content,” then perhaps you should reconsider your chosen medium. There are better alternatives for sharing large amounts of standalone (not narrated or presented) content – especially if it is text-heavy content.
Creating Engaging Presentations

So, you’ve determined that creating a presentation slide deck is the best medium for your audience’s needs. How do you make your presentation accessible to your entire audience? Gillis (2023) offers some general information about what can go wrong with your presentation, and how to plan your presentation to avoid the dreaded “death by PowerPoint.” That advice is very quickly summarized by Gillis in Eye on Tech’s (2023) Don’t bore your team to death:
Some of Gilllis’ key planning points include:
- Use PowerPoint to enhance the presentation.
- Prepare for the presentation.
- Tell a compelling story.
- Create easy-to-understand and aesthetically pleasing slides.
- Make the slides complement the speaker’s presentation.
- Don’t include too many ideas on one slide.
- Use contrast.
- Use the text on a slide as a starting point. Don’t read off the slide word for word.
- Engage the audience with multimedia formats.
Review Gillis’s (2023) Definition: Death by PowerPoint to read more about these tips in detail.
Creating Accessible Presentations
The following tips and resources will be helpful to ensure that your presentation slide decks meet general usability and WCAG 2.3 (W3C, 2022) digital accessibility standards.
Fonts
Keep your fonts consistent throughout. This looks more polished and professional and reduces cognitive load. Also make sure your text is large enough so that someone in the back of a room (or viewing it on a small screen) can easily read it. And it is best to use a sans-serif font when creating text for on-screen viewing. It is easier to read from a distance, or on a smaller screen.
Color

Ensure your text and other content has a high enough color-contrast ratio to be easily visible to all audience members, including those with visual acuity issues (such as color-blindness). Also be careful about how you use color to emphasize key points, as some audience members may not be able to perceive such highlights!
Refer to the chapter Should You Use Color for Emphasis? for more information.
Images
![]() Make sure the images that you use enhance both your spoken message and any other content on your slide. And, make sure those images are easy to perceive and do not contain a lot of text (if you are sharing your slides, the text within the images cannot be accessed using a screen reader application!).
Make sure the images that you use enhance both your spoken message and any other content on your slide. And, make sure those images are easy to perceive and do not contain a lot of text (if you are sharing your slides, the text within the images cannot be accessed using a screen reader application!).
Refer to the chapter A Picture Isn’t Always Worth a Thousand Words… for more information.
Object Placement
If you are creating your slides for a live presentation, be sure to keep some extra “white space” (empty space) in the bottom third of your slides. There’s a good chance that some of your audience members won’t be able to see the bottom of the screen because it is blocked by the people sitting in front of them (or by you, or your lectern, or desk, etc.).
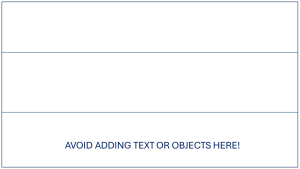
I also find it useful to keep the bottom third of the slide “clear” of any objects (text, images, figures, graphs, etc.) when using my slides to create instructional videos. That’s the area where my webcam footage will appear (if I choose to use the “talking head in the bottom corner” video format). That’s also where closed captions will cover part of the screen if users turn them on!
Testing Accessibility Essentials
If you are going to share copies of your slide deck with your students, then just like with word-processed documents, web-based content, or PDFs, you need to check the accessibility of your slides before distributing them. Microsoft PowerPoint now comes with an accessibility checker under the “Review” tab on the editing toolbar. Some of the accessibility considerations that you’ll need to verify include:
- Slide Titles. Make sure that each slide has a unique title. Visually impaired users will use these to navigate between slides. You can check (and edit) this by switching to “Outline” view on the “View” tab of the editing toolbar.
- Reading Order. This one’s a little trickier than ensuring the proper reading order of text and images in a word processor like Microsoft (2024b) Word. On a PowerPoint slide, the default “reading order” (the order in which a screen reader application will read text or objects to a visually impaired user) is the chronological order of when the objects were added to the slide. Whatever you added to the slide first is read out first. You can verify and adjust the reading order using options provided after running an accessibility check, or by using the “animations” pane.
- ALT Tags. As with digital text and web-based documents, you need to ensure that you have added meaningful “ALT” text (or alternative text) to any images or media objects added to your slides. This hidden “background” text will be read out to any students using a screen reader application. Good ALT text should be succinct but should describe the contents and purpose of the image or object. Also keep in mind that you should only add ALT text to an image if the content has instructional value. If it is simply a decorative image, you can tell a screen reader application to skip it by clicking on the “Decorative Image” checkbox (right-click on the image or object and select “Edit ALT Text” to open the ALT Text panel and access this option).
Refer to the chapter A Picture Isn’t Always Worth a Thousand Words… for more information.
Video Tutorials
![]()
Microsoft Helps (2022) provides a short overview of how to create an accessible presentation slide deck.
TeachUComp (2021) demonstrates how to run the accessibility checker tool in Microsoft PowerPoint.
Byrne (2020) demonstrates how to check accessibility issues when using Google Slides.
Increasing Engagement Through Interactivity
We have already noted that “accessibility” of a presentation includes both digital accessibility standards, as well as the ability of any audience member to fully engage with the content. You can enhance this type of “access” by adding some interactivity to your slides during live presentations. One of my favorite tools to use with Microsoft PowerPoint is the Poll Everywhere (n.d.) add-on.
The following short video (Poll Everywhere, 2020) provides an overview of how you can use Poll Everywhere to engage with remote audiences during live presentations. Of course, you can also use the features in face-to-face classes!
This longer (1:01:18) video is a webinar presentation (Poll Everywhere, 2023) on how to get started with using Poll Everywhere.
Another tool that I like to use is the Q&A feature under the “Audience Tools” in Google Slides. This tool displays a unique link that audience members can use to submit questions to the presenter. You can use the “Presenter Mode” tools to switch between your prepared slides and displaying the questions from the audience. Flipped Classroom Tutorials (2020) demonstrates how to use this audience engagement tool.
Using Your Slides to Create Instructional Videos
Perhaps you want to use an existing slide deck, or create a new one, to use for an instructional video instead of with a live audience. Microsoft PowerPoint has features that will help you to capture a “screencast” presentation (along with your webcam feed, for a “talking head in the bottom corner” style video). Stratvert (2019) walks through how to create videos using PowerPoint.
You can also use specialized screen recording applications such as my go-to, ScreenPal (formerly Screencast-O-Matic) (2024) – which I find to be a better option, with a wider array of video editing capabilities. I cover everything you need to know about this in the Creating Instructional Videos chapter in Everyday Instructional Design.
- Power, R. (2023). Chapter 18: Creating Instructional Videos. In Everyday Instructional Design: A Practical Resource for Educators and Instructional Designers. Power Learning Solutions. https://pressbooks.pub/everydayid/chapter/creating-instructional-videos/
Of course, if you are going to turn your slides into a pre-recorded video, there are the additional accessibility considerations of closed captions and transcripts! The following blog post has resources that will help you learn how to create and edit captions using the YouTube video editor, create your own captions files in ScreenPal, and create captions and transcripts for non-narrated (text-on-screen only) videos.
- Power, R. (2023, May 1). Making Your Text-Only Videos Accessible. [Web log post]. Power Learning Solutions. https://www.powerlearningsolutions.com/blog/making-your-text-only-videos-accessible
References
Byrne, R. (2020, July 29). How to Check the Accessibility of Your Google Slides. [Video]. https://youtu.be/JbAzeJkT89M
Eye on Tech (2023, June 9). Don’t bore your team to death. [Video]. https://youtu.be/_wsKpCf5RUE
Flipped Classroom Tutorials (2020, November 16). Q&A Feature in Google Slides (Audience Tools). [Video]. https://youtu.be/OqMd0NnQQIY
Gillis, A. (2023, March). Definition: Death by PowerPoint. [Web log post]. TechTarget. https://www.techtarget.com/whatis/definition/death-by-PowerPoint
Google (n.d.). Google Slides. [Web page]. https://www.google.ca/slides/about/
Microsoft (2024a). PowerPoint. https://www.microsoft.com/en-us/microsoft-365/powerpoint
Microsoft (2022b). Word. https://www.microsoft.com/en-us/microsoft-365/word
Microsoft Helps (2022, April 13). How to create accessible PowerPoint presentations | Microsoft. [Video]. https://youtu.be/ar6MfnGJbk0
Poll Everywhere (n.d.). Powering hybrid work and inclusive conversations. [Web page]. https://www.polleverywhere.com/
Poll Everywhere (2020, August 5). Engage your remote audience with Poll Everywhere. [Video]. https://youtu.be/nFrBVKgcS68
Poll Everywhere (2023, September 13). Getting Started with Poll Everywhere | Webinar August 2023. [Video]. https://youtu.be/T-ZFiTljkHc
Power, R. (2023). Chapter 18: Creating Instructional Videos. In Everyday Instructional Design: A Practical Resource for Educators and Instructional Designers. Power Learning Solutions. https://pressbooks.pub/everydayid/chapter/creating-instructional-videos/
Power, R. (2023, May 1). Making Your Text-Only Videos Accessible. [Web log post]. Power Learning Solutions. https://www.powerlearningsolutions.com/blog/making-your-text-only-videos-accessible
ScreenPal (2024). Capture, create, and share the easy way. [Web page]. https://screenpal.com/
Stratvert, K. (2019, September 12). How to Make a Video in PowerPoint – ppt to video. [Video]. https://youtu.be/D8JV3w4TOVw
TeachUComp (2021, October 26). Learn How to Check Accessibility in Microsoft PowerPoint 2019 & 365: A Training Tutorial. [Video]. https://youtu.be/vl_2RnHC5G8
W3C (2022). Web Content Accessibility Guidelines (WCAG). [Web page]. https://www.w3.org/WAI/standards-guidelines/wcag/
