18 Creating Instructional Videos
Author’s NoteThis chapter is a compilation of tips and tricks for creating instructional video resources, and has been compiled from a series of blog posts, lecture notes, and discussion posts I have shared with participants in my instructional design courses in recent years. A list of some of the original resources has been provided later in this chapter. |
Useful Tools for Creating Instructional Videos
Screencast-O-Matic
First off, the tool that I used most often for creating instructional videos, and video feedback on student projects — Screencast-O-Matic. You can get a free version of this tool. The only limitations are that your videos are restricted to just 15 minutes max (which won’t be an issue for this assignment!), there is a watermark on your video (no big deal), and the free version does not allow you to record and overlay both your webcam and screen at the same time. (If you want to try out the paid version this is a great tool that will let you create instructional videos where you can switch between having your webcam (instructor feed) full screen, having your screen itself in a smaller overlaid window, having just your screen, or having your webcam feed in a small window overtop of your screen feed.) Screencast-O-Matic also has tools that highlight what you are doing on your screen.
How I would use this for a video presentation on an instructional topic — I’d create a PowerPoint presentation, or even an infographic poster (even better) that summarizes the key points of my presentation. Then I’d record myself talking my way through the key points in the PowerPoint or infographic. Screencast-O-Matic can output to an MP4, or directly to your YouTube account.
Technology for Teachers and Students (2016) provides an excellent tutorial video to help you get started with Screencast-O-Matic:
PowerPoint
Want to make a video out of a recorded PowerPoint? You don’t actually need additional software, if you have Office 2010 or above. PowerPoint will allow you to record your presentation and save it as an MP4. Here’s how (Power, 2015):
PowToon
Another great tool that I frequently use is PowToon (2022). You can create videos up to 5 minutes long using the free version — though some of the cool characters and animations are not available without a paid subscription. With the free version, you can create your presentation with all of its animations, and add your own voice-over soundtrack. And, you can publish your finished video directly to your YouTube account. GadgetGeeks (2016) provide a great tutorial video to help you get up and running with PowToon:
Using YouTube to Share Instructional Videos
 Most institutions cannot handle the bandwidth needed to stream all of the recorded lectures and live virtual classes that we’re going to be asked to facilitate — and they may not even realize that yet! Handling recorded or live video streaming requires specialized servers, with a lot of bandwidth. But, there’s no need to panic! Just use YouTube. YouTube specializes in this, and their servers are optimized for mass distribution and streaming. Upload your recorded lecture presentations to YouTube, get the link for your video, and share that with your students. Don’t want to make your recordings visible publicly? Set the video you have uploaded to “unlisted.” That will block it from search engines, but still allow anyone with the direct link to watch it. Do not set it to “Private.”
Using YouTube
I recently had a question that reminded me… I should never assume that everyone already knows how to use YouTube! I like YouTube as a EdTech tool, because it is a powerful way to share video content with your students (why bother worrying about how to process and stream video content, when YouTube already has powerful servers that will do it for you!). And that doesn’t mean that you have to direct them to YouTube to view it. You can embed your YouTube videos directly into a website, or an LMS content page.
Adding a Video to YouTube
To that end, here are a few resources that might be helpful. This first video shows the basics of how to upload and share videos in YouTube. As noted in the video… you do need to login. All you need for that is a GMail / Google account!
Choosing a Privacy Setting
This next video goes over some of the basics of choosing a privacy setting for your video. It’s important to choose the right setting. If you want your video to be available publicly, then choose “Public.” If you want to share your video with your students, and embed it into a webpage or LMS page, choose “Unlisted.” “Unlisted” means the video can’t be found using a search engine, but anyone with the link can still view it without a password. If you don’t want anyone to view it without you directly allowing “just that person” to see it, choose “Private.” Even with a direct URL, no one can watch the video unless you authorize their email address!
Embedding Video in Your LMS
Finally… here are some quick tutorial videos showing the basics of how to embed a YouTube video (whether it’s one you uploaded or another video that you found on YouTube) into pages in some of the LMS platforms that I have worked with most frequently:
Blackboard
Brightspace/D2L
Canvas
Moodle
Weebly Website Editor
Copyright Note
 One of the great things about embedding a YouTube video into a webpage or course page in an LMS is that you won’t be violating the video owner’s copyright (assuming the person who posted the video isn’t violating a copyright within the video itself!). That’s because you’re not actually making a copy of the video. You’re essentially just sharing a link to it, and if the owner decides they don’t want anyone to use it anymore, they can remove the video, or change the privacy setting. When they do that, your embedded player simply won’t show it any more!
Choosing a Copyright Licence When Posting Your Video to YouTube
YouTube has a few different “licencing” options when you post your own videos. The default is “Standard YouTube Licence,” which is essentially a copyright licence. I prefer to change that setting to a Creative Commons Attribution. Using a CC Attribution means that you are letting others reuse your video as an Open Access resource, so long as they properly attribute you. It also means that you are allowing others to make a copy, edit, remix, or combine parts of your video with other Creative Commons videos from YouTube!
Creating Your Own YouTube Channel
If you have a Google or GMail account, then you already have a YouTube account. In this video, I demonstrate the basic steps to setting up your own YouTube channel for sharing instructional videos with your students.
Time Limits on YouTube Videos
By default, new YouTube accounts have a time limit of 15 minutes for each video upload. To increase this, you will need to “verify” your account with Google. Instructions on how to do this can be found on Google’s (2023) YouTube Help page.
On-Screen Presence in Instructional Videos
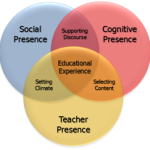
I recently had a recent discussion forum conversation with some of my instructional design students about whether or not to include the instructor in an instructional video. Personally, I believe that doing so increases Teacher Presence, thus promoting the other presences in a Community of Inquiry (Athabasca University, n.d.). It reassures students that the instructor is present, and paying attention to their progress, even in a distributed learning context. Also, while many users may overtly ignore the on-screen instructor (especially when projected in a smaller window in front of a screencast type recording), they can still subconsciously pick up cues from the instructor’s body language that can aid in engagement and overall learning.
An interesting article from 2021 recently came across my Twitter feed. Henderson and Schroeder’s (2021) A Sytematic review of instructor presence in instructional videos highlights many of the reasons to include an on-screen instructor in an instructional video that I just mentioned, which they found as part of their systematic literature review of the impacts of on-screen instructors. However, their actual findings are quite interesting. The authors include the following highlights with the paper’s Abstract:
- We reviewed the literature around the use of on-screen instructors in video.
- We found largely mixed and null results.
- We highlight existing research frameworks that can help move the field forward.
Essentially, there is no definitive answer as to whether the presence of an on-screen instructor actually increases engagement and learning! That’s because of inconsistent findings across the literature reviewed. But — and this is an important “but” — there is also no evidence to indicate that it is detrimental to include the instructor in the video! The authors call for more research (using a consistent, systematic approach) to determine the actual impact level of instructor on-screen presence, and to offer sound guidance on when to include it, and when it is best not to.
In light of this, I find myself “sticking to my guns” on this issue. Even if there are inconsistent findings on the pedagogical benefits of including an instructor on-screen in an instructional video, I do believe that this little bit of extra presence contributes to the bigger picture when promoting engagement, and maximizing the benefits of promoting a Community of Inquiry in our courses!
Maximizing the Impact of Instructional Video Length
With the recent surge in blended on wholly online teaching and and learning scenarios, there has been an uptick in interest in best practices for the creation of video-based instructional content. Here are a few resources discussing elements of effective instructional video creation — particularly the optimal length for an instructional video. While YouTube statistics show that the top 10 videos on that platform are about 3 minutes long (Baker, 2018), Brame (2015) notes of research in an educational video context that:
“the median engagement time for videos less than six minutes long was close to 100%–that is, students tended to watch the whole video (although there are significant outliers; see the paper for more complete information). As videos lengthened, however, student engagement dropped off, such that the median engagement time with 9-12 minute videos was ~50% and the median engagement time with 12-40 minute videos was ~20%. In fact, the maximum median engagement time for a video of any length was six minutes.”
Brame (2015) sums it up nicely, stating that “[m]aking videos longer than 6-9 minutes is therefore likely to be wasted effort.”
Long story short:
- Keep your instructional videos in the 5-10 minute range.
- Stick to one key point per video. If you have a longer lecture topic that you now want to deliver online via video, split the video into short segments. It’s much easier to retain attention and maximize retention. It’s also much more convenient for your audience.
- Shorter videos are easier to repurpose as reusable learning objects, because they focus on a single key point.
- With that in mind, avoid using text or saying things that will date your video too quickly. Instead of saying “last year,” say “in 2019.” Little things like that will keep your video relevant much longer, increasing the return on investment for the time it takes to create them!
- Wherever possible, embed your video directly into your web page or course content page. Avoid redirecting your audience to an external site (because then you have the problem of redirecting them back to your content when they are finished watching the video!).
A Note About Lecture Capture and Instructional Video Creation
Using your live class time to lecture is a waste of your opportunity to connect with your students. If you are going to be lecturing to a camera anyway, it is far better to pre-record your lecture. You can share the recording through a website, or your organizations learning management system. Students can watch it at their convenience. They can pause it. They can rewind it. The can revisit it as often as they need. This frees up your live time to actually interact with your students, to get them working on collaborative activities, and to provide them with encouragement and troubleshooting support.
If at all possible — avoid posting lengthy “lecture” or tutorial videos. Nobody wants to watch a talking head for an hour, and your students won’t retain the key points anyway! It is perfectly okay to record your lecture all in one go… but leave a pause for a few seconds in between your major points. That way, you can “chop up” the video file into several smaller videos. A good length for an instructional video is no more than 5-10 minutes. It’s better for streaming bandwidth, and it’s easier for students to watch short videos at their convenience, and digest the key points. It also makes it easier for you to reuse individual videos in multiple courses, or as refreshers later in the course.
Using Video to Provide Assignment Feedback
I frequently use video to provide feedback on different types of assignments. For traditional research papers, I tend to provide text-based feedback, often as embedded comments. I find that makes it easier for students to refer back to when making revisions, or writing future papers. However, some assignments lend themselves to the more personalized touch that video provides — and it is often easier to “show” rather than “tell” when providing feedback on web-based projects, video assignments, multimedia presentations, etc.
In addition to the positive feedback that I’ve received from students who have received video feedback on their assignments from me, I also frequently get asked things like:
- How did you do that?
- What sort of time investment is involved?
- What software did you use?
- How can I do this for my students?
Using Screencast-O-Matic for Video Feedback
My go-to tool for producing video feedback is a screen capture application called Screencast-O-Matic. I also use Screencast-O-Matic to produce tutorial videos for use in my blog posts or online courses. In the following video, I demonstrate how I use Screencast-O-Matic to produce feedback videos for a project-based assignment.
Benefits of Video Feedback
West and Taylor (2015) showed that students overwhelming preferred narrated video feedback, noting that students found “that video feedback was clearer and less ambiguous than other forms of feedback and improved both the quality and quantity of the feedback received” (p. 400). They also noted that students found video feedback a great tool for increasing their sense of rapport with their tutors or instructors.
Creating Engagement in the Classroom (n.d.) summarizes three key benefits to using video feedback:
- Video form provides higher quality communication with more detail, clearer instructions, and a more personalized approach to education.
- Offers a tool that shines in the “student-centered, intenional learning framework.”
- Video establishes a form of communication preferable to students making them more motivated to act on the feedback.
Stannard (2018) provides an in-depth look at how the use of screencasting applications improves the way we give feedback to students.
A Rubric for Evaluating Instructional Videos
 Ackerman (2021) recently shared a single-point rubric that is “designed to help educators and instructional designers plan and create digital resources in which a teacher is providing narration over graphics (including diagrams, photographs, animations, or video) that are aligned with principles of multimedia learning.” Ackerman included seven key criteria:
- The video is introduced to prime students and place it in context.
- Extraneous material is excluded.
- Organizing cues are provided.
- Graphics with narration (but not on-screen text).
- Narration and corresponding graphics are synchronous.
- Content is chunked appropriately.
- The narration is conversational and expressive.
To these, I would add the following considerations:
- The video avoids statements or references that would likely become quickly outdated (thus, increasing the return-on-investment for the time it takes to create the video, and increasing it’s reusability).
- The video includes closed captions, descriptive video narration, or a transcript (to increase the accessibility of the video to all audiences).
- Any on-screen text that is included uses a single font family that is easy to read (preferably a sans-serif font).
Here is a copy of Ackerman’s High-Quality Instructional Video Rubric, with my added criteria. You can also download a copy of Ackerman’s original rubric (2021) from his post An Instructional Video Rubric.
Further Reading
 The following is a list of the original blog posts where I shared many of these tips, tricks, and resources on the Power Learning Solutions Blog site:
- Power, R. (2020, September 3). Maximizing the Impact of Instructional Video Length. Power Learning Solutions. https://www.powerlearningsolutions.com/blog/maximizing-the-impact-of-instructional-video-length
- Power, R. (2020, April 17). Creating a YouTube Channel for Educators. https://youtu.be/Uy_5gOV80LY
- Power, R. (2020, March 13). A Rapid Transition to Online Learning Survival Guide. Power Learning Solutions. https://www.powerlearningsolutions.com/blog/a-rapid-transition-to-online-learning-survival-guide
- Power, R. (2020, March 6). Using Screencast-O-Matic to Provide Video Feedback. https://youtu.be/Le_ek1aRjdw
- Power, R. (2019, January 14). Using YouTube to Share Video in an Online Course. Power Learning Solutions. https://www.powerlearningsolutions.com/blog/using-youtube-to-share-video-in-an-online-course
References
Ackerman, G. (2021, November 30). An Instructional Video Rubric. Hacksciennce.education. https://hackscience.education/2021/11/30/an-instructional-video-rubric/
Athabasca University (n.d.). CoI Framework. https://coi.athabascau.ca/coi-model/
Baker, A. (2018, December 4). Optimal YouTube Video Length. Content Creator. https://contentcareer.com/blog/optimal-youtube-video-length/
Bhattacharya, P. (2020). Why Your Ideal Online Course Video Must Be 6-12 Minutes Long. HubSkills.com. https://hubskills.com/online-course-video-to-be-6-12-minutes/#gs.elum6y
Brame, C.J. (2015). Effective educational videos. Center for Teaching. http://cft.vanderbilt.edu/guides-sub-pages/effective-educational-videos/
Burch, B. (2020). Video Length in Online Courses: What the Research Says. Quality Matters. https://www.qualitymatters.org/qa-resources/resource-center/articles-resources/research-video-length
Creating Engagement in the Classroom.org (n.d.) Student Engagement Using Video Feedback. https://creatingengagementintheclassroom.org/student-engagement-using-video-feedback/
GadgetGeeks (2016, December 1). Learn How To Make Easy Animation in 10 min using POWTOON for Beginners. https://youtu.be/FY4L7D-FoLA
Gniffke, D. (2016, May 11). Canvas – Embedding Video. https://youtu.be/l2ebbdJPy0o
Google (2020). Upload videos longer than 15 minutes. YouTube Help. https://support.google.com/youtube/answer/71673?co=GENIE.Platform%3DDesktop&hl=en&oco=0
Guo, P. (2013, November 13). Optimal Video Length for Student Engagement. EdX. https://blog.edx.org/optimal-video-length-student-engagement/
Henderson, M., & Schroeder, N. (2021). A Systematic review of instructor presence in instructional videos: Effects on learning and affect. Computers and Education Open, 2(2021) 100059. https://doi.org/10.1016/j.caeo.2021.100059
Interesting Videos (2017, February 2). Creative Commons License YouTube cc Not Standard Youtube License. https://youtu.be/e-46x3mpS8M
Power, R. (2020, September 3). Maximizing the Impact of Instructional Video Length. Power Learning Solutions. https://www.powerlearningsolutions.com/blog/maximizing-the-impact-of-instructional-video-length
Power, R. (2020, April 17). Creating a YouTube Channel for Educators. https://youtu.be/Uy_5gOV80LY
Power, R. (2020, March 13). A Rapid Transition to Online Learning Survival Guide. Power Learning Solutions. https://www.powerlearningsolutions.com/blog/a-rapid-transition-to-online-learning-survival-guide
Power, R. (2020, March 6). Using Screencast-O-Matic to Provide Video Feedback. https://youtu.be/Le_ek1aRjdw
Power, R. (2019, January 14). Using YouTube to Share Video in an Online Course. Power Learning Solutions. https://www.powerlearningsolutions.com/blog/using-youtube-to-share-video-in-an-online-course
Power, R. (2015, January 25). Embedding Videos in D2L. https://youtu.be/QZ4558qvzhw
Power, R. (2015, January 25). Turning PowerPoint Presentations in Videos. https://youtu.be/40uF8H2KgoY
PowToon (2022). https://www.powtoon.com/
Screencast-O-Matic (2019). Video Creation for Everyone. [Web page]. https://screencast-o-matic.com/
Scott Gardiner Technical Services (2016, May 2). How to Embed a YouTube Video on Your Weebly Website. https://youtu.be/4PfKoV9XyN0
Stannard, R. (2018, August 10). Using technology to improve the way we give feedback to students. https://youtu.be/YMpcawBR5uk
Stratvert, K. (2019, May 22). How to Upload Videos on YouTube. [Video]. https://youtu.be/VtF2AgFSLAw
Straub, S. (2018, February 17). How To Embed Media Such As Youtube Videos Into Blackboard. https://youtu.be/BWIF_d2Vcc4
Tattershall, E. (2017, June 6). Embedding Video in Your Moodle Course. https://youtu.be/K4zAZuHGNrM
Technology for Teachers and Students (2016, December 26). Screencast-O-Matic Tutorial – FREE Screen Recording Tool. https://youtu.be/s1jIPo1bWCo
thebasicgist (2013, June 6). Youtube Settings: Unlisted v Private v Public. https://youtu.be/fViYcDDZyhk
University of Leicester Learning and Teaching (2016, February 29). Embed a YouTube video in Blackboard. https://youtu.be/ES-CZtBdHOI
West, J., & Taylor, W. (2015). Enhancing the assessment experience: improving student perceptions, engagement and understanding using online video feedback. Innovations in Education and Teaching International, 53(4), 400-410. https://doi.org/10.1080/14703297.2014.1003954
