23
By the end of this chapter, you will be able to:
- Get started on developing your presentation. (GEO 2)
- Organize your presentation with a good introduction, body, and conclusion. (GEO 2; SLO 1)
- Design your visual aids. (GEO 2)
- Deliver your presentation with confidence and style. (GEO 2)
- Practice and rehearse your presentation. (GEO 2, 4)
You have probably heard that people fear public speaking more than anything else—including death. As comedian Jerry Seinfeld once quipped, “Does that seem right? That means if you’re going to a funeral, you’re better off in the casket than doing the eulogy!”
With new technologies, public speaking is even more important than ever as video streaming, video conferencing, and webinars have become common in college and in the workplace. These new media technologies make it possible to present your ideas in real time and answer your audience’s questions. Similarly, putting your materials on video-sharing Web sites, like YouTube or DailyMotion, is becoming a regular part of college classes, job responsibilities, and everyday life.
Your professors will ask you to present your class projects to an audience, usually other students. They may also ask you to speak to outside groups and non-profit organizations as part of “service learning” projects. Meanwhile, almost any professional career will require you to pitch your ideas, offer briefings, do poster presentations, and give seminars. Your ability to speak effectively in front of an audience will be an important cornerstone of your success.
Of course, public speaking is still as scary as ever, even if we need to do more of it. Everyone gets nervous about speaking in front of others. In this chapter, you will learn some easy strategies for turning your documents into public presentations. As you learn and practice these simple techniques, your presentations will become more polished and persuasive.
Conquering Fears of Public Speaking
 Did you know that glossophobia (fear of public speaking) tops the list of fears for most people – not spiders or heights? If you didn’t, we bet your body does. It will do all kinds of unpleasant things to you when you have to stand up and face a sea of faces with the hope of getting your message across in a compelling and interesting way. Your hands may sweat, your mouth goes dry, your knees may shake, and a quaver affects your voice. Your heart may race, and those well-known butterflies invade your stomach. When all that happens, most people don’t think of getting their message across in a compelling and interesting way; they just think of getting off the “stage” as quickly as possible!
It’s normal! We don’t really mean to frighten you, just remind you that your body reacts “in extremis” when put under pressure, and for most people, public speaking is just about the worst pressure they can be put under. You’d think that for most people, being given the opportunity to impress their audience would be a fantastic one. There you are in front of a group of people, the spotlight is on you and for the length of time you’ve been given, the world is yours. Or is it? The very fact that the spotlight is you is enough to trigger every fear, anxiety, and phobia you’ve ever had about public speaking.
We feel anxious because our bodies are geared to fight or flight from ancient times – to fight that mastodon or get the hell out of the way. We don’t have too many mastodons around these days, but the body still reacts as though we do. So, if we have to get up and speak in public, all that adrenalin and noradrenalin goes coursing through our bodies – way more than we need. We can’t run away (well, we could, but we’d be out of a job pretty quick if we did it too often), so our only option is to fight. But in terms of speaking in public, it can be hard to define just what we’re fighting.
To overcome your fears of public speaking, make your nerves for work you instead of against you. Public speaking may not be comfortable, but take our word for it, nerves are good. Being center stage is not a good place to feel too comfortable. Nerves will keep you awake and ensure you don’t get too complacent. After all, it’s hard to feel complacent when your heart is beating so hard you’re sure everyone watching you can hear it. If channeled well, nerves can make the difference between giving a humdrum presentation and giving one that keeps people listening.
First, get your attention off yourself. It’s very tempting to keep focused on how you’re feeling, especially if you’re feeling really uncomfortable. You’ll start to notice every bead of sweat. To make your nerves work for you, you need to focus on just about anything other than yourself. You can distract yourself by paying attention to the environment in which you’re speaking. Once you’re actually in front of your audience, pay attention to them. If you can, notice how people are dressed, who’s wearing glasses, who is wearing bright colors. There will be dozens and dozens of things you can pay attention to help you trick your mind into not noticing what’s going on with you. Anything will do, and you will find that the less you concentrate on how you are feeling and the more you concentrate on other things, the more at ease you will feel.
 To boost your confidence, remember that the audience is your friend. Unless you know you’re absolutely facing a hostile group of people, human nature is such that your audience wants you to succeed. They’re on your side! Therefore, rather than assuming they don’t like you, give them the benefit of the doubt that they do. They aren’t an anonymous sea of faces, but real people. To help you gain more confidence when speaking in public, think of ways to engage your audience. Remember, even if they aren’t speaking, you can still have a two-way conversation. When you make an important point, pay attention to the people who are nodding in agreement and the ones who are frowning in disagreement. As long as you are creating a reaction in your audience, you are in charge.
Step One: Plan Your Presentation
Because this book is about writing, not public speaking, we are going to assume that you have already written a document that you need to turn into a presentation. Now it is time to repurpose your paper into a presentation for an audience.
Ask a Few Key Questions to Get Started
Solid preparation is the key to successful public speaking. You can start with heuristics by asking the Five-W and How questions:
- Who will be in my audience, and what do they expect?
- What do I want to accomplish with my presentation?
- When will I be asked to speak?
- Where will I be giving my presentation?
- Why am I presenting this information to this audience?
- How should I give the presentation?
Answer each of these questions separately. Your answers will help you figure out what you need to do to prepare for your presentation.
Keep in mind that your audience wants more from you than just the information in your document. After all, if they wanted to, they could just read it themselves. So why do they want you to present it to them instead? A presentation gives the audience a chance to interact with you and ask questions. Your audience wants to see you in action. They want you to perform the material for them.
Choose the Appropriate Presentation Technology
Think about what technology will be available and which type would fit your presentation. The technology you choose depends on the audience’s expectations and the place where you will be giving your talk. Each kind of presentation technology offers advantages and disadvantages. Figure 16.1 describes some of the advantages and disadvantages of each.

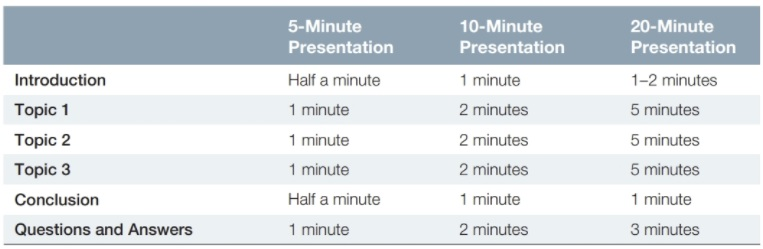
Allot Your Time
If you are new to speaking in public, a five-to ten-minute presentation might sound like a lifetime. The time, though, will go fast. A ten-minute presentation, for example, is only the equivalent of a four-or five-page double-spaced paper. So you will need to budget your time carefully to avoid going over the time allowed.
Figure 16.2 shows how to budget the time for a presentation with three major topics. Of course, if your presentation’s body has fewer or more than three topics, you will need to make adjustments in the times allowed for each one. These time limits are flexible guidelines, not rigid rules.
Step Two: Organize Your Ideas
The organization of your presentation will typically follow the genre you are using to organize your document. Your talk should have a distinct beginning, middle, and end. That advice might seem obvious, but public speakers often forget to properly introduce their talk to the audience, or they abruptly end without summing up their main points.
There is an old saying about speechmaking that you should commit to memory: Tell them what you’re going to tell them. Tell them. Tell them what you told them.
Introduction: Tell Them What You’re Going to Tell Them
The introduction of your talk is almost always the most critical part of your presentation. At the beginning of your speech, you have a small window—perhaps a minute or two—to capture the audience’s attention while stating your topic, purpose, and main point. Speakers should make some or all of the following moves in their presentation’s introduction:
- Identify your topic.
- Tell your audience what your presentation is about.
- State the purpose of your presentation.
- Explain the objective of your talk.
- State your main point (thesis).
- Tell them what you want to prove or support.
- Stress the importance of your topic to the audience. Explain why this issue is important to them and why they should pay attention.
- Offer background information on the subject. Provide enough information to familiarize the audience with your topic.
- Forecast the structure of your talk. Tell them how your talk will be organized.
These moves can be made in any order.
You might also come up with a good grabber to start out your speech. A grabber captures the audience’s attention by stating something interesting or challenging. Some effective grabbers include:
- A rhetorical question: “Do you ever wonder why child actors tend to have personal problems when they become adults?”
- A startling statistic: “A recent survey shows that 74 percent of women students report that they have been sexually harassed at this university. Meanwhile, 43 percent of male students report they have been harassed.”
- A compelling statement: “If nothing is done about global climate change, it is likely that polar bears will become extinct in the wild during our lifetime.”
- An anecdote: “Last year, I finally climbed my first mountain over 14,000 feet. In many ways, climbing that mountain affirmed to me that I had triumphed over the injuries I sustained in Afghanistan two years before.”
- An interesting observation: “Have you ever noticed that the word ogre appears in the middle of the word progress? I keep that ogre in mind whenever I’m trying to do something new, because I know something or someone is going to try to hold me back.”
- A show of hands: “Let’s see a show of hands. How many of you think the pizza here in town leaves something to be desired?”
A good grabber identifies your topic while giving your audience something to think about.
The Body of Your Talk: Tell Them
In the body, state your major points and support them with facts, reasoning, examples, data, quotations, and other forms of proof you can offer.
In most situations, the body of your presentation should follow the same pattern as the body of your document. Divide your text into two to five major issues that you want to discuss with the audience. If you try to cover more than five topics, you risk overwhelming the audience with more new information than they can handle. Organize the body of your talk to feature the most important things you want them to remember.
Here’s a good strategy that might help you strip your talk down to something you can handle in a small amount of time. Look through your document and ask yourself, “What does my audience need to know about this topic to make a decision?” Then cross out any material that goes beyond need-to-know information.
Conclusion: Tell Them What You Told Them
Once you signal that you are about to conclude, you will have the audience’s heightened attention for the next two minutes. Take advantage of their attention by repeating your main point in a clear and memorable way. A typical conclusion will include some or all of the following moves:
- Restate your main point. Tell your audience exactly what you have been trying to explain or prove in your talk.
- Reemphasize the importance of your topic to the audience. Be clear about why the audience should care about your topic. Answer their “Why should I care?” questions.
- Call the audience to action. If you want the people in your audience to do something, tell them what you think they should do. Be specific about the actions you want them to take.
- Thank the audience. When you are finished, don’t forget to say, “thank you.” This phrase signals to the audience that your presentation is done, and it usually prompts them to applaud.
Remember to keep your conclusion brief. Once you say something like, “In conclusion,” you have just one or two minutes to finish up. If you ramble beyond a couple of minutes, your audience will become restless and annoyed.
Question and Answer
At the end of your talk, you should be prepared to answer a few questions from the audience. The question and answer period offers you a good opportunity to interact with the audience and clarify your ideas. You should be ready to answer three types of questions:
A request for clarification or elaboration.
Questions that ask you to clarify or elaborate are opportunities to reinforce some of your key points. When you receive this kind of question, start out by rephrasing the question for the audience. Rephrasing will allow you to put the issue in your own words and state it loudly enough for the audience to hear. Then answer the question, expanding on the information in your talk. Try to use each question to restate one of your major points.
A hostile question.
Occasionally, an audience member will ask a question that challenges the information you provided in your talk. Here is a good three-step strategy for answering these kinds of questions:
- Rephrase the question. State the question in terms that will allow you to answer it in ways that reflect your own understanding or beliefs.
- Validate the question. Tell the audience that you understand the questioner’s concerns and even share them.
- Elaborate and move forward. Explain that the course of action you are supporting handles the issue better or seems more reasonable.
The heckling question.
In rare cases, an audience member will want to challenge you with a heckling question. In this situation, you need to recognize that the questioner is trying to sabotage your presentation. He or she wants you to become flustered. Don’t let the heckler do that to you. After trying your best to answer a question or two from a heckler, simply say, “I’m sorry you feel that way. We have other people with questions. Perhaps we can meet after my talk to discuss your concerns.” Then look away from that person. Usually, someone else in the audience will ask a question, and you can move on.
When the question and answer period is over, you should briefly thank the audience again. This will usually prompt another round of applause.
Step Three: Design Your Visual Aids

Visual aids will help you clarify your ideas and illustrate your main points for the audience. Perhaps the best way to create visual aids is to make slides with the presentation software (PowerPoint, Keynote, Slides, or Presentation) that was packaged with your word-processing software.
Format Your Slides
Whether you are presenting in a large lecture hall with a projector or to a few people with a poster presentation, slides are some of the best visual aids available (Figure 16.3)
Here are some strategies for formatting your slides:
- Title each slide with an action-oriented heading.
- Put five or fewer major points on each slide. If you have more than five major points, divide that topic into two slides.
- Use left-justified text for most items on your slides. Centered text should only be used for slide titles.
- Use dark text on a white or light background whenever possible. Light text on a dark background can be difficult to read.
- Use bulleted lists of phrases instead of paragraphs or sentences.
- Use photos, icons, and graphics to keep your slides fresh and active for the audience. Make sure your graphics look good on the screen. Increasing the size of a Web-based graphic, for example, can make the image look blurry or grainy.
You will be tempted to pack too much material onto each slide. Don’t do that. Effective slides, like the ones shown in Figure 16.3, need to be simple and easy to interpret. You don’t want your audience trying to puzzle out the meaning of your complicated slides instead of listening to your talk.
Step Four: Prepare Your Delivery
The usual advice is to “be yourself” when you are speaking in public. Of course, that’s good advice for people who are comfortable speaking in front of an audience, but many of us aren’t. Instead, like an actor, you should play the role that best fits your topic and your audience.
Body Language
Ideally, the movements of your body should help you reinforce your message and maintain the audience’s attention.
- Dress appropriately. Choose clothing that reflects your audience’s expectations and the topic of your talk. Even when you are presenting to your classmates, you should view it as an opportunity to practice your professional persona. Dress as though you are presenting in a professional workplace.
- Stand up straight. When speakers are nervous, they tend to slouch, lean, or rock back and forth. These movements look unprofessional and make it difficult for you to breathe regularly. Instead, keep your feet squarely under your shoulders with knees slightly bent. Keep your shoulders back and down and your head up to allow good airflow. If your shoulders are forward and up, you won’t get enough air and the pitch of your voice will seem unnaturally high.
- Use open hand and arm gestures. For most audiences, open hand and arm gestures will convey trust and confidence. Avoid folding your arms, keeping your arms at your sides, or putting both hands in your pockets, as these poses will convey a defensive posture that audiences do not trust.
- Make eye contact. Each person in the audience should believe you made eye contact with him or her at least once during your presentation. If you are nervous about making eye contact, look at the audience members’ foreheads instead. They will think you are looking them directly in the eye.
- Move to reinforce major points or transitions. If possible, when you make important points, step forward toward the audience. When you make transitions in your presentation from one topic to the next, move to the left or right. Your movement across the floor will highlight the transitions in your speech.
Voice and Tone
As you improve your presentation skills, you should work toward strengthening your voice and tone.
- Enunciate. Clearly pronounce every syllable of the words that you are speaking.
- Speak lower and slower. When speaking to an audience, you will need to speak louder than you normally would. As your volume goes up, so will the pitch of your voice, making it sound unnaturally high to the audience. By consciously lowering the pitch of your voice, you should sound just about right. Also, nerves may cause you to speak too quickly. Silently remind yourself to speak slowly.
- Use pauses to reinforce your major points. Each time you make a major point, pause for a moment to let the audience commit it to memory.
- Use pauses to eliminate verbal tics. Verbal tics like “um,” “ah,” “like,” “you know,” “OK?” and “See what I mean?” are nervous words and phrases that fill gaps between thoughts. If you have a verbal tic, train yourself to pause when you feel like using one of these sounds or phrases. Not only will you eliminate an annoying verbal tic, but your speaking will sound much more distinguished and measured. You can practice this pausing technique in your everyday conversations.
- Minimize how often you look down at your notes. Look at your notes as little as possible. Looking down at your notes causes your neck to bend, which restricts your airflow and makes your voice harder to hear. Plus, notes can become a distracting “safe place” that keeps you from engaging visually with your audience.
Step Five: Practice and Rehearse
Speech experts often advise people to leave plenty of time to practice their presentations out loud. Even better advice, though, is to “rehearse” what you are going to say and how you are going to say it. Rehearsal allows you to practice your presentation in a more realistic setting.
Practice, Practice, Practice
Practice involves speaking your presentation out loud to yourself. As you are working through your presentation verbally, memorize its major points and gain a sense of its organization and flow. While practicing, you should:
- Listen for any problems with content, organization, and style.
- Edit and proofread your visuals and handouts.
- Decide how you are going to move around as you deliver the speech.
- Pay attention to your body language and voice.
If you notice any problems as you are practicing your presentation, you can stop and fix them right away.
Rehearse, Rehearse, Rehearse
The secret to polishing your presentation is to rehearse it several times. Unlike practice, rehearsal means speaking from beginning to end without stopping.
As much as possible, you want to replicate the experience of giving your real talk. After each rehearsal session, you should make any necessary revisions or corrections. Recruit friends to listen as you rehearse your presentation. They will provide you with a live audience, so you can gauge their reactions to your ideas. Another possibility is recording your presentation, with either audiovisual or just audio equipment.
Practicing will help you find any major problems with your talk, but rehearsal will help you turn the whole package into an effective presentation.
Audience Etiquette
Today, there’s a wealth of public speaking offered in widely differing settings, but the following fundamentals of good audience etiquette are adaptable to virtually any situation:
- No talking, unless audience participation is requested. If something must be said, whisper it quickly. Excessively shushing a talkative neighbor can be just as disturbing.
- Use good posture. Auditorium seating is often arranged so that the person in the seat behind can see between the two seats in front, so slumping sideways or lounging on a partner’s shoulder blocks the view.
- Remove hats.
- Noises off. Turn off cell phones, audible watches, and any other sound-making gadgets before any performance.
- Lights out. Don’t forget, the screen on your mobile device can be a distraction too.
- Snap, crackle, pop. No rattling of candy boxes or ice in cups, shaking popcorn containers, or slurping drinks.
- Control coughing. Muffle coughs and sneezes with a handkerchief. Leave if you can’t stop the attack.
- Avoid other sounds that can disturb the people around you and the performers. Munching noisily, smacking or cracking gum, rattling pages, tapping feet or drumming fingers, humming or singing along, rummaging in purses—these are just a few of the things that can annoy those around you.
- Don’t take flash photos or shoot video during presentations. The point is to do nothing that will distract the presenters or disturb others in the audience.
A discovery tool that helps you ask insightful questions or follow a specific pattern of thinking.
A beginning section which states the purpose and goals of the following writing, generally followed by the body and conclusion. The introduction typically describes the scope of the document and gives the brief explanation or summary of the document.
The broad idea or issue that a message deals with.
The goal or objective that the creator of a message is trying to achieve by communicating that message.
The main idea, point, or claim of a written work. Plural: theses.
A short, personal story about the writer's own experiences.
The majority of an essay in which claims are presented and subsequently proven, described, analyzed, or explained.
The last paragraph in an academic essay that generally summarizes the essay, presents the main idea of the essay, or gives an overall solution to a problem or argument given in the essay.
