94 How to Take Notes
Taking notes is a great way to be able to easily access course content that you’ve learned, further enrich your understanding of that content, and help you better remember the content that you’ve read. But how should you take notes?
There is no single way to take notes. However, you can find the best way for you to take notes! You can figure this out by exploring the myriad of ways of taking notes. Let’s explore them together!
Annotating
First we have annotation; this involves writing on the text that we are reading, whether that’s a narrative, a PowerPoint, an article, or an image. This can take a number of forms.
With modern technology like digital tablets, you can use a variety of software to make annotations on your course content. Usually, this involves having a pdf version of your text, where you can highlight, underline, or write in the margins of your text. You can create a color code for yourself with the highlight colors as well. Perhaps important people are highlighted in pink, while definitions of important concepts are highlighted in blue. Just make sure to pick a light color so that the text you’re highlighting is still readable. Underlining can be another way to emphasize important parts of the text that you’re annotating.
And if you’re someone who doesn’t like to have too much on top of the text, you can always make notes in the margins of your text to point out important information and your own thoughts and understanding of what you’re reading.
If pdfs and finding software to annotate doesn’t work for you (or if you don’t have a digital tablet), Microsoft Word and Google Docs also provide annotation software or you can make notes by creating comments throughout the document. Other accessible note-taking software includes Microsoft OneNote, Evernote, and Pages for Apple Products.
Also, if reading and annotating digitally isn’t your thing (especially if your course content is a physical book), you can always print out your texts to annotate. You’ll need a bit more materials such as different colored highlighters for highlighting, but this can be more hands-on with benefits that come from that. Jennifer Schweighofer, author at Universal Publishing, states that “the combination of kinesthetic and visual stimulation that occurs when students write by hand, helps [you] to better remember and understand the material” (Flavin). You can also use a regular pen for underlining and writing in the margins. Consider using a pencil as well, in case you want to make changes to your annotations as you go!
Some people place sticky notes within pages of their textbooks with small notes written on them as they read (though the book would get really bulky over time). Some even use small, colored sticky notes as a way of highlighting concepts with annotations in mind!
Here are some annotating tips from the Excelsior Online Reading Lab:
- Creating an Annotation System: Annotating while you read is the most fundamental technique of active reading. Learn how to annotate a text by watching this video.
- Annotating an Essay or Book: Learn what to look for when annotating an essay or book.
- Annotating a Textbook: Learn how to identify and annotate the key parts of a textbook.
- Annotating a Journal Article: Learn about the different types of academic journal articles and how to annotate them.
- Annotating a Work of Fiction: Learn about how to read and annotate a work of fiction, such as a short story or novel.
- How to Read Visual Aids: Learn how to read visual aids.
Mind Mapping/Concept Maps/Flow Notes
Next, we have mind maps and flow notes; this works to organize your thoughts graphically when taking notes.
Mind Mapping
This kind of note-taking can be done digitally and in print, just like annotation. You can write in a notebook (preferably without lines) or in note-creation software on tablets. This can also be done on a computer, though it may take a bit longer due to the lack of finesse of a mouse and keyboard.
Mind mapping works great to make connections and subpoints for key concepts. Especially if you’re more of a visual learner, this can help to draw literal connections between ideas and understand how the content you’re learning branches out into smaller ideas. These kinds of notes typically use a template similar to the picture below.
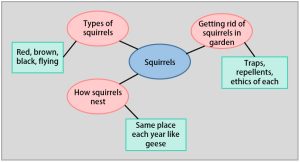
Fig. 1. Template of Mind Mapping from Excelsior Online Writing Lab
Here are some free web tools for mapping and diagramming:
Concept Maps
Concept maps are also visual representations of information but they can take on different forms depending on what you want you need. They can take the form of charts, graphic organizers, tables, flowcharts, Venn Diagrams, timelines, or T-charts. Concept maps are especially useful for students who learn better visually, although they can benefit any type of learner. They are a powerful study strategy because they help you see the big picture: by starting with higher-level concepts, concept maps help you chunk information based on meaningful connections. In other words, knowing the big picture makes details more significant and easier to remember.
Here are some examples from the UNC Learning Center
Example 1: This example illustrates the similarities and differences between two ideas, such as Series and Parallel Circuits. The similarities are represented by the middle circle:

Example 2: This example illustrates the relationship between ideas that are part of a process, such as a Food Chain.

Example 3: This example illustrates the relationship between a main idea, such as climate change, and supporting details.

Flow Notes
Next, we have flow notes this works to follow your train of thought as you process the concepts and content that you’re learning and reviewing.
This way of note-taking is pretty flexible since it can be done on a digital tablet, computer, or physical notebook. If you don’t work well under a rigid structure, this way of note-taking may work better for you.
This kind of note-taking lets you engage in your learning, actively jotting down ideas, drawing arrows, diagrams, or visuals, and connecting them across the page however you feel most comfortable. While this can make it harder to review later, it lets you practice following your own thought process while actively listening and engaging with the content you’re reading and learning.
It may take a bit to get used to following your lines of thought in review, but it’s good practice to think about the ways you think when it comes to learning and understanding. This note-taking method can really be personalized to you in this way, while also helping you make inter-related connections between concepts and ideas.
Charting
Now charts are more particularly suited for organizing concepts that have similar elements to them like genres. This kind of note-taking can be done digitally and in print, just like mind maps.
Charting relies on columns (and sometimes rows) to group notes by topic. Charting or mapping may be preferable to an outline if a lecture or text tends to skip around between topics.
You can write in any kind of notebook or in note-creation software on tablets. This can also be done on a computer and may be easier if you have a hard time drawing straight lines. Many Word document software allows you to create tables to help with making charts like the example below

This kind of note-taking works well for comparing items and summarizing items together in an organized way. When given a number of items under a larger concept, such as different methods, theories, or tools, this kind of note-taking can be helpful in grouping them together to better understand their similarities and differences.
Bullet Journaling
Furthermore, we have the bullet journaling method in note-taking; this is similar to the flow notes but with a bit more structure and focus on visual appeal.
This kind of note-taking works especially well physically in a blank notebook but can also work in note-taking software with a digital tablet. This works well for visual learners who like to organize their thoughts beautifully. Rather than require, it gives you agency for you to choose a range of tools and visuals to craft your notes from fancy or colored gel pens to colored pencils to sticky notes.
The structure you use in this method is completely up to you as long as each part is distinct and colorful to make reviewing your notes pleasing and easy. An example of these kinds of notes is shown in the picture below.
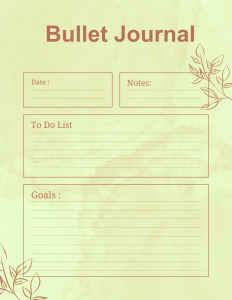
This kind of note-taking focuses more on planning and organizing those plans and notes. While the visuals are no doubt appealing, it can take time for all the visual detailing. But with practice with the kinds of visuals and ways of organizing you like to use, it should get easier and faster. And with this kind of note-taking, you can be proud to share your notes with others due to their aesthetic appeal and clear organization.
Outline Method
Also, we have the outline method in note-taking; this works to easily organize the content that you’re reading and learning.
This kind of note-taking works well physically in a notebook or in a Word document like Google Docs and Microsoft Word. If you’re comfortable formatting with bullet points, outlining within a Word document can be an easy and familiar time. And if you write in an organized manner, writing this out physically can work well for you.
You can use a Roman numeral or bulleted list format to write out these notes. These kinds of notes usually use a template similar to the image below.
Title
|
This method of note-taking works well when you have certain key points or main topics that the text focuses on. From there you can use this way of organizing to indent to add on smaller elements and sub-topics of these key points or main topics.
Keep in mind that this way of note-taking can make reviewing your notes a bit overwhelming with a large amount of text. So consider writing down the most relevant parts of each concept so that reviewing isn’t as intimidating. Taking notes this way digitally can help by more easily deleting less important parts as you go.
Here are some outlining tips from the Excelsior Online Reading Lab:
Cornell Method
Lastly, you have the Cornell method, a much more traditional but popular way of taking notes. The Cornell method creates another kind of organization to support the understanding of concepts and to help you review your notes later.
This is typically and probably the most practically done in a physical notebook. It can probably be replicated in certain note-taking software on digital tablets though.
This method organizes a section for writing down your main notes and key thoughts as you go, along with a smaller section noting which parts of your main notes describe what key concepts and what questions they help to answer. Then there is a small section at the bottom of each page for you to condense and summarize what each page discusses. These kinds of notes use a template similar to the below image:
Main Topic:
Cue Column:Questions Based On Note Taking Column |
Note-Taking Column:Key Words Repeated/Stressed Info Specific Details Lecture Notes ideas/brainstorms projected on screen or written on the board Important People/Places/Dates
|
SummaryAfter class, use this space at the bottom of each page to summarize the notes on that page.
|
While this kind of note-taking does take some setup for each page and more effort to cover different aspects of the note-taking process, it can be helpful to review ideas and ensure understanding as you go and when you need to review your notes later.
Check out the links below for more information about this system.
- Cornell University explanation of the Cornell Notes system
- YouTube video on the Cornell Notes system
- Cornell University handout on the Cornell Notes system
- The Learning Toolbox explanation of the Cornell Notes system
Additional Tips:
- You can always mix these different ways of note-taking. Try doing a number of them together or taking the parts that work for you to make your own method!
- Write in your voice, not your instructor’s or the textbooks. The point of these notes is that they are easy for you to read and understand.
- Get up and move once in a while! This will help you better process the information you’re learning and the break will be good for your brain. The Learning Center at the University of North Carolina on Chapel Hill states that “Research shows that standing and moving around while you are studying and taking movement breaks in between study sessions has numerous benefits to our bodies, brains, memories, and academic performance.”
- Make sure to review your notes within 24 hours of reading them and then once a week. This can ensure that what you’re writing and learning stays in your brain, which is helpful when you have to recall it for an exam or essay!
- If you’re taking notes in a Word document, consider bolding or italicizing to emphasize certain keywords. Something you can do whether you’re taking notes physically or digitally is to make these key words larger in text size too!
- Keep it short and use abbreviations! Why write a really long word like experience when you can shorten it to ‘EXP’ or ‘XP’? Make sure that you’ll recognize these abbreviations and their meanings though! It takes a bit of repetition and practice, but this works well for words that come up often in your course.
- Time stamp your notes! This can help you keep track of content, especially when your professor asks you to look at specific weeks for a particular assignment or rest. You’ll thank your past self later so that you can clearly know which notes are from those weeks.
- Ask yourself: What’s the best strategy for you: handwritten, digital, or both?
| Handwritten | Digital |
| Easier to create diagrams and illustrations | Faster; easier to take a higher volume of notes |
| Sometimes better for visual learners | Easier to edit and reorganize for later studying |
| Provides more focus for students prone to digital distraction | Can be backed up, shared, searched, etc. |
| Can be better for comprehension and retention of conceptual information | Can be better for comprehension and retention of factual information |
