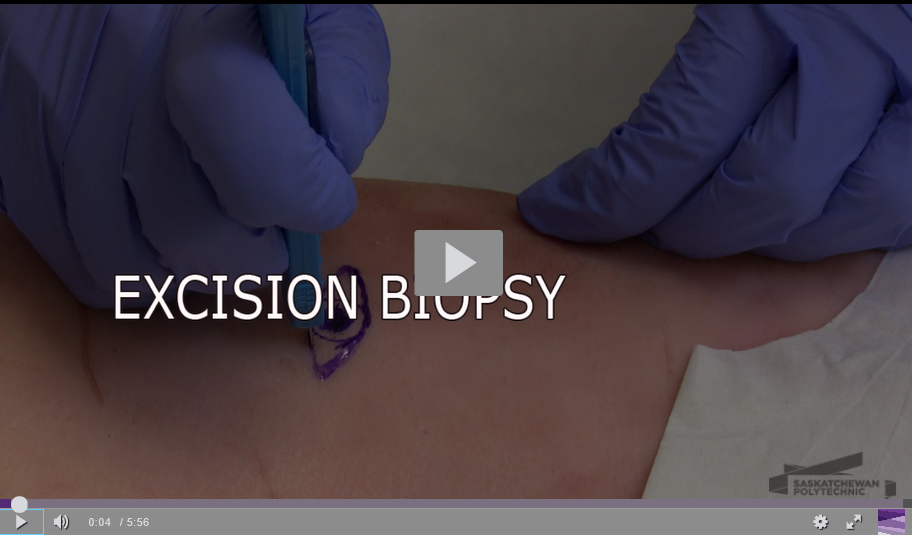
Excision Biopsy
Step 1: Health history and physical exam
Assess the duration of time the lesion has been present, location, presence of infected tissue around planned biopsy site, allergies, bleeding disorders, and ensure the patient is aware that all biopsies result in a scar.
Assess for risk factors for poor wound healing:
• impaired nutritional status
• advanced age
• medications
• diabetes
• peripheral vascular disease
• autoimmune disease
• immunosuppression
• COPD
• CHF
• anemia
• smoking
• substance use
Step 2: Position patient in neutral position
Step 3: Pre-mark incision site
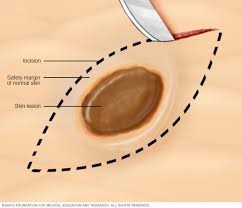
Appropriate margins around the lesion must be defined before removal can be done. Benign lesions are typically removed with a 1 to 2 mm margin. Malignant lesions should be excised with a wider margin and referral to dermatology should be considered.
Marking the intended lesion is also helpful as it may temporarily be distorted following injection of the anesthetic.
When marking the site, pay attention to the skin tension lines and orientate the elliptical incision so that it is parallel to these lines. This allows the wound to close more easily and cosmetically than incisions done at right angles to skin tension lines.
The appropriate margins should be marked using a skin marking pen and then the ellipse drawn around this. Once the axis of the ellipse has been determined, the provider can mark the lines connecting the circle and the tips of the ellipse. The angles at each end should be about 30 degrees and the length-to-width ratio about 3:1 to 4:1.
Retrieved from https://tinyurl.com/ybtbzry6
Step 4: Cleanse the area with chlorhexidine or other approved skin cleanser
Step 5: Anesthetize area using a field block technique
Step 6: Drape the site
Step 7: Make an elliptical incision
i) Hold the scalpel like a pencil with the tip perpendicular to the skin
ii) Begin the incision at one apex
Follow the marked incision line to the other apex. As the incision progresses, use more of the belly of the blade, and then raise it so that the tip is perpendicular to the skin as you reach the next apex.
iii) Avoid crosshatching the lines at the apices
iv) The incision should be about 3 to 4 times as long as it is wide with the corners at about 30 degrees.
v) Ensure the incision extends full-thickness
Step 7: Grasp the dermis
Step 8: Pull out the lesion and remove any remaining lesion wall
Step 9: Undermine the subcutaneous plane
Using a scissor, undermine the subcutaneous plane beneath the dermis to allow the skin to glide together and reduce tension on the sutures:
a. Advance the closed scissors under the wound edge where the dermis meets the subcutaneous tissue
b. Quickly spread the scissors open
c. Continue this around the entire wound
Step 10: Close the incision
Step 11: Apply dressing to incision site
Step 12: Send specimen to lab