Suturing of Uncomplicated Lacerations
Step 1: Health history and physical assessment
Assess mechanism of injury and environment in which injury occurred, time of injury, site and type of wound, and medical history. Never close a wound that is more than 24 hours old.
Assess for risk factors for poor wound healing:
• impaired nutritional status
• advanced age
• medications
• diabetes
• peripheral vascular disease
• autoimmune disease
• immunosuppression
• COPD
• CHF
• anemia
• smoking
• substance use
Physical assessment:
• circulation, sensation and movement distal and proximal to the wound
• 2-point discrimination
• sharp/soft discrimination
• pulses
• capillary refill
• range of motion and strength against resistance of all body parts surrounding the wound site
• pain
Step 2: Set up equipment, wash hands, don gloves
Step 3: Cleanse wound or skin of the operative site with normal saline
Wound irrigation and debridement can be painful for the patient and may be better tolerated after the wound is anesthetized. Wound cleansing reduces the risk of sepsis to the wound site. Cleanse a wide area around the wound to prevent contamination of suture material and surgical instruments during the procedure.
Note that some antiseptics (i.e., chlorhexidine, iodine) are cytotoxic and damage fibroblasts essential to wound healing. Do not introduce antiseptic solution directly into the wound. The wound itself should be cleansed or debrided with sterile normal saline only. Alternative methods for wound debridement are below.
(a) Irrigation: Use an 18-gauge catheter attached to a 30 mL syringe. 10 PSI of irrigating pressure is needed to dislodge contaminants and bacteria, yet not damage tissue.
(b) Scrubbing: Use a sponge or a brush to remove embedded debris. Avoid soaps or detergents.
(c) Debridement: Remove retained debris and devitalized tissue by surgical excision to improve wound healing time and prevent disfigurement.
Step 4: Clip hair on surrounding skin surface
Hair surrounding the wound should be clipped rather than shaved to prevent further trauma to the skin.
Step 5: Drape the wound
Step 6: Anesthetize the wound
Step 7: Determine suturing technique to be used
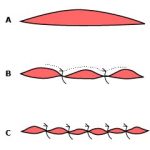
(a) Simple interrupted sutures. Most commonly used technique to close uncomplicated wounds. The distance between sutures will depend on the amount of tension on the area to be sutured and cosmetic effect. The closer together the sutures, the better the cosmetic effect. Presence of dead space when closing wounds can lead to hematoma formation.
(b) Horizontal mattress sutures. Used to close wounds in an everted fashion and provide deep closure support. Useful for high tension areas such as thighs, knees and web of fingers.
(c) Vertical mattress sutures. Allows closure of a wound in an everted fashion and deep closure support. This technique provides greater precision in the alignment of wound edges and when there is significant dead space present.

Step 8: Load suture material into needle driver
Free your fingers from the loops on the handle of the needle driver and grasp the needle driver above the finger loops.
Step 9: Begin at one end of the laceration
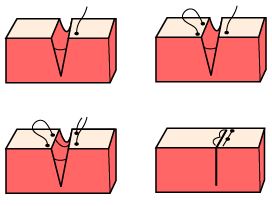
Introduce needle at a 90 degree angle to the skin. Rotate your wrist to achieve a circular motion when bringing the needle from one side of the laceration to the other.
Simple interrupted sutures
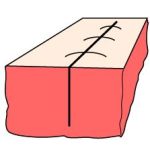
A bite is taken across both wound edges. Ensure wound edges are everted (tented) by directing the needle away from the wound margin at the entrance point and toward the wound margin at the exit point. The path of the properly placed percutaneous suture will be wider at its base than at the skin entry point. The width and depth of the suture loop should be the same on both sides of the wound.

Secure suture material with surgeon’s knot (see below) to the side of the wound. Clip the excess suture material.
The distance between sutures is equal to the bite distance from the wound edge.
Continue for the entire length of the wound.

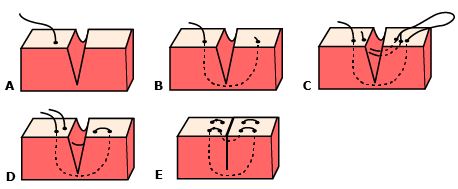
Horizontal mattress sutures
A deep bite is taken and comes out through the middle of the wound as the suture needle is not long enough for a bite to be taken across both wound edges when deep closure support is required. Evert the other side of the wound edge using tissue forceps and take a deep bite coming out on the opposite wound edge from where you started. A second bite is taken approximately 0.5 cm from the first exit site and is brought back across both wound edges to the original starting side, also 0.5 cm from the initial entry point. Again, this may have to be done by coming out through the middle of the wound before a bite is taken on the opposite wound edge to ensure deep closure is achieved. Ensure wound edges are everted.
Secure with surgeon’s knot (see below) to the side of the wound. Clip the excess suture material.
The distance between sutures should be roughly one-half the length of a suture.
Continue for the entire length of the wound.
Vertical mattress sutures
The first portion of the suture approximates the dermal structures. A deep bite is taken and comes out through the middle of the wound as the suture needle is not long enough for a bite to be taken across both wound edges when deep closures support is required. Evert the other side of the wound edge using tissue forceps and take a deep bite coming out on the opposite wound edge from where you started. The second portion closes the wound and everts the edges. Rotate the needle 180 degrees in the needle driver and reverse the direction of the suture loop, taking a second bite across both wound edges. The second bite is located medially to the first bites on each side of the wound. Ensure wound edges are everted.
Secure with surgeon’s knot (see below) to the side of the wound. Clip the excess suture material.
The distance between sutures should be roughly one-half the length of a suture.
Continue for the entire length of the wound.
Step 10: Secure suture material using surgeon’s knot
This method of suture tying is the most useful method for skin closure. This knot will hold even under moderate tension.
Wrap the long part of suture material around the needle driver (away from you) 2-3 throws then grasp the shorter edge with the needle driver. Pull your hands in opposite directions to secure using equal tension. Wrap the long part of the suture material around the needle driver in the opposite direction (towards you) 2-3 throws, then grasp the shorter edge with the needle driver. Pull your hands in opposite directions to secure using equal tension. Continue this pattern 2-3 more times using 1 throw around the needle driver each time.

Step 11: Assess tetanus status
A tetanus booster dose is required if the patient has not had a tetanus booster in the last 10 years. The combined preparation of tetanus and diphtheria toxoid formulated for adults (Td) is preferred.
If the patient has not received pertussis since childhood, then tetanus, diphtheria, pertussis (TdP) should be given. If the wound is excessively dirty, tetanus immune globulin should also be given. See Tetanus immune globulin in the Canadian immunization guide (recent edition) for further information.
Step 12: Consider prophylactic antibiotics
• more than six hours old
• the result of human or cat bites
• a crushing wound
• grossly contaminated
• bone/joint involvement
• patient is immunocompromised