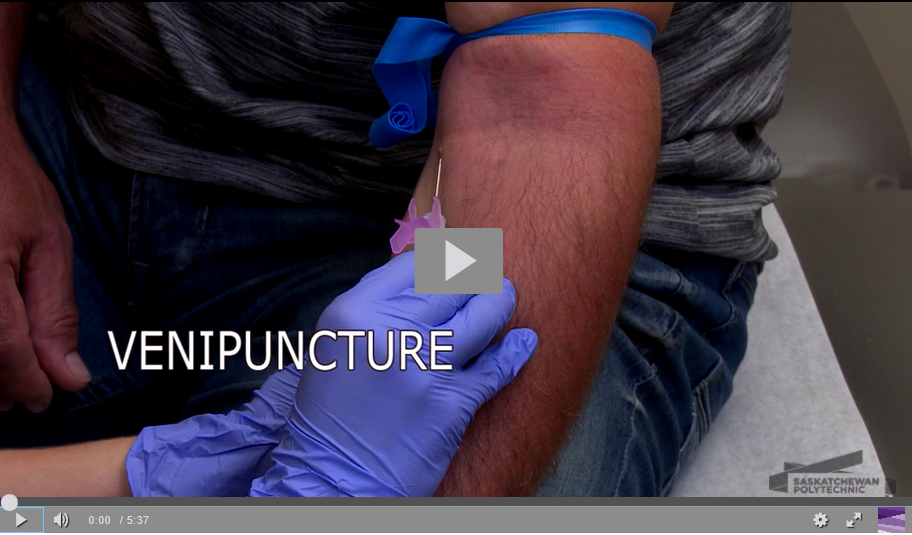
Venipuncture
Step 1: Review the requisition
Confirm patient identification prior to any collection. Review the requisition and ensure all of the following information is present:
- Patient Identification
- Name of ordering Nurse, Nurse Practitioner, or Physician
- Tests ordered
- Collection information (date, time, etc.)
- Accessioning identification
- Status of collection (STAT, Urgent, Timed, Routine)
- Provisional diagnosis
Step 2: Choose venipuncture site
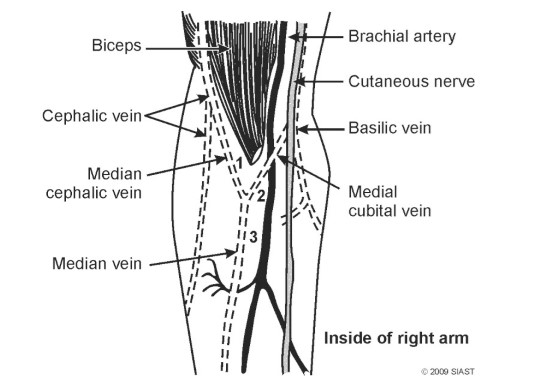 The most commonly used site is the antecubital fossa area which is located on the inside surface of the elbow. The following veins are located in this area:
- Median cephalic vein – most desirable
- Median cubital vein
- Median vein
- Basilic vein (least desirable because of its proximity to internal cutaneous nerve and brachial artery)
- Cephalic vein (often small and has a tendency to roll)
Other sites may need to be considered if the antecubital fossa is not appropriate or available such as the back of the hand, ankle, or foot veins. These are not choice sites, but may be the only ones available. These veins are often thin, small and likely to cause hemorrhage and the procedure is likely to be painful to the patient. Butterfly needles are often preferred to an evacuated tube system for small thin veins because pressure on the vein during sample aspiration can be controlled.
Step 3: Assemble and prepare the equipment
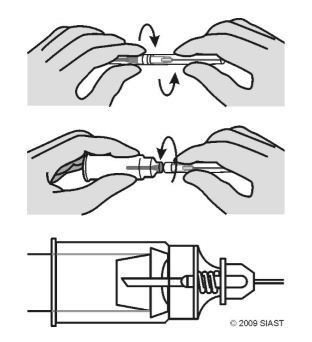 Remove the bottom, shorter cap from the needle and screw it into the plastic holder (the longer cap will remain in place until the actual puncture is done).
Insert the first evacuated tube onto the holder and push it forward until the stopper just meets the guideline. This anchors the tube but doesn’t release its vacuum.
Placing the tube into the holder prior to venipuncture is optional.
Step 4: Position the patient
If the patient is seated, the chair must have a back and side support and the patient’s arm is extended to form a straight line from the shoulder to the wrist and inclined in a downward position. The arm and elbow should be supported.
For patients in bed, the arm should be extended to form a straight line from the shoulder to the wrist. A pillow may be placed under the elbow, if additional support is required.
The patient’s arm should be easily accessible and you should be comfortable with that access.
Step 5: Don gloves and apply tourinquet
The tourniquet should be applied 3 to 4 inches above the puncture site. Application too close to the puncture site can make the vein difficult to enter or the vein may collapse.
The tourniquet should achieve a firm tension without rolling, pinching or causing discomfort. The patient should not feel tingling in the fingers and the arm should not develop small red spots (petechiae).
Tourniquet application should not exceed one minute to avoid hemoconcentration (an increase of cellular elements).
Step 6: Select the vein
Veins should be located by touch (palpation) and not sight alone.
Use the index finger of your non-dominant hand to palpate the veins in the antecubital fossa – in the areas you know the veins to be located. You should be able to feel the vein compress, then have it bounce back as pressure is released, like an elastic tube.
The fullest, most central and most anchored vein should be chosen.
Assess both arms if necessary and select the best.
You may have to move the arm or rotate the wrist slightly to give you easy access to both equipment and vein.
If an appropriate vein is not apparent, ask the patient to make a fist (DO NOT PUMP). Blood circulation may be increased by massaging the arm from wrist to elbow, or by the application of heat.
The patient may be able to tell you where others were successful.
Beginners should remove the tourniquet once the vein is located to avoid hemoconcentration. Proficient phlebotomists will be able to locate the vein and insert the needle within one minute and may not require this step.
Step 7: Cleanse the site with 70% isopropyl, moving in concentric circles from the middle of the vein outward
Allow the alcohol to dry:
- Evaporation and drying helps kill bacteria and excess alcohol may hemolyse the specimen
- Alcohol may cause the actual puncture to sting
- Do not blow on the site
- Do not fan with your hand
- Do not wipe the alcohol away with another dry swab (unless sterile)
Do not touch the site again. If you contaminate the site again, re-cleanse.
Step 8: Perform the venipuncture
- Examine the needle
- Anchor the vein
- Insert needle
- Push tube on
- Change tubes as required and mix
- Release tourniquet
- Remove needle and apply pressure to the puncture site
Immediately following removal of the needle engage the safety engineered sharp device (SESD) over the needle using a one-handed technique by pushing the SESD in place with your thumb and discard the sharp (needle) according to sharps disposal protocol.
Step 9: Handling of specimens
Following collection the tubes should be completely but gently inverted as required and must be labelled within the patients view.
Labels should include:
- patient’s full name (last name in capitals followed by first)
- patient identification number (Provincial Health Number)
- patient date of birth
The requisition must include the collection date and time and the phlebotomist’s initials.