Chapter Objectives:
This chapter is designed to help you do exactly what the title says – get started. Therefore it is intended to:
- Present some generic information on the use of a brightfield microscope. Your instructor will provide additional information, but this brief introduction should enable you to get started with minimal difficulty.
- Point out techniques that may be used to maximize the information retained as you view histological specimens in the laboratory.
- Provide tips that will facilitate the process of identifying an unknown histological specimen.
To the new student of histology, the process of identifying an unknown histological specimen may seem daunting. Current texts and atlases are filled with endless details of microscopic anatomy as seen with light microscopes and electron microscopes. In addition, most atlases simply present pictures of histological specimens with labels indicating the source of the specimen, magnification, stains used, and various items of interest on the photomicrograph. Yet the questions of a beginning histology student have not been answered— namely, “What is the specimen and how do I figure that out?” Few, if any, tips are provided that will aid in learning how to identify an unknown histological specimen. This process is typically left for students to discern on their own; hence my incentive to write this book. Students of histology need a laboratory book that instructs them in the process of identifying an unknown histological specimen. This book was not written as a typical histology atlas. Rather, this book was written to help teach you how to interpret and identify unknown histological specimens. Therefore the photomicrographs in this book are presented in a format that will be very close to that which you will encounter in the laboratory. Specimens with artifacts, variations attributable to the plane of section, specimen thickness, and staining imperfections are included. Therefore we hope that the photomicrographs included in this book will approximate what you will actually see in the laboratory.
Use of a Brightfield Microscope
The following material is generic. That is, it is not written for any particular brand or style of light microscope. Even if you are familiar with the use of a microscope, you should read the following material.
Microscope Placement and Utilization
Use both hands when carrying a microscope. One hand should have a firm grip on the arm of the microscope, and the other should support the microscope from underneath. Never, under any circumstances, carry a microscope with one hand or carry two microscopes at one time.
Provide ample space before placing the microscope on the desk. Never, under any circumstances, slide the microscope across the laboratory bench. If you need to change the position of the microscope, pick up the instrument and place it in the new location. The vibrations caused by sliding the microscope across the laboratory bench may have an adverse effect on the microscope’s optics.
If the microscope has inclined eyepieces and a rotating head, you have two options for positioning the instrument. However you choose to use the instrument, the head should be rotated so that the eyepieces are pointing toward the arm of the microscope when the instrument is being carried or placed back in storage.
Lens Care
It is important that the light, condenser, and objective lenses be kept clean to allow the maximum amount of light to enter the microscope. The light, condenser, and objective lenses should be cleaned only with high-quality lens paper or cotton swabs and a high-quality glass-cleaning solution.
Objectives
Change objectives by rotating the revolving nosepiece on the microscope. To prevent damage to the objective’s threads, never change magnification by grasping the objective! All objectives on the microscope are to be cleaned only with a high-quality glass-cleaning solution and either high-quality lens paper or clean cotton swabs.
Eyepieces
To test the eyepiece for cleanliness, rotate it between your thumb and forefinger as you look at a well-focused slide through the microscope. A rotating pattern will be evidence of dirt on the eyepiece. Eye makeup and natural oils from eyelashes will contribute to dirt on microscope eyepieces. Clean the eyepiece first with a cotton swab that has been lightly dampened with a high-quality glass-cleaning solution. Then dry the eyepiece, either with a dry cotton swab or dry, high-quality lens paper.
Condenser and Diaphragm
The condenser should be at its highest point without touching the slide. If a pattern shows in the visual field, lower the condenser (or clean it) until the pattern disappears.
Under most circumstances, the diaphragm should be kept approximately halfway open. The amount of light desired should be regulated by altering the brightness of the light source rather than by altering the setting of the diaphragm. The diaphragm setting should be changed only to increase the contrast and depth of field of the specimen.
Initial Specimen Examination
Before placing a specimen on the microscope stage, examine the slide with the naked eye by holding it up to the light. This will allow you to do two things before examining the specimen under the microscope: (1) determine the cleanliness of the slide, and (2) determine the general orientation of the specimen.
Focusing and Low-Power Examination
The low-power objective of the microscope is used to gain a general orientation to a new slide. It should be the first objective used to view every preparation.
To focus the microscope, it is necessary to alter the distance between the slide and the objective lens. You accomplish this with knobs on the side of the microscope. On some instruments, these knobs cause the objective lens to move up and down in relation to the stage. On other microscopes, the objective lens is stationary and the stage is moved. In either case, the larger knob is used when coarse focusing is desired. The smaller knob is used for fine focusing.
When focusing, consideration must be given to the working distance of the lens – the distance between the lens and the slide when the specimen is in sharp focus. The greater the power of an objective, the smaller its working distance. Note that an oil-immersion lens may have a working distance of only 0.14 mm. This amounts to a 0.005-inch clearance between the lens and slide! If a slide with a thick cover glass is used, the actual working distance will be even less; therefore you must exercise care when using high-dry and oil-immersion lenses. (See the Oil-Immersion Techniques section.) Although most microscopes have built-in mechanisms to prevent damage to the oil-immersion lens, the safest procedure is to make it a rule never to use the coarse focus adjustment while looking into the microscope if you are using anything other than the lowest-power objective.
When examining a specimen, always start with the low power (usually 10X) objective. Mount the slide in the mechanical stage slide holder with the cover glass up. While looking through the eyepieces, rotate the coarse focus until the specimen begins to come into focus. Then, while using only the fine focus knob, slowly bring the specimen completely into focus. As you rotate to other objectives to view the specimen, only the fine focus knob will be needed. Never use the coarse focusing knob with any objective other than low power!
High-Dry Examination
Once the microscopic field has been surveyed to locate the specimen and an overall orientation of the specimen has been obtained, you can change the magnification to an intermediate power or to high dry, depending on the size of the field to be studied. If the specimen is in focus with low power (10X), all that is necessary to change lenses is to rotate the nosepiece so that the desired lens is locked into place. Because most microscopes are parfocal, it can be assumed that the specimen under the new lens will be either in focus or nearly so. You must remember that once you have switched from the lower-power objective, you should adjust the focus only with the fine focus knob!
Oil-Immersion Techniques
For certain slides and preparations you will need to use the oil-immersion lens. However, once you become more comfortable looking at tissue sections, you will use this objective less and less. In this book we will point out those specimens that should be viewed under oil immersion; therefore it is not necessary to use oil immersion unless it is suggested.
The greatest difficulty students have with this lens is that its working distance is so small that incorrect focusing techniques will result in broken cover glasses or slides. These objectives are the most expensive ones on the microscope, so it is essential that you observe certain safeguards.
One of the easiest and safest ways to use the oil-immersion objective is to progress from low power to medium power and then to oil immersion. This is accomplished by bypassing the high-dry objective. After a good viewing section of the slide is obtained, rotate the fine focus knob so that the stage (or lens, depending on the design of the microscope) is moved away from the slide. (It is best to perform this step with the scanning lens in place to prevent damage to the slide should you rotate the coarse-adjustment knob in the wrong direction.) After moving the objective a safe distance from the stage, place a small drop of immersion oil on the slide in the center of the current field of vision and swing the oil-immersion objective into place. Carefully raise the stage (or lower the objective) while watching the slide from the side. Continue until the objective just touches the oil droplet. Now look through the eyepiece and bring the specimen into focus using the fine adjustment only. Adjust the light intensity if necessary.
When another slide is to be examined, start moving the oil objective out of the immersion oil with the fine focus while watching the slide from the side. When the lens is out of the oil, continue to move the objective away from the slide with the coarse adjustment while also continuing to watch the slide from the side. Always clean the slide carefully before returning it to its storage location. In addition, always clean the oil-immersion objective after every use; never allow oil to remain on the lens. Clean the objective and slide by first removing any excess oil with a clean, dry cotton swab. Then clean the lens and slide using a cotton swab moistened with a high-quality glass cleaner. Finally, dry the lens and slide with a new, clean, dry cotton swab.
Additional Suggestions
Check the bottle of immersion oil to make certain it is not cloudy. The oil should be completely clear.
You must be careful never to lower the high-dry objective into the immersion oil. Doing so would damage the seal around the lens and cause oil to leak into the housing, permanently damaging the lens.
How to Interpret Tissue Sections
Correlate Structure and Function
Histology is defined by Stedman’s Medical Dictionary[1] as “the science concerned with the minute structure of cells, tissues, and organs in relation to their function.” However, from a practical point of view, histology is more than just the structure of cells, tissues, and organs. It also involves the identification of unknown specimens—the process of learning how to determine what it is you are looking at and why. This section provides several suggestions that will allow you to start developing a logical process of identifying an unknown histological preparation.
It is important to keep in mind that the interpretation of histological sections cannot occur in isolation. When you take a course in histology is unimportant. Whether or not histology is part of an entry-level course in the biological sciences, taken as a senior-level college course, or taken as part of the curriculum of a first-year medical student, it is essential that histology students try to correlate what they have learned or are learning in anatomy, physiology, and other courses and use that information as they work to correctly identify an unknown specimen. As a student of histology you must:
- Remember the three-dimensional anatomical characteristics of the organ that was the source for the histological section. How might the shape of the organ affect its histological appearance when sectioned? What other organs, blood vessels, and ducts are normally found in close proximity to the organ being sectioned? How might these structures aid you in identifying the tissue section currently on your microscope stage?
- Learn to relate structure and function. The ultrastructure of any tissue or organ is tightly coupled to its function. Even if you have yet to take a physiology course, it is important to try to relate the physiological functions of every tissue, organ, and organ system to its histological structure. Trying to understand histological structure in isolation will increase the likelihood of confusion and frustration. However, studying the histological structure of a tissue or organ in conjunction with its physiological function will lead to logical conclusions and relationships that will make specimen identification considerably easier.
- As you make the transition from the four basic tissues to organs and then to organ systems, remember the ultrastructure of the “typical” cells of that organ (secretory cells, transport cells, and so forth). In addition, remember specific cellular structures that are enhanced by the particular stains used in the preparation of the tissue in question (see Appendix). Finally, tying these and other pieces of information together provides you with valuable insights into the histological appearances of many structures that you will be identifying throughout your histology course.
Tissue Preparation, Histochemistry, and Cytochemistry
In order to correlate structure and function it is important to have at least a rudimentary understanding of the process used in the preparation of histological specimens.
Tissue Preparation
Tissues that were photographed for this book were obtained from standard student histology slide sets. Most of these tissues were fixed in formalin, embedded in paraffin, and then stained with hematoxylin and eosin (H & E).
Fixation is a process in which cell metabolism is stopped and tissue structure is preserved. The most commonly used preservative is formalin (37% solution of formaldehyde) in combination with a variety of buffers.
In order to slice specimens thinly enough (5 to 15 µm) to allow the transmission of light through the specimen, the tissue must first be embedded in a suitable medium. Such embedding facilitates the straight, thin cutting of the specimen. Preserved tissues that are to be embedded must first be washed and then soaked in progressively stronger alcohol solutions until the specimen finally is soaked in a solution of 100% alcohol. This process allows the tissue to dehydrate (that is, water has been removed) and also removes all intracellular and extracellular alcohol-soluble compounds, including fat, glycogen, proteoglycans, ions, intermediary metabolites, glucose, and mucous. Following dehydration with alcohol, the tissue is soaked in an organic solvent (typically toluene or xylol) to remove all of the alcohol from the specimen. This process also facilitates the penetration of the embedding medium (typically hot paraffin) deep into the tissue specimen. After the paraffin has cooled, the block of paraffin is sectioned, and the resulting thin slices are mounted on a microscope slide.
Staining is the final step in the preparation of tissue samples. Before staining, the specimen is again soaked in an organic solvent to remove all of the paraffin from the tissue. The specimen is then rehydrated by progressive soaking in solutions that simultaneously contain less and less alcohol and more and more water.
Chemical Composition of Tissue Samples Ready for Staining
As a result of the fixation process, the tissue that has been mounted on the microscope slide has a chemical composition significantly different from that found within living tissues. The chemicals remaining in biological tissues after fixation are mainly large macromolecules that are not alcohol soluble, such as membrane phospholipid-protein compounds, membrane phospholipid-carbohydrate compounds, extracellular proteins, intracellular cytoskeleton proteins, and nucleoproteins.
Chemical Basis of Staining
H & E is the most commonly used stain in histology. Eosin is an acidic dye and therefore has a net negative charge. Similarly, hematoxylin, a basic dye, carries a net positive charge. Acidic dyes interact with the cationic groups found intracellularly and extracellularly, while basic dyes interact with the anionic groups. A partial listing of those tissue components that interact with acidic and basic dyes is given below:
- Basophilic tissue components (components that interact with basic dyes such as hematoxylin) include the following:
- Extracellular carbohydrates, such as those found in cartilage
- Nucleic acids within the nucleus and nucleolus
- Cytoplasmic components of the rough endoplasmic reticulum
- Acidophilic tissue components (components that interact with acidic dyes such as eosin) include the following:
- Cytoplasmic filaments
- Intracellular membrane components
- Extracellular fibers
Maximize Your Field of Vision
Beginning students of histology tend to spend too much time using the high-dry or oil objectives. This is a natural inclination; the beginning histology student assumes that the higher magnification power will reveal more information about a specimen. Although this inclination may prove to be correct in some instances, it is often the case that more valuable information will be obtained by examining a specimen with the low- or medium-power objectives than with the high-power or oil-immersion objectives. Note how the field of vision decreases significantly as the magnification of the following photomicrographs increases from 25X to 50X to 100X (Figures 1-1 to 1-3). A histological identification is made by taking into account all of the characteristics of each portion of the specimen being viewed—understanding the “big picture” of the specimen in question. You will see these all-inclusive characteristics only by using the lower-power objectives. Remember—the higher the magnification power of the objective, the smaller the field of vision. It is difficult to make a correct identification by spending the majority of your time using high-power objectives.
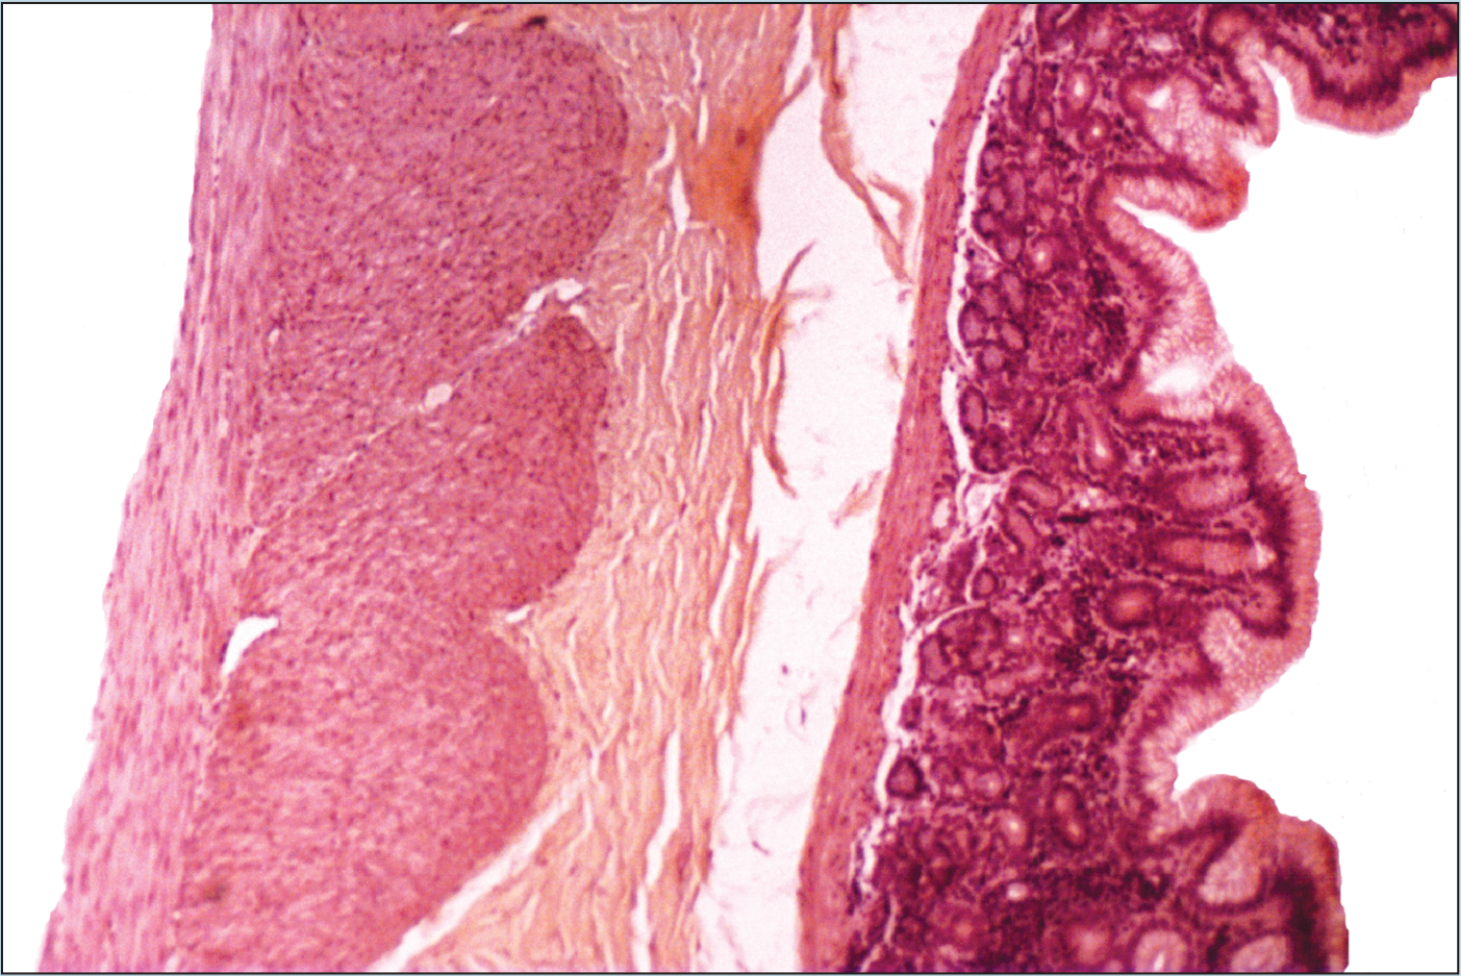
Figure 1-1 (25X): Fundic stomach.
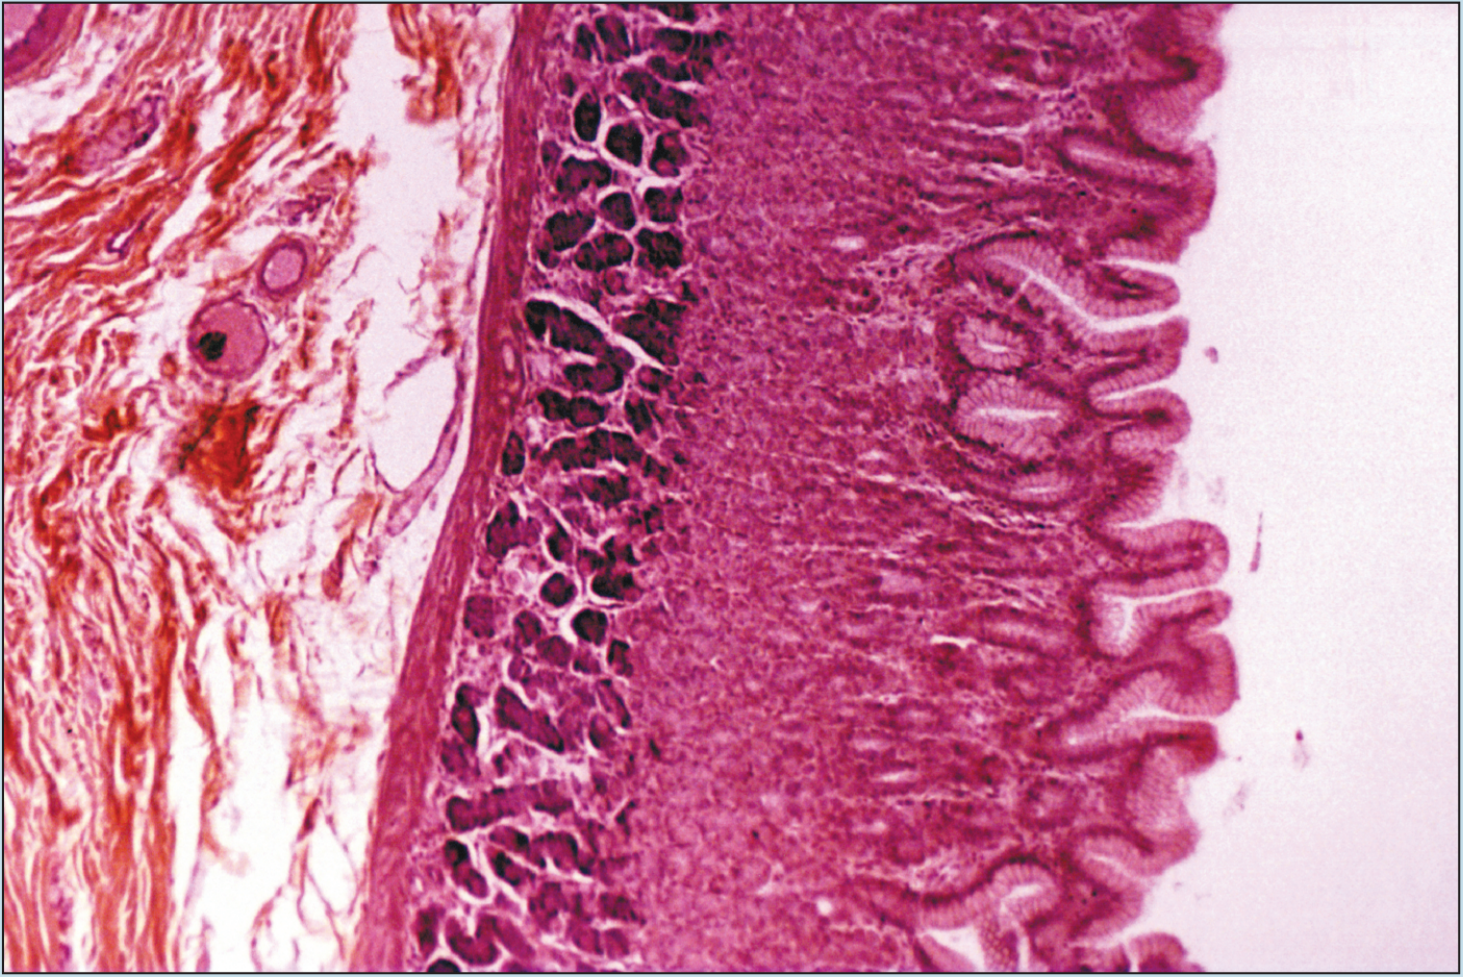
Figure 1-2 (50X): Fundic stomach.
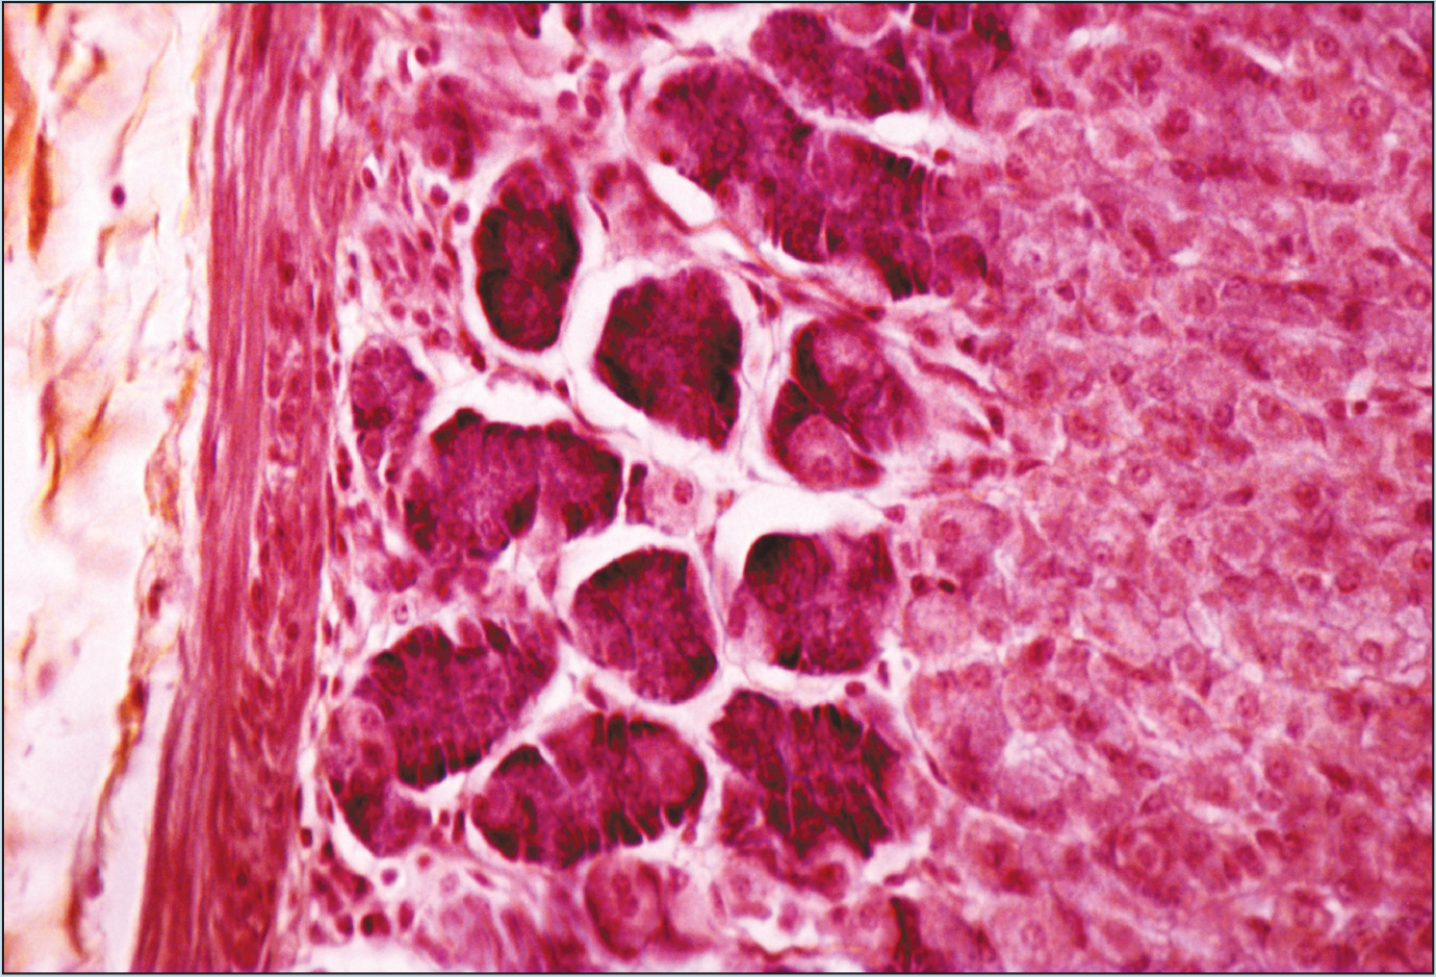
Figure 1-3 (100X): Fundic stomach.
In addition to maximizing use of the low-power objectives when identifying an unknown specimen, keep the following suggestions in mind:
- Do not depend totally on specimen colors. Yes, staining characteristics are important, but you must learn how to rely on the structural characteristics of the tissue in addition to its staining characteristics.
- Try to develop a mental picture of the specimen being studied. This can be facilitated by drawing pictures of the specimens studied in the laboratory.
- Study unknown specimens in a manner that enables you to list a minimum of three reasons for your identification of the specimen. These reasons should be the type that can be documented in a standard histology text.
The identification of an unknown slide is similar to a mystery story. You are given a series of clues that you must understand, analyze, and use in order to make a correct identification. Memorization will not work! You need to develop some methodology that will enable you to logically progress through the various options and arrive at the correct answer. Throughout this book, we plan to provide these logical choices for you—in both verbal and picture format. As you progress through your first histology course, you may choose to use the methodology outlined in this book or you may develop some alternative form of your own. The approach used in this book is one in which you force yourself to think in a series of simple “yes” and “no” questions. To help you to start thinking in this manner, we have included numerous “Logic Trees” throughout the book. Look these over and use them if they help you in your identification process. If you feel more comfortable with another methodology, good! The important things are that you have (or develop) a methodology that works and that you then consistently use this methodology to properly identify an unknown specimen.
Interpreting Planes of Section
Two of the most frustrating things a beginning histology student encounters are lumped under the general category of “artifact”—something that you may see on a specimen that is not a normal component of that tissue or organ. Fixation, staining, and mounting techniques may produce artifacts in the specimen. Some artifacts may aid in the identification of a specimen, while others may hinder it. Only experience will enable you to learn how to ignore some artifacts and pay attention to others. In addition, the plane of section will vary from specimen to specimen, as well as from structure to structure within a specimen, thereby giving rise to “sectioning artifacts.” As you look at a slide, it is important to pay attention to the plane of section. Is the preparation being examined a cross, longitudinal, or oblique section? As you look at Figures 1-4 to 1-7, note how varying planes of section will alter the view of the structures in question. The appearance of a femur (Figure 1-4), curved tube (Figure 1-5), and lemon (Figure 1-6) will vary depending on the plane of section. Similarly, the structures that are visible will vary depending on the level of sectioning. Figure 1-7 demonstrates how the plane of section will alter the view of a tissue depending on the level of the sectioning. There is no quick way to learn which artifacts are important to remember and which are important to ignore. To aid you in this learning process, we have deliberately incorporated micrographs in this book that contain sectioning and staining artifacts. When present, they are discussed in the body of the text.
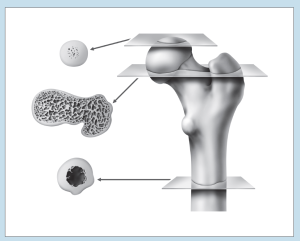
Figure 1-4: Diagram representing different cross-sectional views of the femur, based on plane of section.
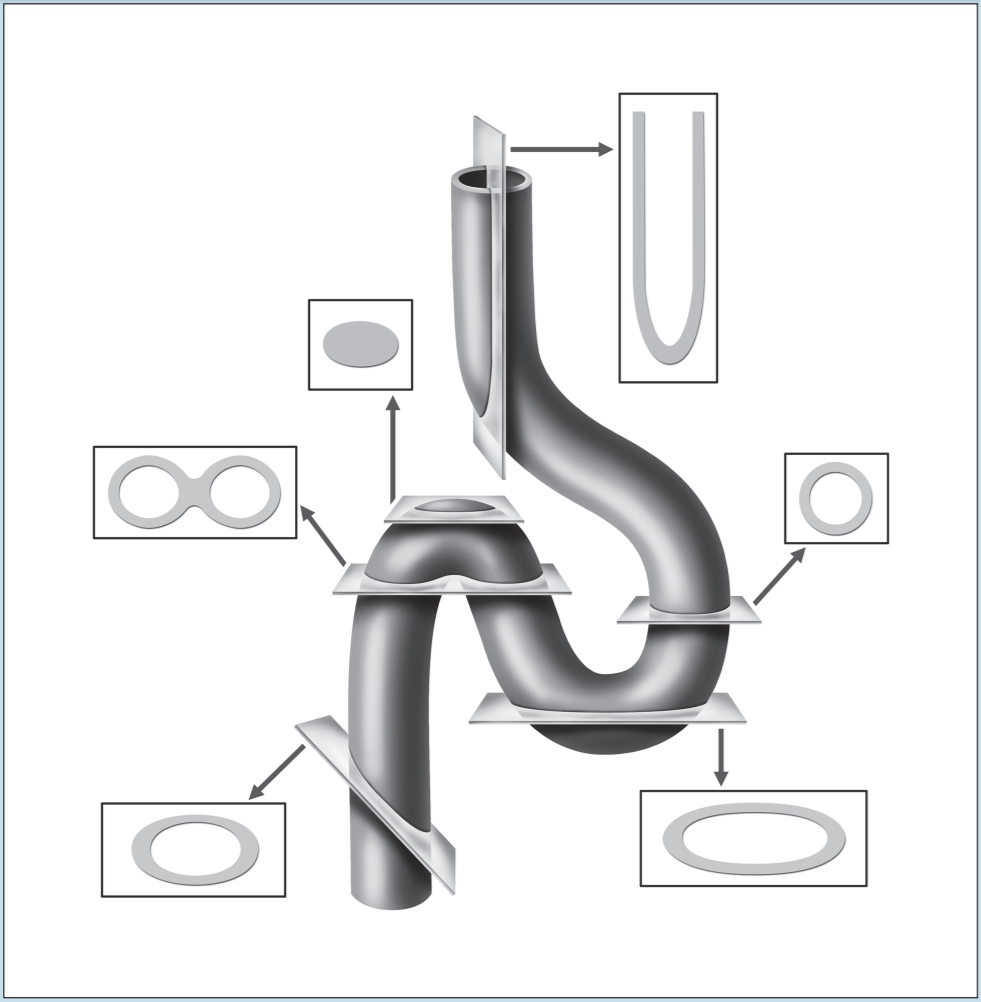
Figure 1-5: Diagram representing different sectional views of a hollow tube, based on plane of section.
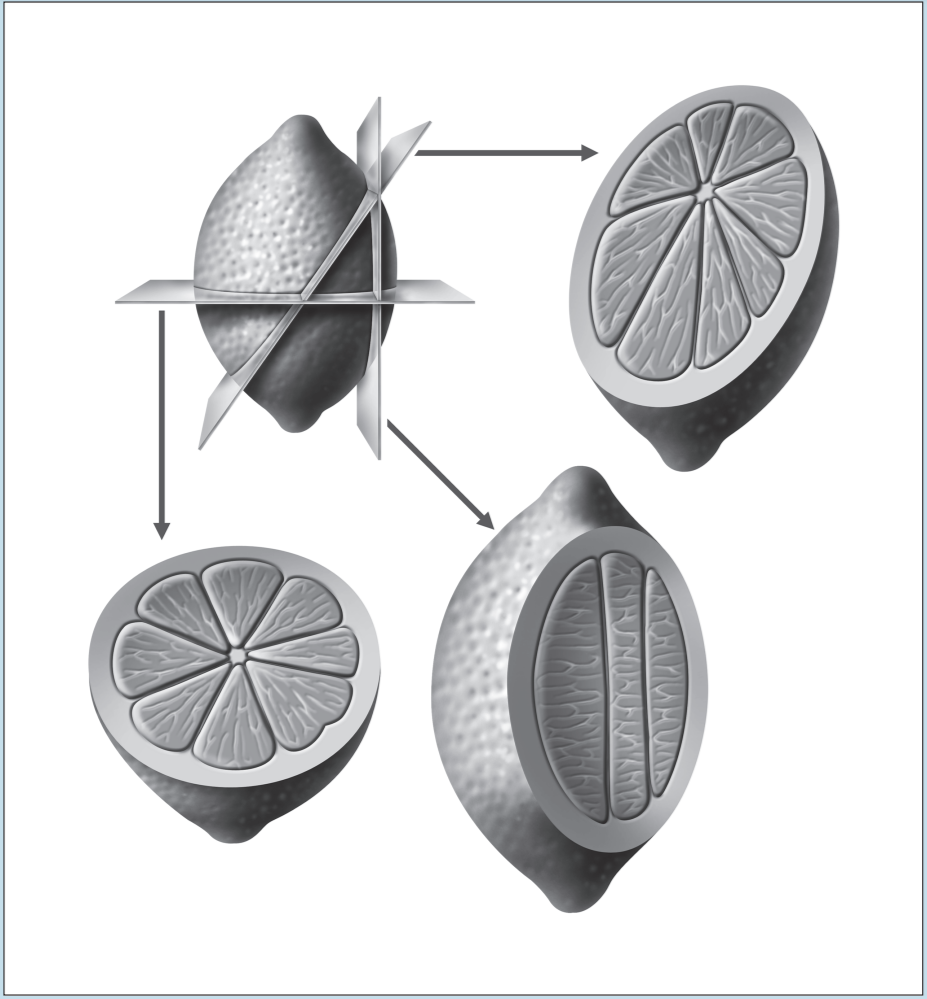
Figure 1-6: Diagram representing different sectional views of a lemon, based on plane of section.
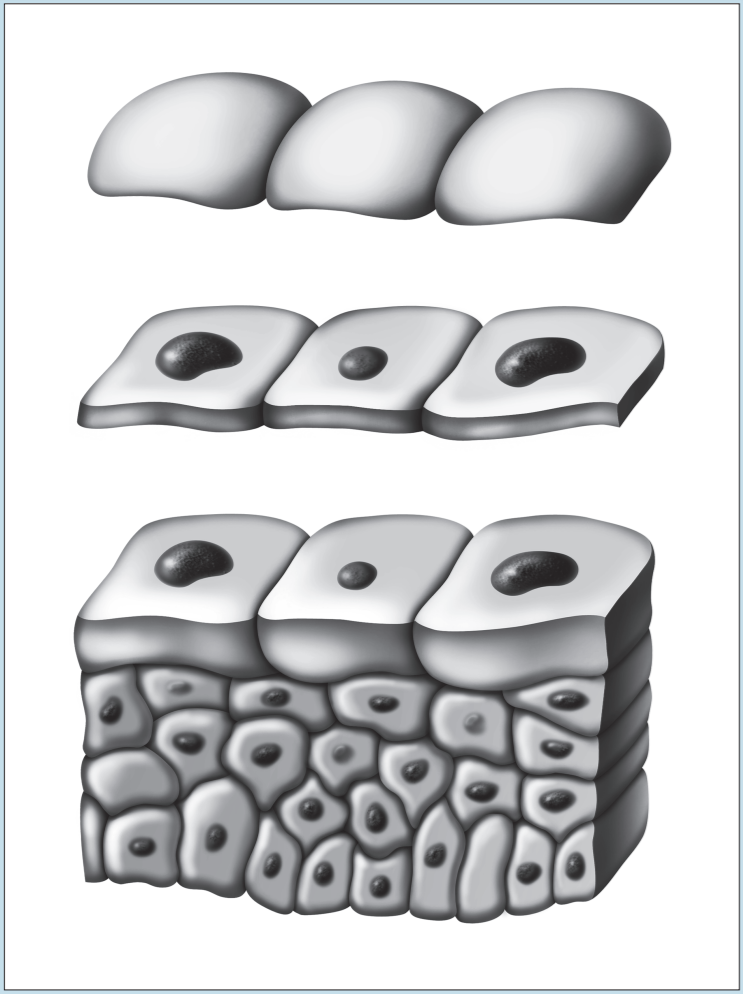
Figure 1-7: Diagram representing how the plane of section will alter the view of a tissue, depending on the level of sectioning.
Logic Trees—How to Develop Them
When you are attempting to identify an unknown epithelium or any other unknown slide, it is important to develop a methodology (such as the Logic Trees used in this book) that will yield reliable and correct results. Several things must be kept in mind as you learn how to develop your individual logic trees and progress through this book:
- To accurately identify unknown slides, one of the key skills that you must develop is the ability to ask simple, reliable “yes” or “no” questions in the proper order. Simply put, you want to obtain the most accurate answer in the shortest amount of time. Being able to identify a slide correctly by asking only three or four key questions will serve you better than correctly identifying a slide by following a “shotgun” approach and randomly asking questions in search of an answer.
- You should try to base an identification on a minimum of two or three characteristics. Artifacts—be they sectioning or staining—will crop up at the most inopportune times. As you progress through this book, note the artifacts in many of the photomicrographs. These have been included for a purpose—you need to become comfortable with artifacts and how they may affect your identification. Therefore, you should base every identification on no fewer than three reliable characteristics. Granted, there will be occasions when a correct identification may be made on fewer characteristics, and we will do our best to point out these instances to you.
- Do not memorize! As hard as it may be to fathom at this time, very little anatomy (gross or microscopic) is learned by memorization. You need to understand the three-dimensional anatomical characteristics of a specimen, as well as the relationships between structure and function, to fully grasp any branch of anatomy.
- Staining characteristics are important, but do not try to identify histological specimens solely on the basis of color. Although H & E is the most commonly used stain, you will encounter different stains as your study of histology progresses. If you memorized staining characteristics without understanding anatomical relationships, both three-dimensional and those of structure and function, you are almost guaranteed to identify an unknown preparation incorrectly.
- Remember to examine the specimen using multiple fields of view. Start examining every slide at the lowest power possible and then slowly progress to higher powers. Remember, you will make an accurate identification by looking at all of the tissue’s characteristics, and the higher the viewing power the smaller the field of vision. Look at the entire specimen at each power and note the characteristics seen at each power.
- Pugh MB, editor: Stedman’s Medical Dictionary, ed 27, Baltimore, 2000, Lippincott Williams & Wilkins. ↵
