27 T2.1 Building a Database System to track Student Advisors
Learning Objectives
- Develop technical understanding of the relational model, such as normalization, primary vs foreign keys, business rules, relation, attribute, and record.
- Develop technical skill in the use of a Database Management system in creating tables, forms, queries and reports.
- Understand that data management involves a good understanding of both technical and organizational factors in the development and use of information systems
This tutorial uses Microsoft Access as a tool for the development of a database prototype system, including the creation of Tables, Queries, Reports and Forms as Graphical User Interfaces. The assignment is to develop such a system. This initial document includes a map of tasks and videotutorials.
You will need this Excel file with the data for the system (The tutorials include a second image file that we could not include here because of its copyright. Please feel free to use any other image instead)
The Advising System. Figure 1 includes a relational schema with the advising system to be developed in this tutorial.
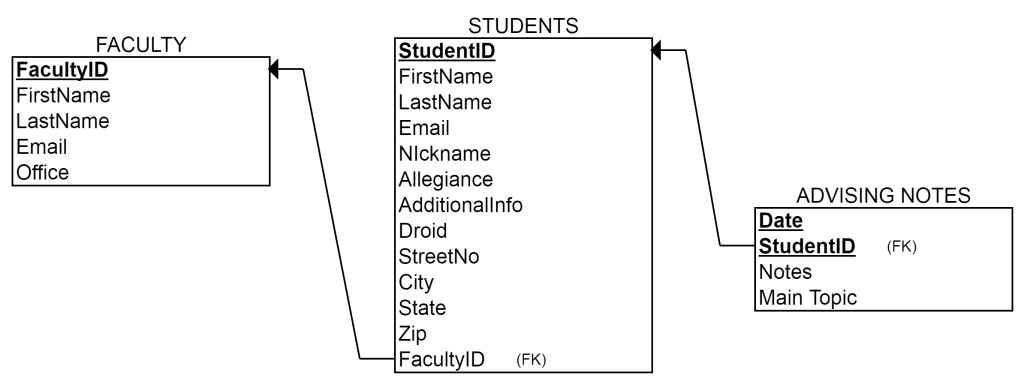
Figure 1. Relational Schema for the Advising System
- Start by preparing the data in the Excel file. The data is presented as a “flat table.” Including a different set of information in each row, but violating some of the basic criteria of the relational model (8 rules from previous week). Write down in the following space two rules of a relation that are being violated in this table.
| Criteria for a table to be a relation | 1.
2.
|
To solve the problem, create two different spreadsheets in the workbook, one for students and the other one for faculty. Name each of these new spreadsheets “Faculty” and “Students” respectively. Keep in the students woksheet the column that includes the Faculty ID. Your final tables should look like Figures 2 and 3.
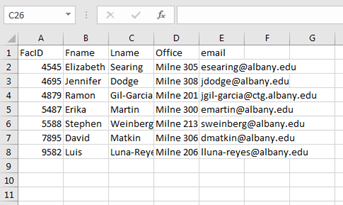
Figure 2. Faculty Worksheet

Figure 3. Student Worksheet
- Defining Tables in Access.- The first step in developing small applications using access is creating a data structure in the computer following a data model. Tasks 3 and 4 are exactly about that, using the data definition tools in Access to set up the database.
- Watch the Video tutorials on “Developing Information Systems” and “Getting familiar with Access,” and the video tutorials on creating tables in access Parts 1 and 2, and then,
- in a new access file, import the data from the Excel file, and create the three tables in the relational schema in Figure 1. Make sure that you have all attributes on them and that you define the proper primary keys. Use the data types, formats and sizes that are used in the video tutorials. For the STUDENTS table that is not in the video tutorials, use this data types and sizes: StudentID is a short text of size 10, FirstName is a short text of size 15, LastName is a short text of size 15, Email is a short text of size 30, Nickname is a short text of size 15, Allegiance is a short text of size 20, AdditionalInfo is a short text of size 75, Droid is a Yes/No type, StreetNo is a short text of size 20, City is a short text of size 15, State is a short text of size 2, Zip is a short text of size 5, and FacultyID is a short text of size 10.
- Defining Relations in Access.- Watch the video tutorial on “Defining relations in Access” and then, update your database to include the relations in the schema in Figure 1. Take a screenshot of the relations and paste it into the box below. Do not continue with the next tasks in the assignment until your relationships table looks like the one in the video (reproduced for you in Figure 4).
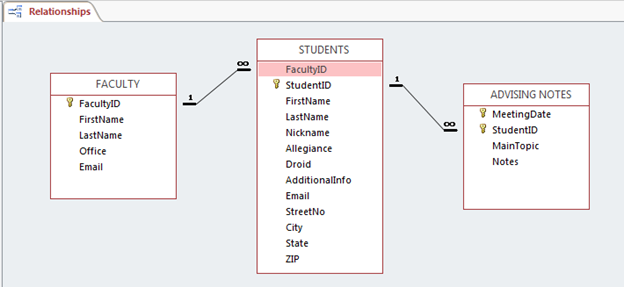
Figure 4. The Relational Schema in Access
- Making Forms in Access.- Forms are one Access tool to develop user interfaces and small applications. In this way, our next step consists of learning how to create simple forms to manipulate or visualize records in the data base.
- Watch the Video tutorials on “Creating Forms” Parts 1 and 2, and then
- create three forms, a student form, a faculty form, and a form with a subform to see advising notes by student (All main components of these three forms are being created in the videos). Name them “Student form,” “Faculty form,” and you will have two forms for the third one “STUDENTS” and “ADVISING NOTES Subform.” Make sure that your student form looks like the form in Figure 5 (including the combo box to assign advisors to students).

Figure 5. Students form
-
- Use the Student Form to add yourself (or all the team) to this database, with student ID # 1111 (you will need to create additional IDs for other members in the team). Pick your advisor from the drop-down list (A combo box that you need to include in the form).
- If your advisor is not yet in the system, add him or her too. Add professor Mila Gasco-Hernandez into the system using the Faculty form too.
- Add some advising notes for all students using the Form with a subform.
- Take a screenshot of the Advising Form with a sub-form with your information and paste it into the box below.
- Querying the Database.- As we have discussed since the beginning of this module. One of the key reasons of looking for alternative data models is to be able to find answers to questions about the data in an efficient way. Thus our next step is to learn how to create this questions using the Query-by-example (QBE) interface in Acccess. Then,
- Watch the video tutorial on queries in Access
- Choose your favorite query to the students table from the tutorial and save it as “Students query”
- Create a totals query using the tutorial and save it as “Advising Load.” Your query should include FacultyID, FirstName and LastName, and the number of students that each faculty advises.
- Build and save a query with all advising notes for a given student. The query should include StudentID, FirsName, LastName, Email, and all the notes. Save it as “Advising Notes History.” Make sure that your query asks for the studentID to generate the answer for a different student any time that you run the query.
- Choose your favorite query, and copy and paste the SQL code in the space below
- Creating Reports.- The last thing that we will learn to do with Access is to make reports, which is one more functionality of the Application generator in the Database Engine. To do that,
- Watch the video tutorial on reports in Access
- Create a report that includes all data in the “Advising Load” query. Save it as “Advising Load Report.”
- Create a report that includes all students in your “Students query.” Save it as “My Students Report.” Make sure that your report has the same feel and look than the report from the video tutorial.
- Copy and paste a screenshot of your favorite report in the space below
- Thinking about implementation.- Last, but not least important, think about relevant issues to be considered in the implementation of these prototype and list them in the following table. Think at least 2 different issues in each category.
| Tools (technology that will be needed to be used by all advisors) | |
| Work Processes and Practices (Any adjustments needed?) | |
| Organizational setting (Department and University policies to be considered) | |
| Context (Ethical principles, legal issues or any other concern associated with the system) |
Attribution
By Erika Martin, Mikhail Ivonchyk and Luis F. Luna-Reyes, and licensed under CC BY-NC-SA 4.0.
