The Microscope
Microscopes have been used to explore the cellular world since the mid-1600s, when Robert Hooke and Antonie van Leeuwenhoek ushered in a new era of microscopic discovery.
Advances in technology have expanded techniques of microscopy to allow researchers to visualize individually organelles at incredible resolution (transmission electron microscopy). Advances in technology have also enhanced the functional properties of the microscopes students and teachers use in the classroom. The authors of this book captured all the images you will see using a special compound light microscope with an integrated high-resolution camera (Motic Panthera L).
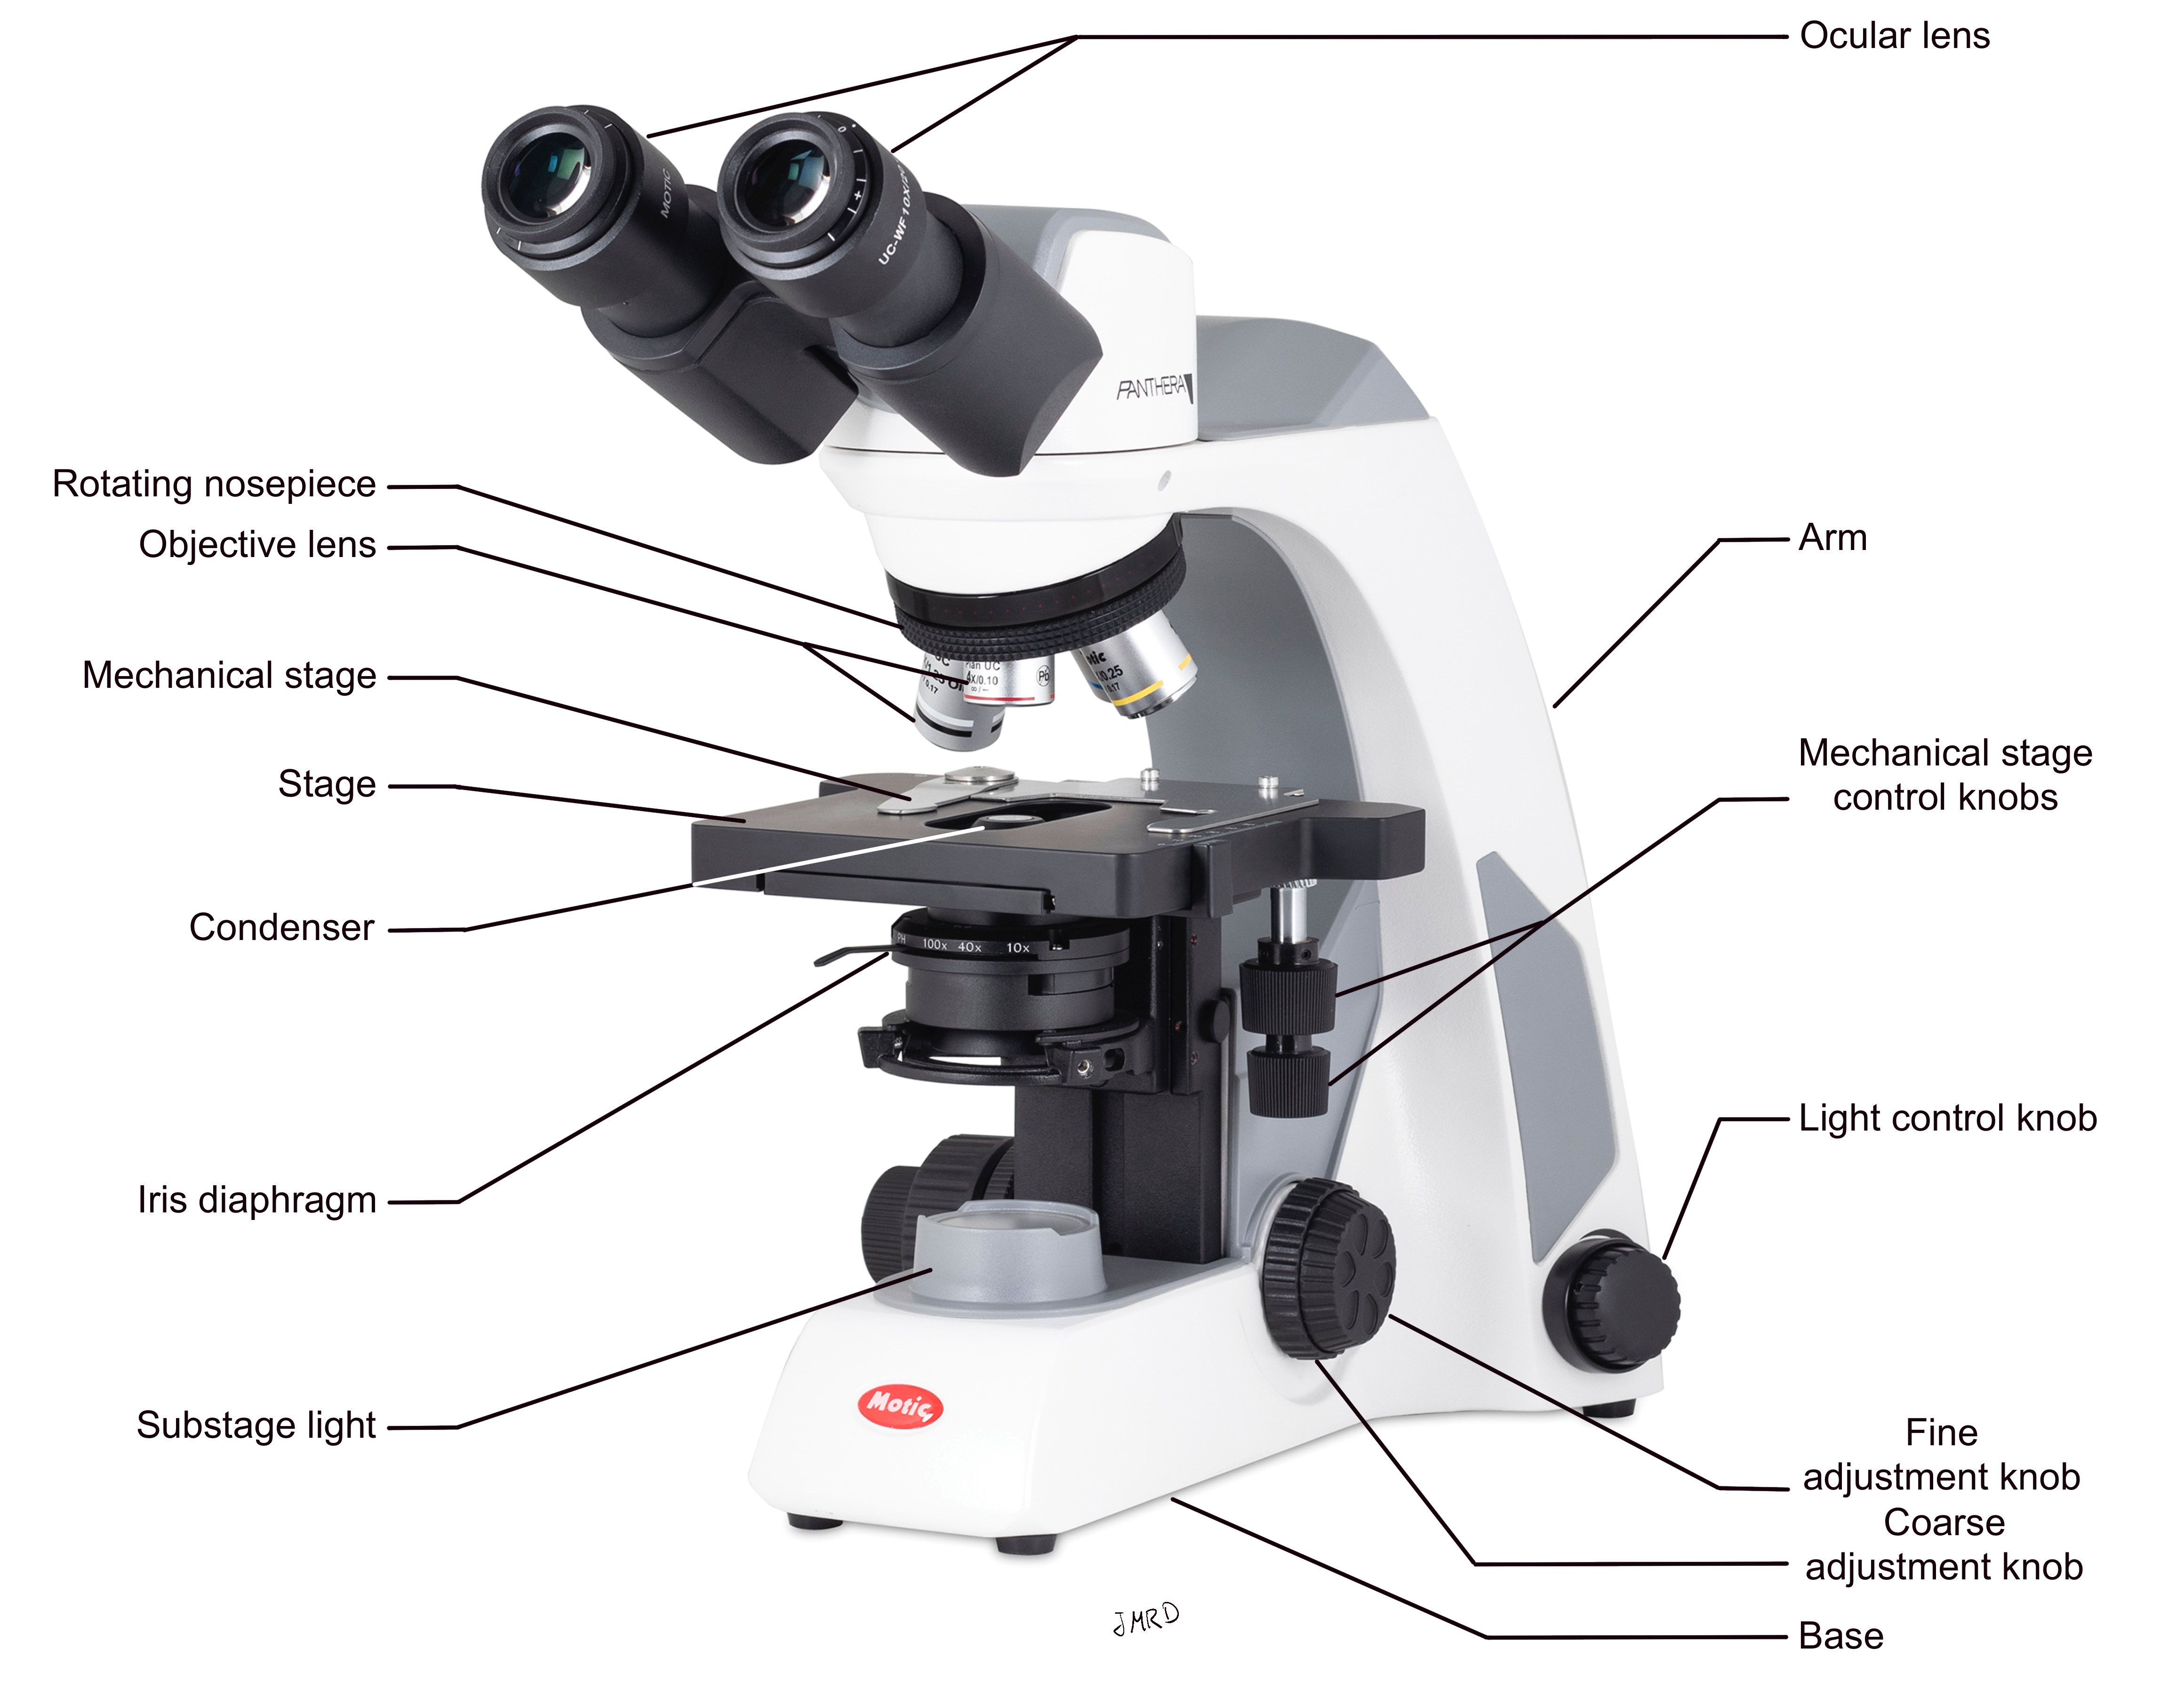
Figure 1: Parts of the Compound Light Microscope (Motic Panthera E2)
Corporate website: https://www.motic.com/
Parts of the microscope and their function
For this section, refer to Figure 1 and Table 1 for reference.
- The light source (substage light) is found in the base of the microscope (which bears the weight of the microscope). It is activated by turning on the light switch at the back of the microscope. The intensity of the light is adjusted by turning the light control knob.
- Above the light source is the condenser. The condenser aids in the focusing of the light onto the specimen. It can be moved up and down using the condenser knob that is located on the left side of the stage. You should always have the condenser set in the highest position.
- Inside the condenser is a shutter called the iris diaphragm that can be opened and closed to adjust the amount of light passing through the condenser and to improve contrast. The iris diaphragm is controlled using the iris diaphragm level. You should always start with the condenser in the open position.
- Above the condenser lies the stage. The stage is where you will place your slide. The stage has an opening that will allow the light from the condenser to pass onto you specimen. It is through the movement of the stage up and down that you will bring your specimen into focus.
- Resting on top of the stage is the mechanical stage. This contains a spring clip that will hold the slide in place (Figure 2). To the right of the stage are two mechanical stage control knobs. One allows you to move the slide left and right while the other moves the slide backwards and forwards.
Figure 2: Stage, with slide properly positioned, of the Compound Light Microscope (Motic Panthera E2)
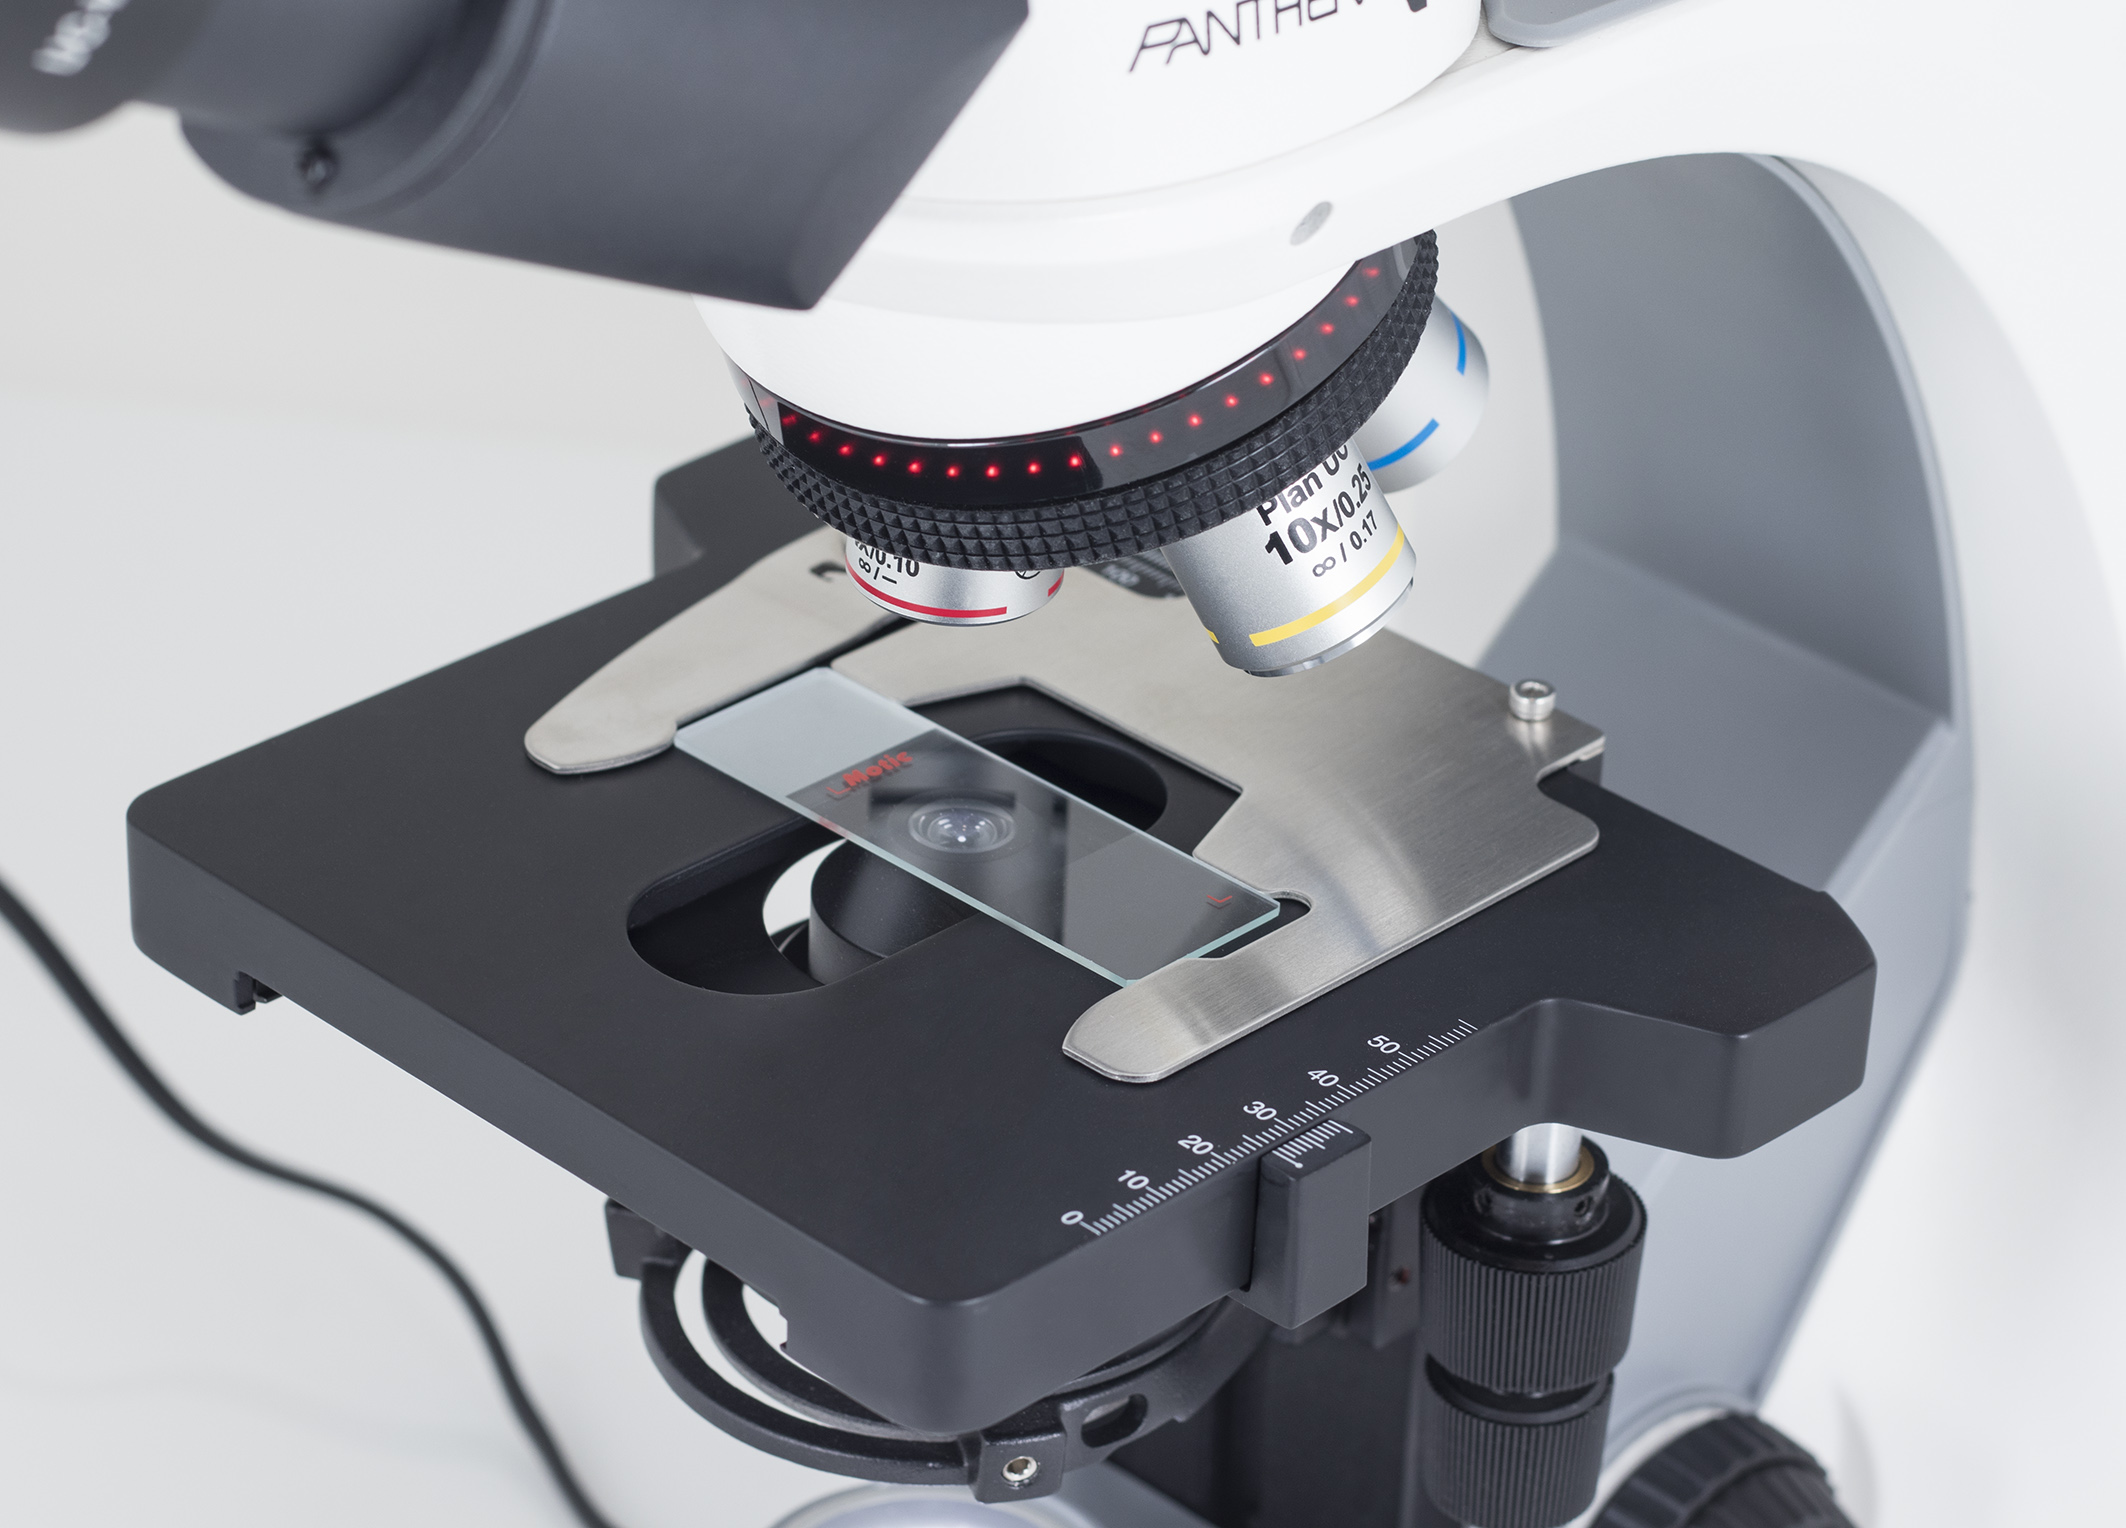
Corporate website: https://www.motic.com/
- At the back of the stage is the arm of the microscope that supports the head of the microscope. It is connected to the base and should be used to remove your microscope from the cabinet.
- Above the stage and attached to the rotating nosepiece are the four objective lenses. The magnification of the lenses is 4X (scanning lens) marked by a red ring, 10X (low power lens) marked by a yellow ring, 40X (high power lens) marked by a blue ring and 100X (oil immersion lens) marked by a white ring (Table 2, and Figure 3). The oil immersion lens must be used by placing a drop of immersion oil on the slide and will NOT be used in this course. Note that the length of the lens increases as the power of magnification increases.
Figure 3: Objective lenses of the Compound Light Microscope (Motic Panthera E2)

Corporate website: https://www.motic.com/
- On the left side of the microscope is the coarse and fine adjustment knobs. These knobs move the stage up and down for the purpose of focusing the specimen. The coarse adjustment knob allows for initial focusing and moves the stage a large visible distance with a single turn. The coarse adjustment knob should ONLY be used with 4X and 10X objectives and should NEVER be used with the 40X and 100X objectives. Using the coarse adjustment knob inappropriately could result in damage to the objective and/or breaking the slide. The fine focus knob allows for precise focusing. Once you have focused your specimen at the 4X or 10X objective when you progress to the next objective you will only need to use the fine focus knob to make the minor adjustments.
- The image magnified by the objective lens in use is passed up through the body tube into the ocular lenses. Each ocular lens contains two lenses for a total magnification of 10X. The total magnification of the microscope is the product of the ocular lens and the magnification of the objective lens in use. This means that if you are using the high power lens, the total magnification of the specimen is 40X (objective lens) x 10X (ocular lens) or 400X. It is this combined magnifying power that makes this microscope a compound microscope (Table 2).
- The microscope is parfocal, which means that when you switch from one objective lens (magnification) to the next, the microscope should stay in the same focal plane. When you switch from the 4x objective to the 10x objective and then to the 40x objective, you do NOT need to lower the stage and can simply switch objectives and then use the fine focus knob to fine-tune the sharpness of the image.
Figure 4: Parts of the Compound Light Microscope (Motic Panthera E2) with and without parts labeled
Your compound light microscope may have a slightly different appearance, depending on the model being used. This chapter includes images of the Motic Panthera E2 compound light microscope to introduce the parts of a microscope and their function.
Table 1: Parts of the microscope and their functions
| Microscope Part | Function |
|---|---|
| Substage light | Light source located below the stage |
| Base | Bears the weight of the microscope |
| Light control knob | Increases intensity of the light |
| Condenser | Aids in focusing of the light onto the specimen |
| Iris diaphragm | A shutter that adjusts the amount of light passing through the condenser |
| Stage | Flat space where the slide is placed |
| Mechanical stage | Clip on stage that holds slide firmly to stage |
| Mechanical stage control knobs | Moves the slide left/right or front/back |
| Arm | Vertical support bar extending up from the base |
| Rotating nosepiece | Rotates the four objective lenses over the stage |
| Objective lens | Provides magnification (4x, 10x, 40x, 100x) power |
| Ocular lens | Used to view specimen and provides additional 10x magnification power |
| Course adjustment knob | For initial focusing only (used for 4x and 10x objective lens only) – visible movement in stage height |
| Fine adjustment knob | Allows small adjustments for sharp focus – movement in stage height to small to be seen |
Table 2: Magnification of objectives lens and their total magnification when viewing a specimen
| Common Name for Objective Lens | Magnification of Objective Lens | Magnification of Ocular Lens | Total Magnification |
| Scanning lens | 4x | 10x | 40x |
| Low power lens | 10x | 10x | 100x |
| High power lens | 40x | 10x | 400x |
| Oil immersion lens | 100x | 10x | 1000x |
